Belkin F1DJ102P-B User Manual
Belkin kvm switch user manual f1dj102p-b, f1dj104p-b
Hide thumbs
Also See for F1DJ102P-B:
- User manual (15 pages) ,
- Quick installation manual (5 pages) ,
- User manual (2 pages)
Table of Contents
Advertisement
Available languages
Available languages
Quick Links
Control up to four PS/2 computers
using one monitor, keyboard and mouse
Contrôlez jusqu'à quatre ordinateurs PS/2
en utilisant un écran, un clavier et une souris
Steuern Sie bis zu vier PS/2-Computer mit
einem Monitor, einer Tastatur und Maus
Beheer tot wel vier PS/2-computers met
slechts één monitor, toetsenbord en muis
Controla hasta cuatro ordenadores PS/2
utilizando un monitor, un teclado y un ratón
Per controllare fino a quattro computer PS/2 mediante
un singolo insieme di monitor, tastiera e mouse
User Manual
Manuel de l'utilisateur
Benutzerhandbuch
Handleiding
Manual del usuario
Manuale utente
11ea_F1DJ10x_man.indd 1
KVM Switch
En
Fr
De
Nl
Es
It
F1DJ102P-B
F1DJ104P-B
12/11/04 11:35:29
Advertisement
Chapters
Table of Contents

Related Manuals for Belkin F1DJ102P-B


Summary of Contents for Belkin F1DJ102P-B
-
Page 1: Kvm Switch
Per controllare fino a quattro computer PS/2 mediante un singolo insieme di monitor, tastiera e mouse User Manual Manuel de l’utilisateur Benutzerhandbuch Handleiding Manual del usuario Manuale utente 11ea_F1DJ10x_man.indd 1 KVM Switch F1DJ102P-B F1DJ104P-B 12/11/04 11:35:29... - Page 2 P74711ea_F1DJ10x_man.indd 2-3 KVM Switch Control up to four PS/2 computers using one monitor, keyboard and mouse User Manual F1DJ102P-B F1DJ104P-B 12/11/04 11:35:35 am...
-
Page 3: Table Of Contents
Engineered to give you control over multiple computers and/or servers from one console, Belkin KVM switches come in a variety of capacities suitable for all configurations, large or small. This Switch is backed by a Belkin Three-Year Warranty and free technical support. -
Page 4: Overview
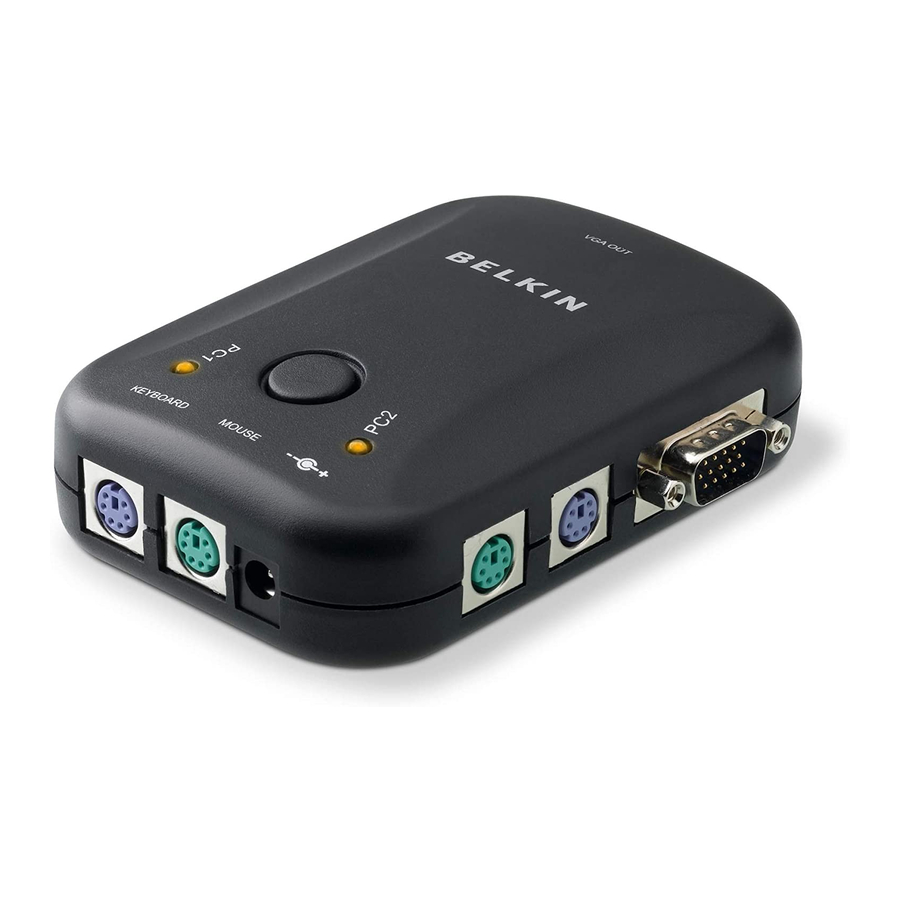
OVERVIEW The Belkin KVM Switch allows you to control multiple computers with one keyboard, monitor, and mouse. The Switch supports PS/2 input devices (keyboard and mouse), VGA, SVGA, XGA, and PS/2 computers. Feature Overview Hot Keys Hot keys allow you to select ports using designated key commands. Control multiple computers using a simple hot key sequence on your keyboard. -
Page 5: Operating Systems
• Microsoft® system-compatible PS/2 mice with 2, 3, 4, or 5 buttons Monitors • VGA • SVGA • MultiSync® Optional Power Supply An optional 9V, 600mA power supply is available. Visit belkin.com for ordering information. P74711ea_F1DJ10x_man.indd 4-5 OVERVIEW Unit Display Diagrams Port Status... -
Page 6: Specifications
OVERVIEW Front-Panel Push Button Port Status Indicator LEDs P74711ea_F1DJ10x_man.indd 6-7 OVERVIEW Specifications Part No.: F1DJ102P, F1DJ104P Power: Optional 9V DC, 600mA adapter with center-pin positive polarity PCs Supported: F1DJ102P: 2 F1DJ104P: 4 Keyboard Emulation: PS/2 Mouse Emulation: PS/2 and Serial (with use of adapter) Monitors Supported: VGA, SVGA, MultiSync, and LCD (with use of adapter cable) Max. -
Page 7: Installation
Note: If your computer needs to be more than 25 feet from the KVM Switch, you can use the Belkin CAT5 Extender (part number F1D084) to extend your PS/2 keyboard, PS/2 mouse, and monitor up to 500 feet (152.4m) away using a standard CAT5 UTP cable. - Page 8 3. Using an OmniView KVM Cable kit, take the VGA cable and connect the male end of the cable to the VGA port on the first computer. Connect the female end to the VGA 1 port on the side of the Switch. 12/11/04 11:35:38 am...
- Page 9 5. Connect one end of the PS/2 mouse KVM cable to the mouse port on your computer and the other end to the MOUSE 1 port on the side of the Switch. Repeat Steps 3 through 5 for each additional computer to be connected to the Switch, connecting them to the corresponding CPU ports on the side.
-
Page 10: Using Your Switch
You can select which computer to operate by either the front-panel push button located on the top of the Switch or through hot key commands. Note that it will take 1-2 seconds for the video to display after switching. This is due to the refresh of the video signal. -
Page 11: Faqs
Belkin Three-Year Limited Warranty—all at a very affordable price. Q: Can I use the Switch on my Sun computer? A: Yes, the Switch works with Sun computers when used with the Belkin Sun Adapter, part number F1D082. 12/11/04 11:35:45 am... -
Page 12: Troubleshooting
• If you are using the Switch for video switching only and have no keyboard and mouse connection between the Switch and computer, you will need to purchase the optional 9V DC, 600mA power adapter (Belkin part number F1D065-PWR for your appropriate country). - Page 13 Computer does not detect your keyboard and you get a keyboard error reported at boot up. • Check that the keyboard cable between the Switch and the computer is connected properly. Tighten any loose connections. • Try swapping your keyboard with a different one.
-
Page 14: Information
INFORMATION FCC Statement DECLARATION OF CONFORMITY WITH FCC RULES FOR ELECTROMAGNETIC COMPATIBILITY We, Belkin Corporation, of 501 West Walnut Street, Compton, CA 90220, declare under our sole responsibility that the products: F1DJ102P, F1DJ104P to which this declaration relates: Comply with Part 15 of the FCC Rules. Operation is subject to the following two... - Page 15 Belkin Corporation warrants this product against defects in materials and workmanship for its warranty period. If a defect is discovered, Belkin will, at its option, repair or replace the product at no charge provided it is returned during the warranty period, with transportation charges prepaid, to the authorized Belkin dealer from whom you purchased the product.
-
Page 16: Manuel De L'utilisateur
Fax: +31 (0) 20 654 7349 Fax: +33 (0) 1 39 46 62 89 Belkin Tech Support Europe: 00 800 223 55 460 © 2004 Belkin Corporation. All rights reserved. All trade names are registered trademarks of respective manufacturers listed. P74711ea_F1DJ10x_man.indd 2-3 Switch KVM Contrôle jusqu’à... - Page 17 Merci d'avoir choisi ce Switch KVM de Belkin (le Switch). Notre gamme variée de solutions KVM en tête du marché vous montre comment Belkin s'engage à fournir des produits de grande qualité, résistants et à un prix compétitif. Conçus pour vous donner le contrôle de plusieurs ordinateurs et/ou serveurs à...
-
Page 18: Présentation
PRÉSENTATION Le Switch KVM de Belkin vous permet de contrôler de multiples ordinateurs à l'aide d'un seul clavier, moniteur et souris. Il prend en charge les périphériques de saisie PS/2 (clavier et souris) ainsi que les ordinateurs VGA, SVGA, XGA et PS/2. -
Page 19: Illustrations De L'unité
P74711ea_F1DJ10x_man.indd 4-5 PRÉSENTATION Illustrations de l'unité Témoins lumineux de l’état du port Bouton de la face avant Port VGA de la Console Ports de l'ordinateur 2 12/11/04 11:35:52 am... -
Page 20: Spécifications
PRÉSENTATION Bouton de la face avant Témoins lumineux de l’état du port P74711ea_F1DJ10x_man.indd 6-7 PRÉSENTATION Spécifications Référence : F1DJ102P, F1DJ104P Alimentation : Adaptateur de courant 9 VCC, 600 mA avec polarité positive sur la broche centrale (en option) PC pris en charge : F1DJ102P : 2 F1DJ104P : 4 Émulation du clavier : PS/2... -
Page 21: Installation
Remarque : Si votre ordinateur doit être éloigné de plus de 7,6 mètres du Switch KVM, vous pouvez utiliser le câble d'extension CAT5 de Belkin (référence F1D084) pour installer votre moniteur, votre clavier PS/2 et votre souris PS/2 jusqu'à 152,4 mètres de votre Switch, grâce à... - Page 22 3. À l’aide d’un kit de câbles KVM OmniView, saisissez le câble VGA et branchez l'extrémité mâle de ce câble sur le port VGA du premier ordinateur. Branchez l'extrémité femelle sur le port VGA 1, situé sur le côté du Switch. 12/11/04 11:35:54 am...
- Page 23 SOURIS 1, situé sur le côté du Switch. Répétez les étapes 3 à 5 pour chaque ordinateur supplémentaire que vous connectez au Switch. Branchez-les sur les ports CPU correspondants sur le côté de l'unité. 12/11/04 11:35:56 am...
-
Page 24: Utilisation Du Switch
à utiliser en vous servant du bouton situé sur la face avant du Switch KVM ou des raccourcis clavier. Notez que la vidéo s'affiche 1 à 2 secondes après avoir effectué la permutation. Ceci est dû à la fréquence de rafraîchissement du signal vidéo. -
Page 25: Foire Aux Questions
à niveau Flash et une option USB. Q : Quels sont les avantages à choisir un Switch KVM Belkin au lieu d’un produit venant d’un compétiteur ? R : Le Switch KVM Belkin représente une solution abordable, comprenant les mêmes... -
Page 26: Dépannage
• Si vous utilisez le Switch pour la permutation vidéo uniquement et si vous ne possèdez aucune connexion clavier ou souris entre le Switch et l’ordinateur, vous devrez vous procurer le bloc d’alimentation 9 VCC, 600 mA (référence Belkin F1D065-PWR, selon votre pays). - Page 27 Clavier L'ordinateur ne détecte aucun clavier et j'obtiens une erreur de clavier au démarrage. • Vérifiez que le câble du clavier entre le Switch et l'ordinateur est correctement branché. Si cela n'est pas le cas, resserrez-le. • Esayez de changer de clavier.
-
Page 28: Information
Déclaration FCC DÉCLARATION DE CONFORMITÉ À LA RÉGLEMENTATION DE LA FCC EN MATIÈRE DE COMPATIBILITÉ ÉLECTROMAGNÉTIQUE Nous, Belkin Corporation, sis au 501 West Walnut Street , Compton CA, 90220, États-Unis, déclarons sous notre seule responsabilité que les produits : F1DJ102P, F1DJ104P auxquels se réfèrent la présente déclaration :... - Page 29 Si l'appareil s'avère défectueux, Belkin le réparera ou le remplacera gratuitement, à sa convenance, à condition que le produit soit retourné, port payé, pendant la durée de la garantie, au dépositaire Belkin agréé auprès duquel le produit a été acheté. Une preuve d'achat peut être exigée.
- Page 30 Fax: +31 (0) 20 654 7349 Fax: +33 (0) 1 39 46 62 89 Assistance technique Belkin Europe: 00 800 223 55 460 © 2004 Belkin Corporation. Tous droits réservés. Toutes les raisons commerciales sont des marques déposées de leurs fabricants respectifs. P74711ea_F1DJ10x_man.indd 2-3 KVM-Switch...
- Page 31 Benutzen Sie für eine einfache Installation die Installationsanleitung, die in der Packung Ihres Switches enthalten ist. Wir freuen uns, dass Sie sich für den KVM-Switch von Belkin entschieden haben. Wir hoffen, Sie zu unseren zufriedenen Stammkunden zählen zu können. Verpackungsinhalt •...
-
Page 32: Übersicht
ÜBERSICHT Mit dem KVM-Switch von Belkin können Sie mehrere Computer mit nur einer Tastatur, einem Bildschirm und einer Maus steuern. Der Switch unterstützt PS/2- Eingabegeräte (Tastatur und Maus), VGA-, SVGA-, XGA- und PS/2-Computer. Merkmale Tastaturbefehle Die Auswahl der Schnittstelle erfolgt mit Hilfe von Tastaturbefehlen (Hot Keys) über die Tastatur. -
Page 33: Bestandteile
P74711ea_F1DJ10x_man.indd 4-5 ÜBERSICHT Bestandteile Anschluss- Statusanzeigen Vorderseiten- drucktaste Konsolen-VGA- Schnittstelle Computer 2 Schnittstellen 12/11/04 11:36:08 am... -
Page 34: Technische Daten
ÜBERSICHT Vorderseiten- drucktaste Anschluss- Statusanzeigen P74711ea_F1DJ10x_man.indd 6-7 ÜBERSICHT Technische Daten Artikelnr.: F1DJ102P, F1DJ104P Stromversorgung: Optionaler Adapter (9 V Gleichstrom, 600 mA), Mittenkontakt positiv Unterstützte PCs: F1DJ102P: 2 F1DJ104P: 4 Tastaturemulation: PS/2 Mausemulation: PS/2 und seriell (unter Verwendung eines Adapters) Unterstützte Monitore: VGA, SVGA, MultiSync und LCD (unter Verwendung eines Adapterkabels) Max. -
Page 35: Installation
Aus diesem Grunde sollte Ihr PS/2-Computer innerhalb eines Abstands von 7,5 m von Ihrem KVM-Switch aufgestellt werden. Hinweis: Werden größere Abstände gewünscht, benötigen Sie eine Belkin CAT5- Verlängerung (Artikelnr. F1D084). Mit diesem Zubehör können Sie über ein standardmäßiges CAT5 UTP-Kabel PS/2-Tastatur, PS/2-Maus und Monitor in einem maximalen Abstand von 152,5 aufzustellen. - Page 36 INSTALLATION 2. Schließen Sie das Bildschirmkabel Ihres Monitors an die Grafikschnittstelle VGA OUT an der Seite des Switches an. P74711ea_F1DJ10x_man.indd 10-11 INSTALLATION Computeranschluss: 3. Benutzen Sie ein OmniView KVM-Kabel. Schließen Sie den Stecker des VGA- Kabels an die VGA-Schnittstelle des ersten Computers an. Schließen Sie die Buchse an die VGA-1-Schnittstelle an der Seite des Switches an.
- Page 37 MOUSE 1 Schnittstelle an der Seite des Switches an. Wiederholen Sie die Schritte 3 bis 5 für jeden weiteren Computer, den Sie an den Switch anschließen möchten, und verwenden Sie hierzu die entsprechenden Computerschnittstellen („CPU") an der Seite.
-
Page 38: Verwenden Des Switches
VERWENDEN DES SWITCHES Hochfahren der Computer Sobald alle Kabel angeschlossen sind, können Sie die an den Switch angeschlossenen Computer hochfahren. Alle Computer können gleichzeitig eingeschaltet werden. Der Switch emuliert an jeder Schnittstelle eine Maus und eine Tastatur und ermöglicht Ihrem Computer einen normalen Systemstart. -
Page 39: Fragen Und Antworten
Jahre beschränkte Garantie von Belkin—all das bei einem erschwinglichen Preis. F: Kann ich den Switch mit meinem Sun Computer benutzen? A: Ja, der Switch ist kompatibel zu Sun-Computern, wenn ein Belkin Sun Adapter benutzt wird, Artikelnummer F1D082. 12/11/04 11:36:16 am... -
Page 40: Fehlerbehebung
• Wenn Sie den Switch nur für Bildschirmumschaltung verwenden und keine Tastatur- und Mausverbindung zwischen dem Switch und dem Computer besteht, sollten Sie ein Netzteil (9 V Gleichstrom, 600 mA) (Belkin Artikelnummer F1D065- PWR entsprechend Ihres Landes) kaufen. • Schließen Sie den Bildschirm direkt an den Computer an, und überprüfen Sie, ob der Bildschirm ordnungsgemäß... - Page 41 Tastatur Der Computer erkennt die Tastatur nicht, und es wird beim Systemstart ein Tastaturfehler gemeldet. • Überprüfen Sie, ob das Kabel sicher am Switch und am Computer angeschlossen ist. Befestigen Sie lose Verbindungen. • Benutzen Sie eine andere Tastatur. • Schließen Sie den Computer an eine andere Schnittstelle an.
-
Page 42: Rechtliche Hinweise
FCC-Erklärung KONFORMITÄTSERKLÄRUNG ZUR EINHALTUNG DER FCC- BESTIMMUNGEN ÜBER ELEKTROMAGNETISCHE KOMPATIBILITÄT Wir, Belkin Corporation, eine Gesellschaft mit Sitz in 501 West Walnut Street, Compton, CA 90220, USA, erklären hiermit in alleiniger Verantwortung, dass diese Produkte mit der Artikel Nr. F1DJ102P, F1DJ104P auf die sich diese Erklärung bezieht,... - Page 43 DIE VORSTEHENDEN GARANTIEBEDINGUNGEN UND RECHTSBEHELFE SCHLIESSEN ALLE ANDEREN GEWÄHRLEISTUNGEN UND RECHTSBEHELFE — OB MÜNDLICH ODER SCHRIFTLICH, AUSDRÜCKLICH ODER KONKLUDENT — AUS UND TRETEN AN DEREN STELLE. BELKIN ÜBERNIMMT INSBESONDERE KEINERLEI KONKLUDENTE GEWÄHRLEISTUNGEN, U.A. AUCH KEINE GEWÄHRLEISTUNG DER EIGNUNG FÜR EINEN BESTIMMTEN ZWECK ODER DER HANDELSÜBLICHEN QUALITÄT.
- Page 44 Fax: +31 (0) 20 654 7349 Fax: +33 (0) 1 39 46 62 89 Belkin Technischer Support Europa: 00 800 223 55 460 © 2004 Belkin Corporation. Alle Rechte vorbehalten. Alle Produktnamen sind eingetragene Warenzeichen der angegebenen Hersteller. P74711ea_F1DJ10x_man.indd 2-3 KVM-switch Beheer tot wel vier PS/2-computers met slechts één monitor, toetsenbord en muis...
- Page 45 Ons uitgebreide programma KVM-oplossingen bewijst de inzet van Belkin, marktleider op dit gebied, om duurzame producten van hoge kwaliteit te leveren voor een aantrekkelijke prijs. Met de KVM-switches van Belkin kunt u meerdere computers en/of servers vanaf één console beheren. Ze zijn leverbaar in een groot aantal uitvoeringen, zowel voor kleine als voor zeer grote configuraties en Belkin geeft op deze switches vijf jaar garantie en kostenloos technische ondersteuning.
-
Page 46: Overzicht
OVERZICHT Deze KVM-switch van Belkin maakt het u mogelijk meerdere computers te besturen met een toetsenbord, monitor en muis. De switch ondersteunt PS/2- invoerapparatuur (toetsenbord en muis), VGA, SVGA, XGA en PS/2-computers. Productkenmerken Hot Keys Sneltoetsen ofwel “hot keys” stellen u in staat met specifieke toetsencombinaties de gewenste poort te kiezen. -
Page 47: Productafbeeldingen
P74711ea_F1DJ10x_man.indd 4-5 OVERZICHT Productafbeeldingen Poortstatus-LED’s Drukknop frontpaneel VGA-poort Console Poorten computer 2 12/11/04 11:36:23 am... -
Page 48: Technische Gegevens
OVERZICHT Drukknop frontpaneel Poortstatus-LED’s P74711ea_F1DJ10x_man.indd 6-7 OVERZICHT Technische gegevens Artikelnr.: F1DJ102P, F1DJ104P Voeding: 9V DC, 600mA voedingsadapter met positieve polariteit middenpin (optioneel) Aantal ondersteunde pc’s: F1DJ102P: 2 F1DJ104P: 4 Toetsenbordemulatie: PS/2 Muisemulatie: PS/2 en serieel (bij gebruik van adapter) Ondersteunde monitoren: VGA, SVGA, MultiSync en LCD (bij gebruik van adapterkabel) Max. -
Page 49: Installatie
Opmerking: Als uw computer op een grotere afstand dan 7,5 m van de KVM-switch moet staan, kunt u gebruik maken van de CAT5 Extender van Belkin (artikelnummer F1D084). Dit product stelt u in staat uw PS/2-toetsenbord, PS/2-muis en monitor tot op een afstand van 152,4 meter van uw switch vandaan te plaatsen, gebruik makend van een CAT5 UTP-kabel. - Page 50 3. Maak gebruik van de OmniView KVM-kabelset en sluit de male connector van de VGA-kabel aan op de VGA-poort van de eerste computer. Sluit de female connector aan op de VGA-poort (1) aan de zijkant van de switch. 12/11/04 11:36:25 am...
- Page 51 Herhaal stap 3 tot en met 5 voor elke volgende computer die u wilt aansluiten op de switch, waarbij u ze aansluit op de desbetreffende CPU- poorten aan de zijkant van de switch. 12/11/04 11:36:28 am...
-
Page 52: Gebruik Maken Van Uw Switch
“SCROLL LOCK” en de toetsen PIJL OMHOOG en PIJL OMLAAG. Het versturen van een opdracht naar de switch doet u door binnen twee seconden twee maal op de “SCROLL LOCK”-toets te drukken. Als bevestiging hoort u een geluidsignaal. -
Page 53: Veelgestelde Vragen
XP, Linux en Novell NetWare 4.x/5.x. V: Ondersteunt de switch de Microsoft® IntelliMouse? A: Ja, de switch werkt met muizen van Microsoft, Logitech, Kensington en Belkin. De switch zal slechts twee muisknoppen ondersteunen. Als u vragen hebt over compatibiliteit kunt u altijd contact opnemen met de afdeling Technische Ondersteuning. -
Page 54: Problemen Oplossen
PS/2-poort van de computer te trekken. V: Kan ik de switch ook gebruiken als ik alleen van videosignaal wil wisselen? A: Ja, dat is mogelijk. U kunt de switch gebruiken voor het overschakelen tussen videosignalen zonder dat u een toetsenbord en een muis hoeft aan te sluiten. - Page 55 • Beweeg de muis niet en druk niet op muisknoppen tijdens het wisselen van poort. • Om de muis te resetten en weer correcte muisbewegingen te verkrijgen, maakt u de muiskabel los van de switch en wacht u 2–3 seconden voordat u de muis weer aansluit.
-
Page 56: Informatie
CE-conformiteitsverklaring Wij, Belkin Corporation, verklaren hierbij dat wij de volle verantwoordelijkheid aanvaarden dat de producten met artikelnummers F1DJ102P en F1DJ104P, waarop deze verklaring van toepassing is, voldoen aan de emissienorm EN55022 en aan de immuniteitsnormen EN55024, LVP EN61000-3-2 en EN61000-3-3. - Page 57 Belkin Corporation biedt garantie op dit product gedurende de garantieperiode voor zover het materiaal- en fabricagefouten betreft. In geval van defecten heeft Belkin de keuze tus- sen een gratis reparatie of vervanging, in het geval het product binnen de garantieperiode wordt teruggebracht naar de leverancier en dat de transportkosten aan de leverancier vooruit worden betaald.
-
Page 58: Manual Del Usuario
Fax: +31 (0) 20 654 7349 Fax: +33 (0) 1 39 46 62 89 Belkin technische ondersteuning Europa: 00 800 223 55 460 © 2004 Belkin Corporation. Alle rechten voorbehouden. Alle handelsnamen zijn gedeponeerde handelsmerken van de betreffende rechthebbenden. P74711ea_F1DJ10x_man.indd 2-3 Conmutador KVM Controla hasta cuatro ordenadores PS/2 utilizando un monitor, un teclado y un ratón... - Page 59 INTRODUCCIÓN Enhorabuena por la adquisición del conmutador KVM de Belkin (el conmutador). La amplia línea de soluciones KVM líderes en el mercado de Belkin da muestra de nuestro compromiso por suministrar productos duraderos de alta calidad a un precio competitivo. Creado para proporcionarle el control sobre múltiples ordenadores y/o servidores desde una única consola, los conmutadores KVM de Belkin se presentan...
-
Page 60: Esquema General De Características
VGA coaxial de 75 ohmios. Los cables deben tener conectores hembra HDDB15 a macho HDDB15. Los cables KVM OmniView de Belkin ofrecen la más alta calidad posible para asegurar que su información se transmita de manera óptima. Los cables KVM incluyen conectores PC99 codificados por colores para una identificación y conexión... -
Page 61: Diagramas De Los Indicadores De La Unidad
P74711ea_F1DJ10x_man.indd 4-5 GENERALIDADES Diagramas de los indicadores de la unidad Indicadores LED del estado de los puertos Panel frontal Botón Consola puerto VGA Ordenador 2 Puertos 12/11/04 11:36:39 am... -
Page 62: Especificaciones
GENERALIDADES Panel frontal Botón Indicadores LED del estado de los puertos P74711ea_F1DJ10x_man.indd 6-7 GENERALIDADES Especificaciones Número de artículo: F1DJ102P, F1DJ104P Alimentación: Adaptador opcional CC 9V, 600mA con un pin central de polaridad positiva PCs válidos: F1DJ102P: 2 F1DJ104P: 4 Emulación de teclado: PS/2 Emulación de ratón: PS/2 y Serie (con uso de adaptador) Monitores válidos: VGA, SVGA, MultiSync y LCD (con la utilización del cable adaptador) -
Page 63: Guía De Instalación Paso A Paso
Atención: Si es preciso que su ordenador se encuentre a una distancia superior de 25 pies del conmutador KVM, puede utilizar el cable alargador CAT5 de Belkin (número de pieza F1D084) para ampliar su teclado PS/2, ratón PS/2 y monitor hasta una distancia de 152,4 m utilizando un cable UTP CAT5 estándar. - Page 64 INSTALACIÓN 2. Tome el cable de vídeo que se encuentra conectado a su monitor y conéctelo al puerto de salida VGA situado en un lateral del conmutador. P74711ea_F1DJ10x_man.indd 10-11 INSTALACIÓN Cómo conectar el ordenador: 3.Utilizando el kit de cableado Omniview KVM, tome el cable VGA y conecte el extremo macho al puerto VGA del primer ordenador.
- Page 65 INSTALACIÓN 4. Conecte un extremo del cable KVM del teclado PS/2 al puerto del teclado del ordenador y el otro extremo al puerto del TECLADO 1 en un lateral del conmutador. P74711ea_F1DJ10x_man.indd 12-13 INSTALACIÓN 5. Conecte un extremo del cable KVM del ratón PS/2 al puerto de ratón de su ordenador y el otro extremo al PUERTO del ratón 1 en un lateral del conmutador.
-
Page 66: Cómo Usar El Conmutador
CÓMO USAR EL CONMUTADOR Cómo encender los sistemas Una vez que todos los cables han sido conectados, encienda las CPUs que se encuentran conectadas al conmutador. Todos los ordenadores pueden ser encendidos de forma simultánea. El conmutador emula un ratón y un teclado en cada puerto y permitirá... -
Page 67: Preguntas Más Frecuentes
USB. P: ¿Cuáles son las ventajas del conmutador KVM de Belkin frente a un producto similar de la competencia? R: El conmutador KVM de Belkin es una solución asequible, que incorpora características que habitualmente sólo se encuentran en unidades de un precio... -
Page 68: Resolución De Problemas
• Si está usando el conmutador solamente para la conmutación de vídeo y no tiene conexión entre el conmutador y el ordenador, necesitará adquirir el adaptador de alimentación opcional 9V CC, 600mA (Número de artículo de Belkin F1D065-PWR para el país apropiado). - Page 69 RESOLUCIÓN DE PROBLEMAS Teclado El ordenador no detecta su teclado y se obtiene un error de teclado durante el arranque. • Compruebe que el cable del teclado entre el conmutador y el ordenador se encuentra perfectamente conectado. Apriete las conexiones flojas. •...
-
Page 70: Información
Normativa FCC DECLARACIÓN DE CONFORMIDAD CON LAS NORMATIVAS DE LA FCC SOBRE COMPATIBILIDAD ELECTROMAGNÉTICA Nosotros, Belkin Corporation, con sede en 501 West Walnut Street, Compton, CA 90220 (EEUU), declaramos bajo nuestra sola responsabilidad que los productos F1DJ102P, F1DJ104P a los que hace referencia la presente declaración: Cumplen con la sección 15 de las normativas de la FCC. - Page 71 Esta garantía perderá su validez en el caso de que el producto haya sido dañado de forma accidental, por abuso o empleo erróneo del mismo, si el producto ha sido modificado sin la autorización por escrito de Belkin o si alguno de los números de serie de Belkin ha sido eliminado o deteriorado.
-
Page 72: Manuale Utente
Fax: +33 (0) 1 39 46 62 89 Asistencia técnica de Belkin Europa: 00 800 223 55 460 © 2004 Belkin Corporation. Todos los derechos reservados. Todas las marcas son marcas registradas de los respectivos fabricantes enumerados. P74711ea_F1DJ10x_man.indd 2-3 Switch KVM... - Page 73 —nella remota eventualità dell’insorgere di un problema. Per un’installazione facile, far riferimento alla Guida d’installazione rapida inclusa a corredo di questo switch. Grazie per aver acquistato lo switch KVM Belkin. Ci sta a cuore il vostro tipo di attività. Contenuto della confezione •...
-
Page 74: Descrizione Generale
DESCRIZIONE GENERALE Lo Switch KVM Belkin rappresenta la soluzione più semplice per gestire vari computer PS/2 da una sola tastiera, un monitor ed un mouse. Lo Switch supporta periferiche di entrata PS/2 (tastiera e mouse), VGA, SVGA, XGA e computer PS/2. -
Page 75: Diagrammi Di Visualizzazione Dell'unità
P74711ea_F1DJ10x_man.indd 4-5 DESCRIZIONE GENERALE Diagrammi di visualizzazione unità Indicatori LED di stato Pulsante pannello anteriore Porta console VGA Porte Computer 2 12/11/04 11:36:55 am... -
Page 76: Specifiche
DESCRIZIONE GENERALE Pulsante pannello anteriore Indicatori LED di stato P74711ea_F1DJ10x_man.indd 6-7 DESCRIZIONE GENERALE Specifiche Cod. Prodotto: F1DJ102P, F1DJ104P Alimentazione: Opzionale CC a 9 Volt, con adattatore da 600 mA con polarità positiva al contatto centrale. Numero di PC assistiti: F1DJ102P: 2 F1DJ104P: 4 Emulazione tastiera: PS/2 Emulazione mouse PS/2 e seriale (mediante adattatore) -
Page 77: Installazione
7,6 metri di distanza dallo Switch KVM. Nota: Se il computer deve essere situato a più di 7,6 metri dallo Switch KVM, si può usare l’Extender CAT5 Belkin (codice prodotto F1D084) per estendere la tastiera PS/2, il mouse PS/2 e il monitor ad un massimo di 152,4 metri, usando un cavo CAT5 UTP. - Page 78 P74711ea_F1DJ10x_man.indd 10-11 INSTALLAZIONE Collegamento del Computer: 3.Utilizzando un kit di cavi KVM OmniView, collegare lo spinotto maschio del cavo VGA alla porta VGA del primo computer. Collegare lo spinotto femmina alla porta VGA 1 sul lato dello switch. 12/11/04 11:36:57 am...
- Page 79 MOUSE 1 sul lato dello switch. Ripetere le fasi dal punto 3 al punto 5 per ciascun computer aggiuntivo da collegare allo switch, tenendo conto delle porte che corrispondono al computer e che si trovano sul lato dello switch 12/11/04 11:36:59 am...
-
Page 80: Utilizzo Dello Switch
"Scroll Lock" (blocco dello scorrimento) e dei tasti con le frecce verso l'alto e il basso. Per inoltrare comandi verso lo switch, premere il tasto “Scroll Lock” per due volte in un intervallo di due secondi. Si sentirà... -
Page 81: Domande Frequenti
Belkin —: il tutto ad un prezzo veramente conveniente. D: Posso usare lo Switch con il mio computer Sun? R: Si, lo switch funziona con i computer Sun, se usato con l’Adattatore Belkin per Sun, codice prodotto F1D082. -
Page 82: Rilevazione E Risoluzione Delle Anomalie
• Se si usa un adattatore di alimentazione, controllare che il cavo della tastiera tra il computer e lo switch sia ben collegato. • Se si usa lo Switch solo per la commutazione video e non vi è una connessione con tastiera o mouse tra lo switch e il computer, bisognerà acquistare un adattatore di alimentazione 9 V CC da 600mA (Codice prodotto Belkin F1D065-PWR per il vostro paese). - Page 83 Tastiera Il computer non rileva la tastiera e all’avvio viene segnalato un errore in tastiera. • Assicurarsi che il cavo per la tastiera sia ben collegato tra lo switch e il computer. Stringere eventuali connessioni lente. • Provare a sostituire la tastiera.
-
Page 84: Informazioni
Il computer non si avvia quando è collegato allo switch, tuttavia funziona quando la tastiera, il monitor e il mouse sono collegati direttamente a questo. • Accertarsi che i cavi della tastiera e del mouse tra lo switch e il computer non si siano allentati. - Page 85 Questa garanzia non si applica nel caso in cui il prodotto sia stato danneggiato in seguito a incidente, abuso, cattivo utilizzo o errata applicazione; se il prodotto è stato modificato senza il consenso scritto da parte della Belkin; o se un qualsiasi numero di serie Belkin è stato rimosso o cancellato.
- Page 86 Fax: +33 (0) 1 39 46 62 89 Assistenza tecnica Belkin Europa: 00 800 223 55 460 © 2004 Belkin Corporation. Tutti i diritti riservati. Tutti i nomi commerciali sono marchi registrati dai rispettivi produttori elencati. P74711ea_F1DJ10x_man.indd 2-3 12/11/04 11:37:04 am...
-
Page 87: Kvm Switch
Tel: +31 (0) 20 654 7300 Fax: +31 (0) 20 654 7349 Belkin Tech Support Europe: 00 800 223 55 460 © 2004 Belkin Corporation. All rights reserved. All trade names are registered trademarks of respective manufacturers listed. 11ea_F1DJ10x_man.indd 4 KVM Switch...
Need help?
Do you have a question about the F1DJ102P-B and is the answer not in the manual?
Questions and answers