Table of Contents
Advertisement
Quick Links
Advertisement
Table of Contents

Related Manuals for GRT Avionics Sport SX


Summary of Contents for GRT Avionics Sport SX
- Page 1 Sport SX/Sport EX/Horizon EX Installation Manual Revision H 7-March-2018...
- Page 2 SPORT Installation Manual GRT Avionics Copyright© 2016 3133 Madison Ave. SE Wyoming, MI 49548 (616) 245-7700 www.grtavionics.com Revision H...
- Page 3 Congratulations on your purchase of the GRT Avionics EFIS! We are pleased that you have chosen our product to meet your flying needs. This manual describes installation of the GRT Sport SX/EX and Horizon EX EFIS using the software version shown in the Record of Revisions. Some differences may be observed when comparing the information in this manual to other software versions.
- Page 4 SPORT Installation Manual GRT Avionics RECORD OF REVISIONS Sport SX Sport EX Date Change Description Revision SW Rev SW Rev 1- May- Initial Release 2007 1-April- Extensive 2008 18-Dec- Complete Reissue 2012 07-Mar- Addition of adaptive AHRS 2015 23-Nov- —...
-
Page 5: Table Of Contents
Certification.........................9 System Description & Architecture...................9 Display Unit Features & Limitations..................10 Light Aircraft Avionics Primer...................11 Gray-Code Altitude Encoder Output (Applies to Sport SX Only)........15 USB Port..........................15 Physical Wiring........................15 Optional Features - (Sport EX Only).................16 Analog Inputs/Audio Output - (Sport/Horizon EX only)..........16 Basic Engine Monitoring Functions - (Sport/Horizon EX Only)........17... - Page 6 Mounting Template..........................40 External Module Footprint and Mounting Holes................41 Magnetometer Installation Notes.....................42 Sport SX Internal GPS Diagram (Sport SX only)................43 Sport SX200A (Adaptive AHRS) Connector A Pinout Diagram.............44 Connector A Pinout Diagram, Legacy Model SX200 ..............45 Magnetometer - Digital and Analog (Legacy)................46 Sport SX200A - Connector A - Suggested wiring for a dual-screen system ........47...
- Page 7 GRT Avionics SPORT Installation Manual Revision H...
-
Page 8: Introduction
GPS or pitot/static input, making it more reliable than systems that require external data. The Sport SX EFIS display units have two model numbers. The S200 is used as the primary flight display (PFD) in a multi-display system, or the only display in a single-display system. It contains the AHRS, Air Data Computer, and altitude encoder for the transponder. -
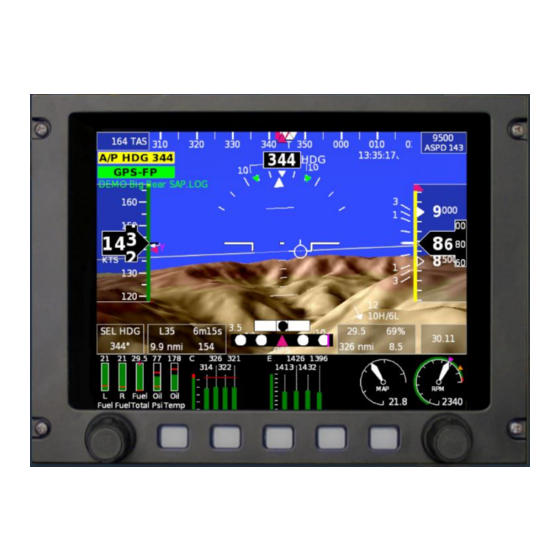
Page 9: Display Unit Features & Limitations
GRT Avionics SPORT Installation Manual this on its map and flight plan pages. This feature is also useful for adding IFR GPS capability to the Sport system via an IFR approved GPS. Note that the only GPS functions will be transmitted via a GPS serial output, such as position, ground track, flight plan, etc, and other non-GPS data, such as map details, terrian, XM weather, etc, are not displayed on the GRT EFIS screen. -
Page 10: Light Aircraft Avionics Primer
SPORT Installation Manual GRT Avionics Ÿ Interfaces to SL30/40 for display of VOR/ILS/GS and tuning pre-set radio frequencies Ÿ Fully-integrated autopilot functionality or interface with third-party autopilot units Ÿ Flight director Ÿ Customizable split-screen views, PFD-MFD screen swap, engine page and moving map overlays Ÿ... - Page 11 SPORT Installation Manual GRT Avionics Sport SX Display Unit Physical Specs Overall Size: 6.5” Sport SX Faceplate 7.1” wide x 5.25” high Depth of Display Unit 4.75” behind panel face (approx.) Panel Opening 6.25” wide x 5.19” high Weight 3.5 lbs Overall Size: 8.4”...
- Page 12 SPORT Installation Manual GRT Avionics Sport EX/Horizon EX 7” Display Unit Physical Specs Faceplate 7.19” wide x 4.75” high Depth of Display Unit 1.5” behind panel face (approx.) Panel Opening 6.25” wide x 4.38” high Weight 1.5 lbs Sport EX AHRS/Air Data Computer Specifications...
- Page 13 EFIS may place on this signal. The Sport SX has four serial ports, all high speed (five if it has the upgraded processor). Sport HS or WS units only have four serial ports, and Port 4 is the only high-speed port. (This is why XM Weather must be wired to Serial Port 4 when installed in a WS or HS system.) During the display...
-
Page 14: Gray-Code Altitude Encoder Output (Applies To Sport Sx Only)
USB devices do not require you to program a baud rate. The Sport SX/EX/Horizon EX all have one USB port that may be used for one USB device, or you may attach a USB hub to run up to three devices. Software updates are also delivered to the EFIS via USB–... -
Page 15: Optional Features - (Sport Ex Only)
SPORT Installation Manual GRT Avionics The pinout diagrams included in this manual show the function of each d-sub connector pin. NC means “no connection,” or a pin that should not be used. TX, or transmit, designates a Serial OUT, and RX, or receive, designates a Serial IN connection. -
Page 16: Basic Engine Monitoring Functions - (Sport/Horizon Ex Only)
) Optional Features - (Sport SX Only) The Sport SX includes a moving map, ADS-B displays, bluetooth wireless enabled, 5 serial ports and audio alerting as standard features. Synthetic vision/Terrian relief map and angle-of-attack are available options. -
Page 17: Display Unit Installation
GRT Avionics SPORT Installation Manual SECTION 2: MECHANICAL INSTALLATION Display Unit Installation Mount the display unit(s) in the desired location in the instrument panel. The main consideration in choosing a location is the ability to view the display unit and reach its controls. Since the display is fully sunlight-readable, no consideration for shielding the display unit from sunlight is required. -
Page 18: Legacy Analog Magnetometer Installation For Sport Sx200
SPORT Installation Manual GRT Avionics control cables, or cable carrying electrical currents, such as navigation or landing lights, being too close to the magnetometer. The magnetometer’s location will be tested for interference in Section 4, after the initial boot-up checks of the Mini. -
Page 19: Cooling Considerations
GRT Avionics SPORT Installation Manual 1. Turn on and off any electrical equipment whose wiring passes within 2 feet of the magnetometer. 2. Move the flight controls from limit to limit. 3. If the magnetometer is located within 2 feet of retractable landing gear, operate the landing gear. -
Page 20: Angle-Of-Attach Pressure Port Connection
SPORT Installation Manual GRT Avionics facilitate installation and removal of the display unit, quick disconnect fittings may be helpful. Connections and the entire pitot-static system must be leak tight. Refer to AC 43.13-2B for approved methods to achieve this. Consider placing a water trap or drain in the lowest part of the pitot-static system to prevent water from getting into the electronics. -
Page 21: General Guidelines
GRT Avionics SPORT Installation Manual SECTION 3: WIRING CONSIDERATIONS General Guidelines Wires that are certain to be used are pre-installed in the EFIS cable assembly connectors. Optional connections to the EFIS are not installed in the D-sub connectors at the factory, however, colored aviation-grade wires with pre-installed D-sub connector contacts are included for these connections. -
Page 22: Ground Connections
SPORT Installation Manual GRT Avionics No provision is included within the display units for a power switch. If a power switch is desired for the EFIS, the +12V power should be controlled with the switch (not ground). The display units include internal thermally-activated fuses. This protects the equipment from internal electrical faults. -
Page 23: Loss Of Gps Data
Since all serial ports on the Sport SX, Sport EX, and Horizon EX are high-speed ports , capable or receiving data at 115,200 baud, any serial port can be used for any function. -
Page 24: Display Unit Check Out
GRT Avionics SPORT Installation Manual SECTION 4: Initial Checkout, Basic Configuration Settings, and Calibration Display Unit Check Out 1. Apply power to the display unit. The LCD may flicker, and within 20 seconds, the display should show the accept page if on the ground. (If in-flight, the accept page will not be displayed. ) 2. -
Page 25: Sport Sx Internal Gps Settings
At least one GPS should be connected to the EFIS. Only one GPS source (internal or external, can be assigned to GPS1, and only one GPS source may be assigned to GPS2.) Sport SX Internal GPS Settings The internal GPS provides serial data at 9600 baud in the NMEA0183B format. The output from this GPS is wired to pin 32, may be shared with all GRT EFIS display units as desired, as well as at least two other devices, such as an ELT, transponder, etc. -
Page 26: Ahrs/Air Data Computer Test
GRT Avionics SPORT Installation Manual stopped providing data. A setting is provided for each of the two possible AHRS connections. This setting is provided via the set menu, general setup submenu. AHRS(1/2) Has Magnetometer: Yes/No/Auto (default is auto) - Set to match your installation. -
Page 27: Setting Instrument (Ahrs) Orientation
SPORT Installation Manual GRT Avionics Setting Instrument (AHRS) Orientation This is a coarse setting to account for angled instrument panel installations. You will fine-tune the instrument orientation again in flight after validating the location of the magnetometer (if installed). 1. Access Set Menu > AHRS Maintenance. Scroll to Set Instrument Orientation. -
Page 28: Magnetometer Location Validation
SPORT Installation Manual GRT Avionics Magnetometer Location Validation 1. Park the aircraft on a level surface and start the engine. 2. Press any button on the EFIS display to bring up the soft key labels. Press SET MENU soft key, then scroll to and select AHRS Maintenance. -
Page 29: Set Final Magnetometer And Instrument Orientation
GRT Avionics SPORT Installation Manual It is also possible that no built-in-test failure is reported, but the wiring is still incorrect. This can occur if the magnetometer X, Y, Z inputs are swapped. To check for this, point the airplane at various directions listed in the table below, with the magnetometer in an approximately level position (it may need to be removed from the airplane and held by hand). -
Page 30: Magnetometer Calibration Procedure
SPORT Installation Manual GRT Avionics Magnetometer Calibration Procedure The magnetometer must be calibrated before the first flight of the aircraft. Magnetometer calibration is required to achieve accurate magnetic heading readings. This calibration corrects for errors induced by magnetic disturbances local to the sensor, such as ferrous metal objects. - Page 31 SPORT Installation Manual GRT Avionics airplane must be rotated completely through 360 degrees, plus an additional 20 degrees past magnetic north, within 3 minutes after initiating the calibration. The airplane should be rotated slowly, such that it takes approximately 60 seconds for the complete rotation.
-
Page 32: Measuring The Accuracy Of The Magnetic Heading
SPORT Installation Manual GRT Avionics The status of the magnetometer correction data is indicated by the field next to the Magnetometer Calibration setting on the AHRS Maintenance page. If the field has the message “Change to open page,” then no valid data is stored within the AHRS and it must be recalibrated. If the field says “Valid,”... - Page 33 SPORT Installation Manual GRT Avionics TachP/R - The TachP/R setting must be set to match the number of pulses per revolution of the engine provided by the tachometer connection. The following table below shows the most common settings. Pulses per...
-
Page 34: Introduction
GRT Avionics SPORT Installation Manual SECTION 5: EQUIPMENT INTERCONNECT DETAILS Introduction This section contains information for wiring some of the most popular brands and models of avionics to interface with the GRT Sport. If your specific unit is not listed in this manual, please check the Support section of our website or contact GRT tech support at (616) 245-7700 for more information. - Page 35 Providing EFIS Internal GPS Data/Active Waypoint to External Devices: Sport SX - When equipped with the optional internal GPS, serial input 3 is wired within the EFIS to its internal GPS. This will cause serial output data to be present on this EFIS serial input, which may be wired to other devices that require GPS data.
- Page 36 SPORT Installation Manual GRT Avionics Optional Dual Serial Inputs to Autopilot: A switch may be installed to allow coupling the autopilot to the GPS in the event the display unit that normally controls the autopilot is not functional. This switch is wired to select between the EFIS autopilot output and the GPS serial data output. This switch should remain in the EFIS position unless the display unit that provides the autopilot output is not functional.
-
Page 37: Sport Efis
Mounting Template...............................39 External Module Footprint and Mounting Holes....................40 Magnetometer Installation Notes..........................41 Sport SX Internal GPS Diagram (Sport SX only)....................42 Sport SX200A (Adaptive AHRS) Connector A Pinout Diagram..............43 Connector A Pinout Diagram, Legacy Model SX200 ..................44 Magnetometer - Digital and Analog (Legacy).....................45 Sport SX200A - Connector A - Suggested wiring for a dual-screen system ..........46... - Page 38 SPORT Installation Manual GRT Avionics A-38 Revision F...
-
Page 39: Sport Efis
GRT Avionics SPORT Installation Manual Revision F A-39... -
Page 40: External Module Footprint And Mounting Holes
SPORT Installation Manual GRT Avionics A-40 Revision F... -
Page 41: Magnetometer Installation Notes
SPORT Installation Manual GRT Avionics FRONT A-41 Revision F... -
Page 42: Sport Sx Internal Gps Diagram (Sport Sx Only)
SPORT Installation Manual GRT Avionics Sport SX Internal GPS Diagram (Sport SX only) This diagram does not apply to Sport EX or Horizon EX. EFIS Display Unit 36 TX GPS In RX (internal) Internal GPS 32 RX GPS Out TX... -
Page 43: Sport Sx200A (Adaptive Ahrs) Connector A Pinout Diagram
SPORT Installation Manual GRT Avionics Sport SX200A (Adaptive AHRS) Connector A Pinout Diagram Connector A is a 37-Pin D-Sub female connector that attaches to the male EFIS 37-pin D-sub. Pins that are certain to be used, such as the Magnetometer connections, are pre-wired at GRT. -
Page 44: Connector A Pinout Diagram, Legacy Model Sx200
SPORT Installation Manual GRT Avionics Connector A Pinout Diagram, Legacy Model SX200 Connector A is a 37-Pin D-Sub female connector that attaches to the male EFIS 37-pin D-sub. Pins that are certain to be used, such as the Magnetometer connections, are pre-wired at GRT. -
Page 45: Magnetometer - Digital And Analog (Legacy)
SPORT Installation Manual GRT Avionics Magnetometer - Digital and Analog (Legacy) The magnetometer cable is provided without the B connector end attached. Use the following diagram to attach the connector to the cable after routing it through the airframe. Digital Magnetometer... -
Page 46: Sport Sx200A - Connector A - Suggested Wiring For A Dual-Screen System
SPORT Installation Manual GRT Avionics Sport SX200A - Connector A - Suggested wiring for a dual-screen system Connector A is a 37-Pin D-Sub female connector that attaches to the male EFIS 37-pin D-sub. Pins that are certain to be used, such as the Magnetometer connections, are pre-wired at GRT. -
Page 47: Sport Sx200 (Legacy*) Connector A -Suggested Wiring For A Dual-Screen System
GRT Avionics SPORT Installation Manual Sport SX200 (Legacy*) Connector A -Suggested wiring for a dual-screen system Connector A is a 37-Pin D-Sub female connector that attaches to the male EFIS 37-pin D-sub. Pins that are certain to be used, such as the Magnetometer connections, are pre-wired at GRT. -
Page 48: Sport Sx100 Connector A Pinout - Suggested Wiring For A Multi-Screen System
GRT Avionics SPORT Installation Manual Sport SX100 Connector A Pinout - Suggested wiring for a Multi-Screen System Function Wire Color Function Wire Color _ Primary Power Input Tone (future use) s GPS Memory * s Secondary Power Input RED/WHT RED/BLU... -
Page 49: Sport Ex/Horizon Ex - Connector A Pinout Diagram
SPORT Installation Manual GRT Avionics Sport EX/Horizon EX - Connector A Pinout Diagram Connector A is a 25-Pin D-Sub female connector that attaches to the male EFIS 25-pin D-sub. Pins for primary power IN and ground are pre-installed in the connector. Commonly used optional wires are supplied as loose wires. -
Page 50: Sport Ex/Horizon Ex - Connector B Pinout Diagram
SPORT Installation Manual GRT Avionics Sport EX/Horizon EX - Connector B Pinout Diagram Connector B is a 25-Pin D-Sub male connector that attaches to the female EFIS 25-pin D-sub. Pins that are most likely to be used are pre-installed at GRT. Commonly used optional wires are supplied as loose wires. -
Page 51: Angle Of Attack (Aoa) Installation And Calibration
SPORT Installation Manual GRT Avionics Angle of Attack (AOA) Installation and Calibration Sensed AOA Installation The sensed version of the angle of attack option uses a two-port pitot tube, such as the Garmin GAP-26. If a heated probe is not required, a two-port pitot probe may be fabricated by mounting a second pitot tube, bent downward at approximately a 60 degree angle, as shown here. -
Page 52: Sport Ex Basic Engine Monitoring Wiring
SPORT Installation Manual GRT Avionics Sport EX Basic Engine Monitoring Wiring A-52 Revision F... -
Page 53: Sport Ex - Common Tachometer Connections
SPORT Installation Manual GRT Avionics Sport EX - Common Tachometer Connections Common tachometer connections are shown here for Sport EX/Horizon EX equipped with the basic engine monitoring option. A-53 Revision F... -
Page 54: Dual Sport Sx200 Interconnect Diagram Example
SPORT Installation Manual GRT Avionics Dual Sport SX200 Interconnect Diagram Example This example shows an EIS, SL30, GTX327, GRT Autopilot, and Navworx ADS-600B. WD2510 11-01-2012 A-54 Revision F... -
Page 55: Trim/Flap Position Sensor Wiring
SPORT Installation Manual GRT Avionics Trim/Flap Position Sensor Wiring This diagram illustrates the use of an EIS engine monitor auxiliary input for sensing trim or flap position. A Sport EX may use this method, or one of its optional analog inputs.
Need help?
Do you have a question about the Sport SX and is the answer not in the manual?
Questions and answers