Table of Contents
Advertisement
Quick Links
Advertisement
Table of Contents

Related Manuals for World Market Chase Platform Storage Bed


Summary of Contents for World Market Chase Platform Storage Bed
- Page 1 Chase Platform Storage Bed SKU - 420929 THANK YOU FOR PURCHASING OUR QUALITY PRODUCT. IF YOU HAVE ANY QUESTION PERTAINING TO THE ASSEMBLY OF THIS FURNITURE PIECE, PLEASE CONTACT YOUR NEAREST COST PLUS WORLD MARKET STORE FOR ASSISTANCE. Page 1 of 9...
-
Page 2: Parts List
Parts List Headboard 2 pcs Center Rail 1 pc Center Frame A 1 pc Center Frame B 1 pc Side Rail 2 pcs Slat 4 pcs Drawer Front 4 pcs Drawer Side 8 pcs Drawer Bottom 4 pcs Drawer Back 4 pcs Page 2 of 9... -
Page 3: Hardware List
Hardware List Label Picture Description Connector Bolt M6 x 80mm Connector Bolt M6 x 60mm Connector Bolt M8 x 50mm Spring Washer M6 Spring Washer M8 Flat Washer L-Bracket U-Shaped Spacer Wood Dowel M8 H-10 Wood Dowel M10 H-11 Castor H-12 Castor Screw M3.5 x 12mm H-13... -
Page 4: Assembly Preparation
Do not assemble on flooring or carpet - Assemble on a clean non-marking surface (packing foam) - Save all packaging until finished - In case of missing parts, please contact your nearest Cost Plus World Market Store. Page 4 of 9... -
Page 5: Drawer Assembly
Drawer Assembly Step 1: Step 2: H/W Required H-11 H-12 H-13 H-13 H-13 4 sets a. Place Drawer Front (G) on a a. Slot Drawer Bottom (I) into the groove of scratch-free surface. Drawer Front (G) and Drawer Sides (H). b. -
Page 6: Assembly Steps
Assembly Steps Step 1: H/W Required a. Place Center Rail (B) on a soft, non-marring surface. b. Attach Center Frame (C) and (D) to Center Rail (B). Secure Center Frame (C) and (D) using Connector Bolt (H-1), Spring Washer (H-4) and Flat Washer (H-6), provided. Step 2: H/W Required a. - Page 7 Assembly Steps Step 3: H/W Required H-10 a. Insert Wood Dowel M8 (H-10) onto Center Frame Long ( B). Attach Side Rails (E) to the assembly using Wood Dowels M10 (H-10) and secure using Connector Bolts M8X50mm (H-3), Spring Washer (H-5) and U-Shaped Spacer (H-8). Tighten with Allen Key M5 (T-1), provided. Step 4: H/W Required H-10...
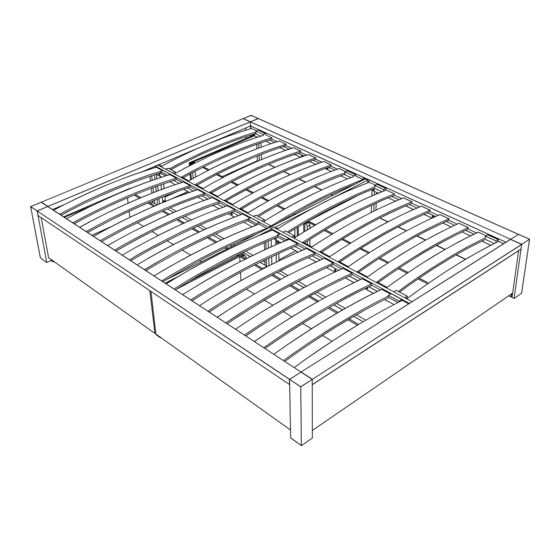
- Page 8 Assembly Steps Step 5: H/W Required H-15 H-15 a. Place Slat (F) rolls on top of the assembly as illustrated. Secure Slats to the assembly using Slat Screws ( H-15). Tighten using a Phillips Screw Driver. b. Adjustable levelers are provided underneath Center Frame Long (B), Center Frame (C) & (D), that can be adjusted to make the assembly leveled on the floor.
-
Page 9: Care And Maintenance
Care & Maintenance Do not put hot items directly on furniture surface. Do not clean furniture with harsh cleansers or polish. Do not place furniture in direct sunlight. Do not place furniture near heating or cooling vents. Do not write on furniture without a padded barrier to protect the surface. Do not place furniture outside.
Need help?
Do you have a question about the Chase Platform Storage Bed and is the answer not in the manual?
Questions and answers