Advertisement
Table of Contents
- 1 Important Safety Instructions
- 2 Compliance with Fcc Regulations
- 3 Protect Your Furniture
- 4 Important Notes
- 5 Accessories Included
- 6 Location of Controls
- 7 Precautions for Use
- 8 Usb Operation
- 9 Bluetooth Operation
- 10 Aux in Operation
- 11 Line out Connection
- 12 Care and Maintenance
- 13 Troubleshooting Guide
- Download this manual
Advertisement
Table of Contents

Related Manuals for Studebaker SB6059


Summary of Contents for Studebaker SB6059
-
Page 2: Important Safety Instructions
WARNING TO PREVENT FIRE OR SHOCK HAZARD, DO NOT USE THIS PLUG WITH AN EXTENSION CORD, RECEPTACLE OR OTHER OUTLET UNLESS THE BLADES CAN BE FULLY INSERTED TO PREVENT BLADE EXPOSURE. TO PREVENT FIRE OR SHOCK HAZARD, DO NOT EXPOSE THIS APPLIANCE TO RAIN OR MOISTURE. THE CAUTION MARKING AND RATING LABEL ARE LOCATED AT THE BACK OF THE UNIT IMPORTANT SAFETY INSTRUCTIONS Read these instructions. - Page 3 filled with liquids such as vases shall be placed on the apparatus. 16. Do not overload wall outlet. Use only power source as indicated. 17. Use replacement part as specified by the manufacturer. 18. Upon completion of any service or repairs to this product, ask the service technician to perform safety checks.
-
Page 4: Compliance With Fcc Regulations
IMPORTANT NOTES Avoid installing the unit in locations described below: • Places exposed to direct sunlight or close to heat radiating appliances such as electric heaters. • Places subject to constant vibration. • Dusty, humid or moist places. • Unplug the unit from the electrical power outlet immediately in case of malfunction. COMPLIANCE WITH FCC REGULATIONS FCC ID: RQUTT-9913BT This device complies with Part 15 of the FCC Rules. -
Page 5: Accessories Included
The serial number of this product is found on its back cover. You should note the serial number of this unit in the space provided as a permanent record of your purchase to aid in identification in the event of theft or loss. Model Number: SB6059 Serial Number: ____________________ ACCESSORIES INCLUDED... -
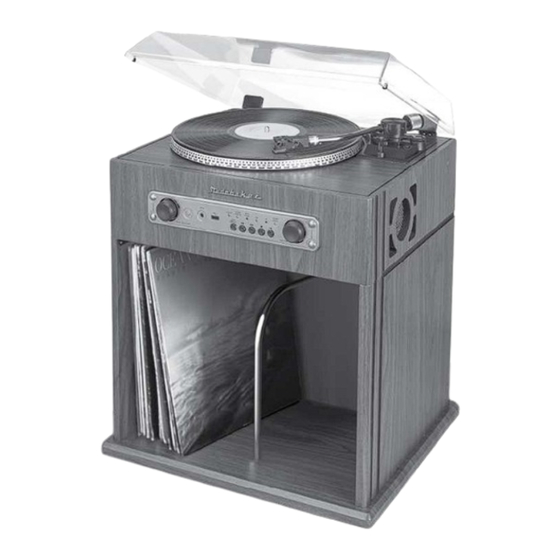
Page 6: Location Of Controls
LOCATION OF CONTROLS POWER ON/OFF BUTTON / VOLUME CONTROL AUX IN JACK USB PORT POWER LED INDICATOR REPEAT/RANDOM LED INDICATOR PLAY/PAUSE LED INDICATOR USB MODE LED INDICATOR BLUETOOTH LED INDICATOR PHONO/AUX IN MODE LED INDICATOR 10. FUNCTION KNOB 11. PLAY MODE BUTTON SKIP DOWN BUTTON SKIP UP BUTTON STOP BUTTON... - Page 7 INSTALLATION OF THE COUNTER WEIGHT 1. Slide the COUNTER WEIGHT (#19) onto the back of the tone arm, and push it forward until it reaches the pivoting hub of the tone arm as shown in figure 1 below. 2. Rotate the COUNTER WEIGHT (#19) clockwise and it will begin to move away from the pivoting hub.
- Page 8 you are playing. 5. Place the record on the platter [use the 45 RPM ADAPTER (#17) if necessary]. 6. You can manually raise the tone arm or you can use the CUE LEVER (#22) to lift up the tone arm. 7.
-
Page 9: Usb Operation
Tone arm auto return alig nment The position of the tone arm to complete playback and return to the rest position can be adjusted by the AUTO RETURN ALIGNMENT SCREW (#18) as follow:- Before starting the alignment, please take out the hole covering rubber:- a) If the system cannot complete the playback of record and return earlier, use a Phillips head screw driver to turn the AUTO RETURN ALIGNMENT SCREW (#18) inside the hole clockwise. -
Page 10: Bluetooth Operation
6. After successfully pairing the SB6059 with your Bluetooth device, The BLUETOOTH LED INDICATOR (#8) will stop flashing and remain lit. 7. If you want to pair (link) the SB6059 with another Bluetooth device, press and hold PLAY/PAUSE BUTTON (#15) for a few seconds. The BLUETOOTH LED... -
Page 11: Aux In Operation
(#13) or SKIP DOWN BUTTON (#12) to select the Next or Previous track. 3. Slowly adjust both the volume control of your SB6059 and your Bluetooth device until you reach a comfortable listening level. Notes : 1. Refer to the manual of your cell phone, tablet PC, computer or other Bluetooth enabled devices for Bluetooth operation since it may vary from model to model. -
Page 12: Line Out Connection
LINE OUT CONNECTION You can connect this unit to an external Hi-Fi / AMPLIFIER system by connecting the LINE OUT RCA Jacks to the auxiliary input jacks on your Hi-Fi / AMPLIFIER system with RCA cables. Notes: The Volume control on the main unit will adjust the volume when using the LINE OUT. - Page 13 RECORD CARE AND MAINTENANCE To ensure the best sound and the least amount of wear on your records, it’s essential that they are kept clean. Make sure your records, especially older ones are sufficiently cleaned prior to playing them. Thoroughly clean dust off the stylus and record regularly. Use a soft brush to clean the stylus.
-
Page 14: Troubleshooting Guide
SB6059. Select "SB6059" from the device list when it appears on your device screen. If required, enter the pass code “0000” to pair (link) SB6059 with your device. E-13... - Page 15 90 DAY LIMITED WARRANTY AND SERVICE VALID IN THE U.S.A ONLY SPECTRA MERCHANDISING INTERNATIONAL, INC. warrants this unit to be free from defective materials or factory workmanship for a period of 90 days from the date of original customer purchase and provided the product is utilized within the U.S.A. This warranty is not assignable or transferable.
- Page 16 0616 Printed in China E-15...
Need help?
Do you have a question about the SB6059 and is the answer not in the manual?
Questions and answers