
Related Manuals for Studebaker SB6065


Summary of Contents for Studebaker SB6065
- Page 1 TURNTABLE CASSETTE AM/FM STEREO RECEIVER AND CD RECORDER SB6065 OWNER’S MANUAL PLEASE READ THIS USER MANUAL COMPLETELY BEFORE OPERATING THIS UNIT AND RETAIN THIS BOOKLET FOR FUTURE REFERENCE.
-
Page 2: Important Safety Instructions
WARNING: TO REDUCE THE RISK OF FIRE OR ELECTRIC SHOCK, DO NOT EXPOSE THIS APPLIANCE TO RAIN OR MOISTURE. DANGEROUS HIGH VOLTAGES ARE PRESENT INSIDE THE ENCLOSURE. DO NOT OPEN THE CABINET REFER SERVICING TO QUALIFIED PERSONNEL ONLY. THE CAUTION MARKING IS LOCATED AT THE BACK OF THE UNIT THE RATING PLATE IS LOCATED AT THE BACK OF THE UNIT CAUTION: PLEASE READ AND OBSERVE ALL WARNINGS AND INSTRUCTIONS GIVEN IN... - Page 3 7. DO NOT BLOCK ANY OF THE VENTILATION OPENINGS. INSTALL IN ACCORDANCE WITH THE MANUFACTURER’S INSTRUCTIONS. 8. DO NOT INSTALL NEAR ANY HEAT SOURCES SUCH AS RADIATORS, HEAT REGISTERS, STOVES, OR OTHER APPARATUS (INCLUDING AMPLIFIERS) THAT PRODUCE HEAT. 9. DO NOT DEFEAT THE SAFETY PURPOSE OF THE POLARIZED OR GROUNDING – TYPE PLUG. A POLARIZED PLUG HAS TWO BLADES WITH ONE WIDER THAN THE OTHER.
-
Page 4: Precaution For Use
CAUTION Note: This product complies with DHHS Rule 21 Subchapter J at date of manufacture. Follow the advice below for safe and appropriate operation. ON PROTECTION AGAINST LASER ENERGY EXPOSURE o As the laser beam used in this compact disc player is harmful to the eyes, do not attempt to disassemble the casing. -
Page 5: Important Notes
IMPORTANT NOTES Avoid installing the unit in locations described below: • Places exposed to direct sunlight or close to heat radiating appliances such as electric heaters. • Places subject to constant vibration. • Dusty, humid or moist places. COMPLIANCE WITH FCC REGULATIONS This device complies with Part 15 of the FCC Rules. -
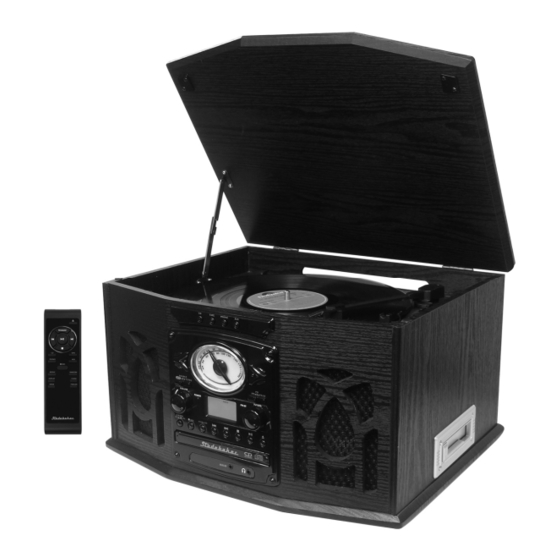
Page 6: Location Of Controls And Indicators
LOCATION OF CONTROLS AND INDICATORS MAIN UNIT 1) DIAL POINTER 2) LCD DISPLAY 3) POWER OFF/SOURCE/TUNER MODE SELECTOR 4) POWER LED INDICATOR 5) VOLUME CONTROL KNOB 6) CD SKIP DOWN BUTTON 7) FINALIZATION BUTTON 8) EXTRA BASS ON/OFF BUTTON 9) CD RECORD BUTTON 10) CD TRAY 11) CD/TAPE/PHONO/AUX FUNCTION BUTTONS... -
Page 7: Remote Control
REMOTE CONTROL BUTTON DESCRIPTION 1) CD TRAY OPEN/CLOSE PRESS TO OPEN AND CLOSE THE CD DOOR 2) CD PROGRAM BUTTON PRESS TO ACTIVATE CD PROGRAMMING FUNCTION 3) CD SKIP UP /DOWN PRESS TO SELECT PREVIOUS / NEXT TRACKS IN CD MODE 4) PLAY/PAUSE BUTTON IN CD PLAYER MODE - PRESS TO START/PAUSE CD PLAYBACK... -
Page 8: Battery Installation
BATTERY INSTALLATION The battery compartment is located on the back of the remote control. Remove the battery compartment door by pressing in on the tab and lifting it off. Insert two (2) AAA size batteries (not included) into the battery compartment following the polarity markings inside the battery compartment. -
Page 9: Listening To Radio
LISTENING TO RADIO Manual Tuning 1. Slide the POWER OFF/SOURCE/TUNER MODE SELECTOR to “TUNER“ position. 2. Slide the RADIO BAND SELECTOR to the desired band: AM, FM or FM-STEREO. 3. Tune to the required station with the TUNING KNOB. 4. Adjust VOLUME KNOB to the desire volume level. FM &... - Page 10 Stop Mode 1. If “ STOP “ button is pressed during play or pause mode, the CD will stop playback and display total number of tracks on the LCD display. Skip Mode (skip up / skip down 1. During play or pause mode, if “SKIP UP ”...
- Page 11 4. Press the “ PROGRAM ” button to store the track into memory. The program counter advances to P-02. 5. Repeat steps 3 and 4 to enter additional tracks into the memory if necessary. 6. When all the desired tracks have been programmed, press the “ PLAY/PAUSE ”...
- Page 12 ii) Cassette Recording 1) Slide MODE SELECTOR to “ SOURCE ” position. Then press the “ TAPE “ button. Insert a recorded cassette tape & get ready to playback the track you want to record and then remove the tape. 2) Press the “REC “...
- Page 13 Notes: The time for finalizing is subject to the contents of the recording and it may take up to 15 minutes in some cases. No button is working during finalize process. Never turn off the power or un-plug the power cord during finalize process. The CD-R disc cannot be recorded again after finalizing.
-
Page 14: Listening To Tape
LISTENING TO TAPE General Operation Cassette Playback The system will start the playback automatically after inserting a cassette tape Fast Forwarding Press the “ TAPE FAST FORWARD / EJECT “ button inwards half way when playing, the tape will be advanced forward rapidly. Slightly press the “... -
Page 15: Auxiliary Input
5. Move the tone arm to the beginning of the record, or to the start of a particular track. Gently lower the tone arm onto the record to start playing. 6. Adjust the volume knob to the desired level. 7. When the record is played to the end of the record, the platter will automatically stop rotating. -
Page 16: Care And Maintenance
(2) Slide the MODE SWITCH to turn off the system when you finish listening. Don't forget to switch off the power on your external device as well. RESETTING If the system does not respond or has erratic operation, you may have experienced an electrostatic discharge (ESD) or a power surge that triggered the internal computer to shut down automatically. -
Page 17: Compact Disc Care
COMPACT DISC CARE Handle the disc only by its edges. Never allow your fingers to come in contact with the shiny, unprinted side of the disc. Do not attach adhesive tape, stickers etc., to the disc label. Clean the disc periodically with soft, lint-free, dry cloth. Never use detergents or adhesive cleaners to clean the disc. -
Page 18: Troubleshooting Guide
TROUBLESHOOTING GUIDE SHOULD YOU EXPERIENCE DIFFICULTIES IN THE USE OF THIS PLAYER PLEASE REFER TO THE FOLLOWING CHART OR CALL 1-800-777-5331 FOR CUSTOMER SERVICE. PROBLEM POSSIBLE CAUSE SOLUTION The unit is disconnected from the Reconnect to the AC outlet. The unit does not AC outlet respond (no Plug another device into the same... -
Page 19: Specification
SPECIFICATION Power Requirement Main unit: AC120V~ 60Hz Remote control 2 x 1.5V “AAA” (UM-4) size batteries (not included) Frequency Range Radio Band FM 88 ~ 108 MHz AM 530 ~ 1710 KHz Power Consumption Main Unit: 30Watts... - Page 20 90 DAY LIMITED WARRANTY AND SERVICE VALID IN THE U.S.A ONLY SPECTRA MERCHANDISING INTERNATIONAL, INC. warrants this unit to be free from defective materials or factory workmanship for a period of 90 days from the date of original customer purchase and provided the product is utilized within the U.S.A.
Need help?
Do you have a question about the SB6065 and is the answer not in the manual?
Questions and answers