Table of Contents
Advertisement
Advertisement
Table of Contents

Subscribe to Our Youtube Channel
Related Manuals for Zotac VR GO 2.0


Summary of Contents for Zotac VR GO 2.0
- Page 2 ZOTAC. Products and corporate names mentioned in this manual may be registered trademarks or copyrights of their respective companies, and are used for identification purposes only.
-
Page 3: Table Of Contents
Setting up your system -------------------------------------------------------------------------------------4 Care during use ----------------------------------------------------------------------------------------------4 Welcome -----------------------------------------------------------------------------------------------------------5 Package contents -------------------------------------------------------------------------------------------5 Getting to know your ZOTAC VR GO 2.0 ----------------------------------------------------------------6 Top view --------------------------------------------------------------------------------------------------------6 Right view -----------------------------------------------------------------------------------------------------7 Front view -----------------------------------------------------------------------------------------------------8 How to disable Low Power Alarm in BIOS settings -------------------------------------------------9 Installing Hardware inside ZOTAC VR GO 2.0 ---------------------------------------------------------11... -
Page 4: Product Specifications
ZOTAC VR GO 2.0 Product specifications q Microprocessor support v Intel Core i7-8700T, six core 2.4 GHz (12M Cache, up to 4.0 GHz) q Onboard Graphics support v NVIDIA GeForce GTX 1070 w/ 8GB GDDR5, 256-bit v Two HDMI 2.0 ports, one DP 1.4 outputs (supports 4K @ 60 Hz) -
Page 5: Safety Information
ZOTAC VR GO 2.0 Safety information Your ZOTAC VR GO 2.0 is designed and tested to meet the latest standards of safety for information technology equipment. However, to ensure your safety, it is important that you read the following safety instructions. -
Page 6: Welcome
Welcome Congratulations on your purchase of the ZOTAC VR GO 2.0. The following illustration displays the package contents of your new ZOTAC VR GO 2.0. If any of the below items is damaged or missed, contact your retailer. Package contents •... -
Page 7: Getting To Know Your Zotac Vr
ZOTAC VR GO 2.0 Getting to know your ZOTAC VR GO 2.0 Top view 1. USB 3.1 Type-C port The type-C USB 3.1 port supports the SuperSpeed USB 3.1 devices. Use this port for USB 3.1 devices for maximum performance with USB 3.1 compatible devices. -
Page 8: Right View
ZOTAC VR GO 2.0 Right view 1. Power input (DC19.5V) The supplied power adapter converts AC power to DC power for use with this jack. Power supplied through this jack supplies power to the PC only. It does not charge the batteries. To prevent damage to the PC, always use the supplied power adapter. -
Page 9: Front View
ZOTAC VR GO 2.0 8. Microphone jack The microphone jack is designed to connect the microphone used for video conferencing, voice narrations or simple audio recordings. 9. Power output (DC12V) The power output is used to connect DC 12V power to the VR head-mounted display. -
Page 10: How To Disable Low Power Alarm In Bios Settings
How to disable Low Power Alarm in BIOS settings 1. Turn on the VR GO 2.0 and press <Delete> to enter the BIOS SETUP UTILITY. 2. Use the arrow keys to navigate to the Power menu, select Low Power Alarm and press... - Page 11 ZOTAC VR GO 2.0 3. Select [Disable] and press <Enter>. 4. Press F10 to save the configuration and exit.
-
Page 12: Installing Hardware Inside Zotac Vr
Before installing hardware, please follow the instructions below to remove the cover of your ZOTAC VR GO 2.0. Refer to page 35 to detach the backpack. 1. Lay the ZOTAC VR GO 2.0 on a flat surface with the back support facing upwards. 2. Locate the screws and remove. -
Page 13: Installing A Hard Disk Drive/Ssd (Optional)
ZOTAC VR GO 2.0 Installing a hard disk drive/SSD (optional) 1. Unscrew and remove the hard disk drive cover. 2. Locate the 2.5-inch SATA hard disk drive/SSD slot and the drive bracket. Remove the thumb screw and bracket. - Page 14 ZOTAC VR GO 2.0 3. Install the hard disk drive/SSD to the drive bracket. 4. Insert the bracket into the SATA slot. 5. Reinstall the thumb screw and cover.
-
Page 15: Installing An M.2 Nvme Ssd
ZOTAC VR GO 2.0 Installing an M.2 NVMe SSD 1. Unscrew and remove the M.2 NVMe SSD cover. 2. Insert an M.2 NVMe SSD into the slot at a 45 degree angle. - Page 16 ZOTAC VR GO 2.0 3. Install the M.2 NVMe SSD with screw and reinstall the cover. Note: The system includes M.2 SSD pre-installed.
-
Page 17: Removing The Memory Module
ZOTAC VR GO 2.0 Removing the memory module 1. Unscrew and remove the memory cover. 2. Gently press the two arms securing the memory module outwards, as shown in the image below, to release the memory module. - Page 18 ZOTAC VR GO 2.0 3. Remove the memory module from the slot.
-
Page 19: Installing A Memory Module
ZOTAC VR GO 2.0 Installing a memory module 1. Locate the SO-DIMM memory slots and insert a SO-DIMM memory module into the slot at a 45 degree angle. 2. Gently press down on the memory module until it locks into place by the arms of the memory slot. - Page 20 ZOTAC VR GO 2.0 3. If you need to install two memory modules, please follow the above steps to install the second one. Reinstall the memory cover...
-
Page 21: Installing Battery
ZOTAC VR GO 2.0 Installing Battery 1. To ensure correct battery installation, locate the batteries and place them to the side of the system. Make sure the battery status indicators are visible face up and on the side facing the system. See below illustration. -
Page 22: Removing Battery
ZOTAC VR GO 2.0 3. Ensure that the battery is installed in place, and release the battery lock to “Lock” position. Note: Only change one battery at a time to maintain power to the system when the system is powered on. -
Page 23: Battery Charging
ZOTAC VR GO 2.0 Battery Charging The VR GO 2.0 does not support charging the batteries directly. Please follow the instructions below to charge the batteries. 1. Insert the batteries into the battery charging dock. 2. Connect the AC adapter to the battery charging dock. - Page 24 ZOTAC VR GO 2.0 3. All battery LEDs will be OFF when fully charged. 4. Press the battery status button to check battery status.
-
Page 25: Setting Up Your Zotac Vr
ZOTAC VR GO 2.0 Setting up your ZOTAC VR GO 2.0 You need to connect peripherals before using your ZOTAC VR GO 2.0. 1. Connecting to USB 3.0 devices Connect USB 3.0 devices such as external hard drives, SSDs and flash drives to the USB 3.0 port on the system rear panel. - Page 26 Connect the supplied AC adapter to the DC IN jack on the system rear panel and then press the power switch on the front panel to turn on the system. When your ZOTAC VR GO 2.0 is not in use, unplug the power adapter or switch off the AC outlet to save power.
-
Page 27: Getting Started With Windows 10 Pro 64-Bit
ZOTAC VR GO 2.0 Getting started with Windows 10 Pro 64-bit Please follow the steps below to begin using your VR GO 2.0 with Windows 10 Pro 64-bit. 1. Power on the system. 2. Connect to the Internet via Ethernet or Wi-Fi. - Page 28 ZOTAC VR GO 2.0 4. Read and accept the license terms.
- Page 29 ZOTAC VR GO 2.0 5. We recommend using the express settings. 6. Create a Microsoft new account if you don’t have one. Otherwise, select “Sign in”.
- Page 30 ZOTAC VR GO 2.0 7. Setup your account. 8. Wait for the initial system setup to complete .
- Page 31 ZOTAC VR GO 2.0...
-
Page 32: Using Your Zotac Vr
Configuring audio output Follow the steps below to enable audio output when connecting the ZOTAC VR GO 2.0 to a TV or receiver via DP/HDMI adapter. Access the Sound settings via the system Control Panel. Under Playback devices, click the display device that corresponds with your audio compatible display. -
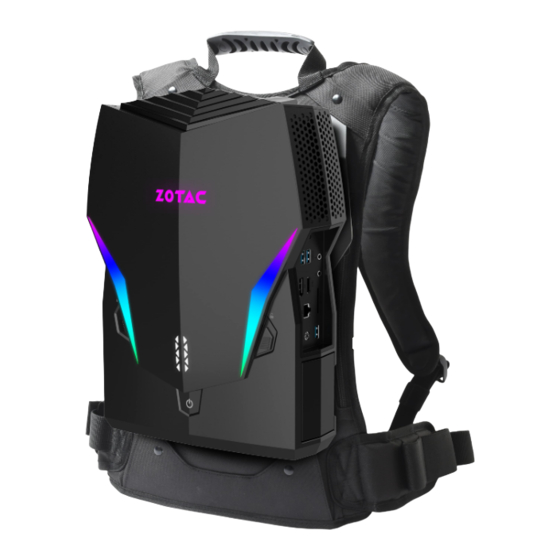
Page 33: Attaching Backpack
ZOTAC VR GO 2.0 Attaching backpack 1. Lay the ZOTAC VR GO 2.0 and the backpack on a flat surface. 2. Lay the ZOTAC VR GO 2.0 on the backpack. Align the white line of backpack with the bottom of VR GO 2.0. - Page 34 ZOTAC VR GO 2.0 3. Push the ZOTAC VR GO 2.0. When you hear a click, it means the installation is in place.
-
Page 35: Recommended Layout
ZOTAC VR GO 2.0 Recommended layout Note: VR devices are not included. -
Page 36: Detaching Backpack
ZOTAC VR GO 2.0 Detaching backpack 1. Lay the backpack on a flat surface with the ZOTAC VR GO 2.0 facing upwards. 2. Pull the lever of the backpack, and push the VR GO 2.0 to release it. - Page 37 ZOTAC VR GO 2.0 3. Remove the ZOTAC VR GO 2.0 from the backpack. 291-MB395-00...
Need help?
Do you have a question about the VR GO 2.0 and is the answer not in the manual?
Questions and answers