
Related Manuals for CircuPool RJ16+


Summary of Contents for CircuPool RJ16+
- Page 1 RJ + Saltwater Chlorination System - Installation and Operation Guide Models: RJ16 + RJ20 + RJ30 + RJ45 + RJ60 + RJ PLUS Series Salt Systems Advanced Swimming Pool Sanitation...
-
Page 2: Table Of Contents
TABLE OF CONTENTS SAFETY INSTRUCTIONS INTRODUCTION GETTING STARTED SYSTEM OVERVIEW WATER CHEMISTRY & SALT LEVELS Preparing the Pool Water Ideal Salt Level & Pool Size Adding Salt Ideal Water Chemistry Levels OPERATION How it Works Initial Start Up General Operation Using the Control Module LED Indicator Lights MAINTENANCE... -
Page 3: Safety Instructions
Save all instructions. When installing and using this electrical equipment, basic safety precautions should always be followed, including the following. • WARNING: Follow all aspects of local and National Electrical Code(s) when installing the CircuPool RJ Series. Disconnect all electrical power during installation & service. •... -
Page 4: Introduction
Please choose your installer with great care! Be sure to familiarize yourself with the pool chemistry requirements and maintenance procedures. Please visit www. circupool.com/help for more information, tips, and troubleshooting assistance. -
Page 5: System Overview
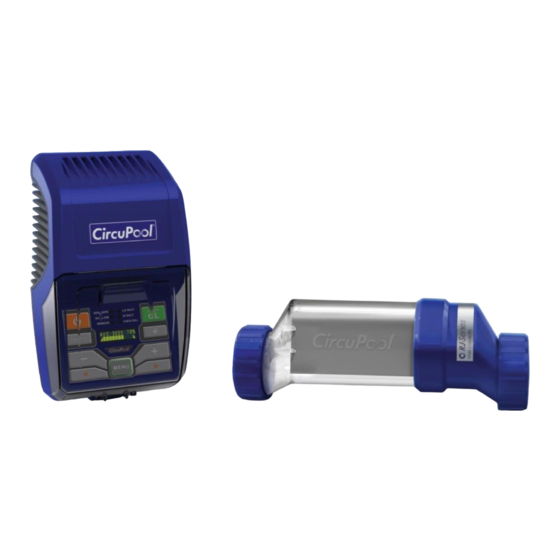
RJ SERIES SYSTEM OVERVIEW RJ-Series The 3 Generation system utilizes three main components for operation: Control Module Electrolytic Cell Flow Switch Control Module: This component supplies power to the Cell and allows you to customize the system's operation in order to meet your pool's unique needs. Electrolytic Cell: This component creates chlorine as the water inside passes through and returns to the pool. -
Page 6: Water Chemistry & Salt Levels
WATER CHEMISTRY & SALT LEVELS Preparing the Pool Water RJ-Series It is important that the pool's water chemistry is balanced before the is powered on and used. In order for the system to be able to work, there must be a minimum level of salt in the pool water, see “Salt Levels”... -
Page 7: Adding Salt
Adding Salt IMPORTANT: Before adding salt at any time, ALWAYS perform an independent water test to measure pre-existing salt levels. If the salt level (PPM) in your pool is currently… 1000 1500 2000 2500 3000 3500 4000 4,000 6,000 8,000 10,000 12,000 14,000... -
Page 8: Ideal Water Chemistry Levels
Ideal Water Chemistry Levels It is important to maintain these chemistry levels in order to ensure that the pool can be enjoyed safely, to minimize the amount of effort required to sanitize the water, and to prevent corrosion or scaling. The only unique requirement for a pool with a chlorine generator is the low level of salt (salinity) to be maintained in the water. -
Page 9: Operation
OPERATION How it works RJ-Series Think of the as a chlorine generator; set it to create a steady supply of chlorine for the pool, instead of buying and adding chlorine by hand. How it works: Using electrolysis, it creates chlorine from the salt molecules (NaCL) in your water in order to sanitize your pool. -
Page 10: Using The Control Module
Using the Control Module CONTROL BUTTONS: 1) ON/OFF : Use this button to manually activate / deactivate the system on or off. 2) Chlorine Output : Use the minus/plus buttons to lower the system's power setting (the rate of chlorine production), in order to customize operation for your pool's needs. -
Page 11: Led Indicator Lights
Controls (continued) LED INDICATOR LIGHTS TIP: All LED indicators get reset when system is powered off. After restoring power, the system will run normally for 1-5 minutes while running diagnostics before displaying any warning lights. Be sure to check system after this point, especially if you were seeing any warning lights prior to turning the system off. -
Page 12: Maintenance
4) Remove entire Cell from between the unions. DO NOT pull or hold the Cell by its cable. To clean the Cell of mineral buildup: 1) Attach Cleaning Cap or Cleaning Stand (sold separately, available at www.circupool.com) and orient the Cell vertically. Place on the ground and stabilize so as to remain upright and prevent spilling. -
Page 13: General Maintenance
When the titanium blades inside the Electrolytic Cell have reached the end of their lifespan, replacements are readily available so that the whole system does not have to be replaced. Replacements are easily switched out. To ensure quality and value, only genuine CircuPool replacement parts may be used. -
Page 14: Installation
INSTALLATION RJ-Series IMPORTANT: If you haven’t already done so, it is necessary to balance the pool's water chemistry before the powered on and used. See pages 6 - 8 for more information. The following are guidelines for the typical installation using 2” plumbing, which should be performed by a qualified individual. If 1.5”... -
Page 15: Installing The Electrolytic Cell And Flow Switch
Vertical Installation Kits are also available to minimize plumbing space required and increase ease of installation (sold separately, available at www.circupool.com). IMPORTANT: These instructions are for 2” plumbing (typical). Be sure to select the Cell Unions that match the existing pool plumbing size (1 ½”... -
Page 16: Installing The Control Module
Installing the Control Module Mount the Control Module as close to the pump and filtration system as possible. For safety concerns, do not install the Control Module within 10 feet of the pool edges, and follow all applicable codes. Verify that the Cell and Flow Switch cables can reach the Control Module from the section of pipe selected for plumbing. - Page 17 Wiring (Continued) Wiring to Power Source: Always double-check the voltage of your power source. Connection to improper voltage can: a) cause severe damage/harm, or b) cause lights and screen to power on without system function. The RJ-Series is shipped from the factory with a 240 VAC configuration. If 120VAC is needed, move the internal jumpers as shown on page 18 (the white wire on the power cord becomes the neutral).
-
Page 18: Voltage Conversion
VOLTAGE CONVERSION Always double-check the voltage of your power source. Connection to improper voltage can: a) cause severe damage/harm, or b) cause lights and screen to power on without system function. All service should only be attempted by a person with appropriate electrical skills, with all equipment disconnected from power. -
Page 19: Installation Checklist
INSTALLATION CHECKLIST □ Cell Unions installed and glued into pipe work. □ Threaded Collars on either side of the Cell are hand tight. □ Flow Switch is installed and oriented properly. □ Control Module is affixed to wall and wired correctly. □... -
Page 20: Helpful Hints
HELPFUL HINTS For more detailed information and useful tips, visit www.circupool.com/help. Proper operation of the chlorine generator can be easily verified by checking the lights on the control panel. However, if the pool remains cloudy, or the chlorine residual tests low, then the chlorine being produced is being lost due to high chlorine demand or improper water conditions. -
Page 21: Troubleshooting
Manually verify salinity (see pages 6-7). Hi Salt LED is on Loose Cell connection, or Cell is dirty or Inspect and clean Cell if necessary. clogged Incorrect Cell Version set Verify Cell Version in system status menu For more information or troubleshooting, visit www. circupool.com/help... - Page 22 Check operation of heater, or turn off until water operation temp is above 65° and more sanitation is needed. Cell is dirty or clogged Clean Cell (see page 12). Damaged Cell or Cell cable Contact manufacturer. For more information or troubleshooting, visit www. circupool.com/help...
-
Page 23: Warranty
2. Should a defect in any item or part covered by the warranty become evident during the warranty's term, CircuPool Products will at its sole discretion repair or replace such item or part. CircuPool Products reserves the right to replace defective parts with new or refurbished parts. - Page 24 RJ + Series Owner's Manual Notes:...
Need help?
Do you have a question about the RJ16+ and is the answer not in the manual?
Questions and answers