Table of Contents
Advertisement
Quick Links
Wheel Guardian™ Tire Changer
Installation and Operation Manual
Manual P/N 5900089 — Manual Revision A — March 2019
Model:
• RV1
Designed and engineered in Southern California, USA. Made in China.
⚠
DANGER
entire
Read the
contents of this manual
product. Failure to follow the instructions and safety precautions in
this manual can result in serious injury or death. Make sure all other
operators also read this manual. Keep the manual near the product
for future reference. By proceeding with setup and operation, you
agree that you fully understand the contents of this manual.
1645 Lemonwood Dr.
Santa Paula, CA 93060 USA
Toll Free: (800) 253-2363
Tel: (805) 933-9970
rangerproducts.com
before
using this
Advertisement
Table of Contents

Related Manuals for Ranger Wheel Guardian RV1


Summary of Contents for Ranger Wheel Guardian RV1
- Page 1 1645 Lemonwood Dr. Santa Paula, CA 93060 USA Toll Free: (800) 253-2363 Tel: (805) 933-9970 rangerproducts.com Wheel Guardian™ Tire Changer Installation and Operation Manual Manual P/N 5900089 — Manual Revision A — March 2019 Model: • RV1 Designed and engineered in Southern California, USA. Made in China. ⚠...
- Page 2 Ranger website. Warranty. The BendPak Ranger warranty is more than a commitment to you: it is also a commitment to the value of your new product. For full warranty details, contact your nearest BendPak Ranger dealer or visit bendpak.com/support/warranty.
-
Page 3: Table Of Contents
Technical support and service for your Tire Changer is available from your distributor or by calling BendPak Ranger at (805) 933-9970. You may also call regarding parts replacement (please have the serial number and model number of your unit available). -
Page 4: Shipping Information
Shipping Information Your equipment was carefully checked before shipping. Nevertheless, you should thoroughly inspect before the shipment you sign to acknowledge that you received it. When you sign the bill of lading, it tells the carrier that the items on the invoice were received in good Do not sign the bill of lading until after you have inspected the shipment. - Page 5 BendPak Ranger assumes no liability for damages resulting from: • Use of the equipment for purposes other than those described in this manual. • Modifications to the equipment without prior, written permission from BendPak Ranger. • Damage to the equipment from external influences. •...
-
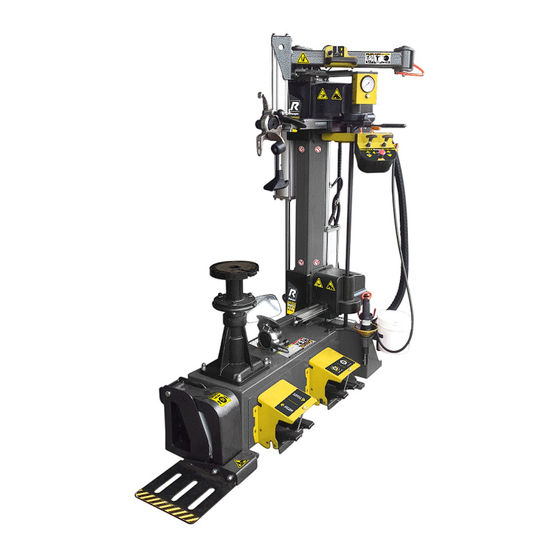
Page 6: Components
Components The following image shows the main components of the Tire Changer. The Air Pressure Regulator/Filter and Oiler/Lubricator are on the other side of the Tire Changer and are not visible above. RV1 Wheel Guardian™ Tire Changer P/N 5900089 — Rev. A — March 2019... - Page 7 Tire Changer components include: • Turntable. Holds the Wheel. • Mirror. Lets you see what is happening on the underside of the Wheel. • Post. Holds many components. Needs to be lubricated for easy movement of those components. do not lean on or touch the Post Once lubricated, •...
-
Page 8: Faq
Frequently Asked Questions Question: What does a Tire Changer do? Answer: A Tire Changer takes Tires off of Wheels (called demounting) and puts Tires onto Wheels (called mounting). Q: What is the difference between a Tire, Wheel, and Rim? A: A Wheel is the round metal piece that attaches to the Vehicle’s axle. -
Page 9: Specifications
Specifications Model Wheel Diameter Range 13" to 30" / 330 mm to 762 mm Maximum Tire Diameter 47" / 1,194 mm Maximum Wheel Width 15" / 381 mm Maximum Tire Weight 143 lbs / 65 kg RPM of Turntable 7 to 14 turns per minute Motor Power 1.1 kW / 24 A / NEMA 30 amp plug Motor Specs... -
Page 10: Installation Checklist
Installation Checklist Following are the steps needed to install an RV1 Tire Changer. Perform them in the order shown. ☐ 1. Review the installation Safety Rules. ☐ 2. Plan for Electrical Work. ☐ 3. Make sure you have the necessary Tools. ☐... -
Page 11: Installation
CAUTION Certain parts of installing the Tire Changer are difficult for just one person. BendPak Ranger strongly recommends having two or more persons work together to install the Tire Changer. If you have to use an extension cord, make sure its current rating is equal to or greater than that of the equipment being used. - Page 12 30 feet of the Tire Changer while it is being used. above You also need room the Tire Changer, which is 73 inches /1,850 mm high. BendPak Ranger recommends leaving at least an additional 12 inches / 305 mm of open space above the top of the Tire Changer.
- Page 13 ⚠ CAUTION Ranger recommends having at least two people move the Tire Changer; it is heavy and the weight is not evenly distributed. If it is dropped or falls, it could cause injuries and the Tire Changer could be damaged.
- Page 14 The Tire Changer has holes for anchoring it into place; anchoring is optional. Note: You are not required to anchor your Tire Changer. BendPak Ranger recommends doing so, as the Tire Changer applies a certain amount of force at various times during the changing of a Tire.
- Page 15 Once past the hole in the Base Plate, the Anchor Bolt eventually stops going down into the hole as the Expansion Sleeve contacts the sides of the hole; this is normal. 5. Hammer or mallet the Anchor Bolt the rest of the way down into the hole. Stop when the Washer is snug against the Base Plate.
- Page 16 Connecting to an Air Source The Tire Changer requires a 15 to 25 CFM Air Source with an operating air pressure of 140 to 165 PSI (9.6 to 11.4 bar). The Tire Changer uses pneumatic and electrical energy; if your organization has Lockout/Tagout policies, make sure to implement them after connecting to the Air Source.
- Page 17 Connecting to a Power Source The Tire Changer has to be connected to a 208-230 VAC power source. A Power Cord with no Plug is provided with the unit. You need to have a licensed, certified Electrician wire the open end of the Power Cord to an appropriate 208-230 VAC NEMA 30 Amp Plug. Refer to Plug Wiring Information for additional wiring information.
- Page 18 The Tire Changer comes with a Tire Lube Bucket (to hold your Tire Lube) and a Tire Lube Brush (to apply your Tire Lube). BendPak Ranger does not include any Tire Lube with the Tire Changer, as there are many options available.
- Page 19 Preparing the Quick-Nut The Quick-Nut holds Wheels in place while the Tire is being demounted or mounted. Note: When the Quick-Nut and its Cones and Adapters are shipped from the factory, they are coated with oil to protect them. Until you clean the oil off of them, either wear gloves, keep a rag handy, or be prepared to wash your hands frequently.
- Page 20 • Change some non-customer Tires. Just to make sure you are used to all of the controls, non-customer Tires BendPak Ranger recommends changing some before changing some customer Tires. Final Checklist Before Operation Do the following things...
-
Page 21: Operation
The RV1 Tire Changer may work differently than other Tire Changers you have • used . BendPak Ranger recommends practicing with non-customer Tires to get familiar with how the product works before starting work on customer Tires. before each use •... - Page 22 Keep the work area clean and well lit. Dirty, cluttered, and dark work areas increase the chances of an accident happening. • Do not try to access the inside of the unit unless instructed to do so by Ranger Support. There are no user serviceable parts inside. ⚠...
- Page 23 Using the Controls The Tire Changer has multiple controls; this section describes how to use them. Pedals The Tire Changer has four Pedals: • Up. Step on and hold down to raise the Tire Lift. Uses pneumatic power. Step off to stop. •...
- Page 24 Tool Arm Handle The Tool Arm Handle controls the in and out movement (towards and away from the Wheel/Tire) of the Upper Tool Arm and the Lower Tool Arm. they move in and out Important: The Upper and Lower Tool Arms are synchronized; together .
- Page 25 Upper and Lower Tool Arm Controls The Upper and Lower Tool Arms Controls control the up and down movement of the Upper Tool Arm and the Lower Tool Arm. Note: The Upper and Lower Tool Arms move up and down separately. Their up and down movement are not synchronized with each other.
- Page 26 Upper Multifunction Tool The Upper Multifunction Tool has three components: • Bead Breaker Tool. Breaks the Bead on the top side of a mounted Tire. • Demount Hook Tool. Pulls the Tire up and over the Wheel during the demount process. •...
- Page 27 Lower Multifunction Tool The Lower Multifunction Tool has two components: • Bead Breaker Tool. Breaks the Bead on the underside of a mounted Tire. • Mounting Tool. Slides the Tire back onto the Wheel during the mount process. • Turn Knob. Pull out and turn to switch between the tools on the Lower Multifunction Tool. RV1 Wheel Guardian™...
- Page 28 Assist Tower The Assist Tower holds the Assist Tool, which is used to hold the sidewall of the Tire down during the mount process. The components of the Assist Tower are: • Handle. Helps to move the Assist Tower into the desired position. •...
- Page 29 Laser The Laser, when turned on, shines a beam straight down, showing you where the selected Upper Multifunction Tool will impact the Tire if used. For example, if you are looking to use the Bead Breaker Tool on the Upper Multifunction Tool and you want to know where it will hit the Tire if you were to lower it, the Laser shows that location.
- Page 30 Before You Change a Tire ⚠ DANGER Do not use the Tire Changer unless you have been properly trained and have read the entire Installation and Operation Manual. Tire changing must only be done by trained personnel. Failure to understand and follow proper procedures will result in injury or death.
- Page 31 The Tire, Wheel, or both can be damaged and the Tire could explode under pressure, resulting in serious injury or death. BendPak Ranger recommends you not try to demount or mount this type of Wheel . If you do attempt to demount or mount this type of Wheel, proceed with extreme caution.
- Page 32 The Steps in Changing a Tire Changing a Tire consists of multiple steps: 1. Place the Wheel on the Turntable. Use the Tire Lift and the Up Foot Pedal to get a Wheel onto the Turntable. 2. Secure the Wheel. It is important for the Wheel to stay in place on the Turntable. Use the Quick-Nut to do this.
- Page 33 Placing a Wheel on the Turntable When you want to take the Tire off of a Wheel (called demounting the Tire), you must first put the Wheel onto the Tire Changer Turntable. To put a Wheel onto the Turntable: 1. Make sure you are wearing ANSI-approved eye protection: safety glasses, face shield, or goggles. 2.
- Page 34 Secure the Wheel Securing the Wheel ensures it stays in place while you demount or mount the Tire. To secure a Wheel on the Turntable: 1. Select an appropriate Adapter or Cone. You want the Adapter or Cone to go into the hole in the center of the Wheel without going all the way through and touching the Turntable.
- Page 35 Deflate the Tire If you have not done so already, you need to fully deflate the Tire. ⚠ DANGER Never attempt to demount or mount an inflated Tire. You must fully deflate it first. Attempting to demount or mount an inflated Tire will result in injury or death.
- Page 36 Break the Bead The Bead must be broken – on both sides of the Tire – before the Tire can be taken off the Wheel. sure Important: Do not begin breaking a Tire’s bead until you are that the Tire is being held securely in place and it is completely deflated.
- Page 37 7. Using the Upper Tool Arm Control, push the upper Bead Breaker Tool down into the Tire about an inch. 8. Step on the Rotation Foot Pedal and hold it down. The Turntable begins turning clockwise. 9. Press and hold the Tool Adjustment Button. The upper Bead Breaker Tool pushes down into the Tire until it gets below the edge of the rim and then automatically moves in about an inch or two, depending on the geometry of the Tire.
- Page 38 After the Bead is broken, you can take the Tire off the Wheel, called demounting. Important: BendPak Ranger recommends using a liberal amount of lubricant; this makes the Tire come off more easily and helps to prevent damage to the Wheel or the Tire.
- Page 39 14. Move both Arms up, high enough so the lower Bead edge will clear the top of the upper Rim. 15. Use the Lower Tool Arm Control to move the lower Bead Breaker Tool up. 16. Press and hold the Tool Adjustment Button and the Rotation Foot Pedal. The Tire is pulled up.
- Page 40 Wheel / Tire Mismatches A Wheel / Tire mismatch is mounting a Tire where the Tire Bead diameter does not exactly match the Diameter of the Wheel. A Wheel / Tire mismatch is dangerous . A mismatched Tire and Wheel may separate or explode, resulting in injury or even death.
- Page 41 Mount a New Tire This section describes how to mount a new Tire on a Wheel. ⚠ WARNING Mounting a new Tire can be hazardous if not done correctly. Do not change a Tire unless you have been trained to do so. Failure to understand and follow proper procedures can result in injury or death.
- Page 42 8. Push down on the Tire so that it is part way down the Mounting Tool. 9. Rotate the Turntable until the bottom edge of the Tire slips down over the top edge of the Wheel. 10. Lower the Lower Tool Arm. The Tire slides down so that it is next to the Wheel.
- Page 43 If the Tire inflation process goes smoothly, these three stages could easily be considered a single stage instead of multiple stages. ⚠ CAUTION The inflation process can produce some additional noise. BendPak Ranger recommends wearing ear protection when inflating a Tire. ⚠ Do not exceed the maximum air pressure specified by the Tire manufacturer. This...
- Page 44 5. Press and hold on the Inflation Foot Pedal for a second or two. Air goes into the Tire and seals the Bead. Bead Sealing takes very little air pressure, anywhere from 0 to 3 psi, which you can monitor on the Pressure Gauge.
- Page 45 Remove the Wheel from the Turntable Once the new Tire has been correctly mounted on the Wheel and inflated, you can remove it from the Turntable. To remove a Wheel from the Turntable: 1. Take the Quick-Nut off and return it to its holder on the Tire Changer. Flip down the Wings, turn the Wings counter-clockwise until the Quick-Nut is untightened, then hold the Quick Release Levers to the side and pull up the Quick-Nut.
-
Page 46: Maintenance
• Daily: Make sure the unit is clean and dry. • Weekly: Check all labels to make sure they are in place and legible. Contact BendPak Ranger if replacement labels are needed. • Weekly: Check the water of the Regulator/Filter. If the reservoir is one quarter (25%) or more filled with water, drain it. - Page 47 Check the Water Level Water coming in from the Air Source is pulled out of the incoming air by the Regulator/Filter and dropped into the reservoir at the bottom. This water needs to be drained periodically. To drain water from the Regulator/Filter reservoir: 1.
- Page 48 Check the Oil Feed Rate and Adding Oil The built-in lubricator adds pneumatic oil to the Incoming Air. This ensures that all pneumatic components of the Tire Changer receive the necessary lubrication, which maintains operating performance, reduces wear, and extends service life. It is very important to make sure the oil feed rate is correct, 1 or 2 drops of oil per use of the Up or Down Foot Pedals, and that there is enough pneumatic oil in the Oil Reservoir of the Oiler/Lubricator.
-
Page 49: Troubleshooting
Make sure the unit is connected to an appropriate air source. Control does not work. If you continue to have problems with your Tire Changer, visit www.bendpak.com/support/ or call BendPak Ranger at (805) 933-9970. RV1 Wheel Guardian™ Tire Changer P/N 5900089 — Rev. A — March 2019... -
Page 50: Plug Wiring Information
Plug Wiring Information The RV1 comes with a Power Cord that is connected inside the unit on one end and with three exposed wires on the other end. The three exposed wires need to be hard-wired to an appropriate power source or connected to a 220 VAC Plug. ⚠... -
Page 51: Labels
Labels RV1 Wheel Guardian™ Tire Changer P/N 5900089 — Rev. A — March 2019... - Page 52 RV1 Wheel Guardian™ Tire Changer P/N 5900089 — Rev. A — March 2019...
- Page 53 RV1 Wheel Guardian™ Tire Changer P/N 5900089 — Rev. A — March 2019...
-
Page 54: Parts
Parts Part Number Description Shovel tire wheel Deep groove ball bearing Tool disc gasket Water box Round hairbrush Vaseline Tire mouth clamp Work plate rubber pad Power line Triangular belt RV1 Wheel Guardian™ Tire Changer P/N 5900089 — Rev. A — March 2019... - Page 55 Part Number Description Mirror with bracket 5328467 Mirror with bracket 5328467 Hexagon socket cap screws Spring washer Flat washer Acorn nut 1-Type Non-metal insert hexagonal lock nut Flat washer 1-Type Hex nut Hexagon bolt Flat washer Flat washer Spring washer Box welded parts Hexagon socket cap screws Hexagon socket cap screws...
- Page 56 1-Type Non-metal insert hexagonal lock nut Tool frame assembly Water box adjusting rack Hexagon bolt Flat washer 1-Type Non-metal insert hexagonal lock nut Water box support Accessory box assembly Flat washer Spring washer Hexagon socket cap screws Hexagon socket cap screws Spring washer Flat washer Hexagon bolt...
- Page 57 Rubber sheet for accessory case Bridge type nylon chain 5328454 Inflation hose with air chuck 5328463 Inner buckle shoot-through Part Number Description Circlip for hole Lock nut gland Shifting fork Hexagon socket cap screws Hand shank sleeve, set of two 5328461 Lock nut main body welding assembly Handle...
- Page 58 Spline housing Elastic bilge pin Turntable inner lift plate Turntable outer lift plate Backing pin O-ring Stop pin spring Block assembly Hexagon socket set screw I-type hexagon nut Large side pads Hexagon socket cap screws Hexagon socket cap screws Flat washer 1-Type Non-metal insert hexagonal lock nut Turntable Hexagon socket cap screws...
- Page 59 Part Number Description Extension piece Lock nut elbow Oil-water separator Hexagon socket cap screws Pneumatic filter regulator lubricator RV1 Wheel Guardian™ Tire Changer P/N 5900089 — Rev. A — March 2019...
- Page 60 Part Number Description Hexagon socket cap screws Spring washer Inner hexagon cylinder end set screw Hexagon thin nut Upper left sliding block assembly Slide block 5328471 Slide front and rear Skid adjustment plate Hexagon thin nut Inner hexagon cylinder end set screw Hexagon socket head screw Sliding front cover 5328472...
- Page 61 Hexagon socket head screw Coil spring 5328455 Hexagon thin nut Hexagon socket set screw Square bar locking plate Inner hexagon cylinder end set screw Hexagon thin nut Flat washer Spring washer Hexagon socket cap screws Fixed rack on side cover Flat washer Hexagon socket cap screws Front cutting cylinder shaft...
- Page 62 Part Number Description Transmission assembly 5328476 Reducer casing roof cover Oil plug Hexagon socket cap screws General flat key Oil plug Annular ball bearing Worm General flat key Worm pad Hexagon socket cap screws Spring washer Large belt Oil seal Reducer casing lower cover Hex nut Deep groove ball bearing...
- Page 63 Part Number Description Acorn nut Solid block stick Pedal cover Hexagon socket half-cap screws A-Type circlip for shaft Pedal spindle Pedal plate Two sides spacer sleeve Interval spacer sleeve Control panel assembly Foot pedal torsion spring 5328459 Torsional spring block shaft Non-metal insert hexagonal lock nut Hexagon socket head bolt Hex nut...
- Page 64 Hexagon socket head bolt Flat washer Switch fork Spring washer Cross recessed pan head tapping screws Switch to pull board Non-metal insert hexagonal lock nut Hexagon socket head bolt Non-metal insert hexagonal lock nut Small valve pull plate Small air valve joint Spring washer Elastic cylindrical pin Hexagon nut...
- Page 65 Part Number Description Acorn nut Pedal block stick Pedal buckle cover Hexagon socket head screw A-type circlip for shaft Pedal spindle Pedal plate Two sides spacer sleeve Pedal spacer sleeve Control panel assemblies Hexagon socket head cap screws Spring washer Hex nut Cross recessed pan head tapping screws Spring washer...
- Page 66 Wheel lift air valve, up/down 5328479 Valve adjusting pad O-ring Small air valve skeleton Cross recessed countersunk head screw Small valve end cover Equal tee Small air valve Part Number Description Lock nut elbow 1-type non-metal insert hexagonal lock nut Rear cover Double armed bolt Aluminum cylinder...
- Page 67 Part Number Description Lock nut elbow 1-type non-metal insert hexagonal lock nut Rear cover Double armed bolt Aluminum cylinder 1-type non-metal insert hexagonal lock nut Flat washer Rubber piston Piston rod O-ring Bronze belt Y-ring-dustproof Front cover Nether shovel cylinder Lower bead breaker cylinder 5328484 RV1 Wheel Guardian™...
- Page 68 Part Number Description 1051 Hexagon bolt full thread 1052 Hexagon thin nut 1053 Turnbuckle 1054 Hexagon socket cap screws 1055 Big washer 1056 Flip frame assembly 1057 Pinch roller 1058 Big washer 1059 Hexagon socket cap screws 1060 Elastic washer 1061 Lock nut connection 1062...
- Page 69 1075 Hexagon socket cap screws 1076 Circlip for shaft 1077 Cylinder fixed shaft 1078 Hexagon socket cap screws 1079 Circlip for shaft 1080 Big washer 1081 Tire pressure roller 1082 Hexagon socket cap screws 1083 Lifting block welded parts 1084 Cylinder piston rod 1085 Double end connection bolt...
- Page 70 Part Number Description Hexagon socket cap screws 1101 Elastic washer 1102 Rear synchronous plate 1103 Upper arm welding assembly 1104 Round nut 1105 Hexagon socket set screw 1106 Oil bearing 1107 Locating pin 1108 Mount demount retaining spring 1109 5328468 Tool disc gasket 1110 Upper tool disc...
- Page 71 Part Number Description 1201 Lock air cylinder assembly 1202 Lock elbow 1203 Valve foundation support 1204 Y-ring 1205 Lock air valve piston RV1 Wheel Guardian™ Tire Changer P/N 5900089 — Rev. A — March 2019...
- Page 72 Part Number Description 1301 Swing arm shaft 1302 Tower crash pad 1303 Swing arm block assembly 1304 Acorn nut 1305 Tapered roller bearing 1306 Stop collar 1307 Torsional spring 1308 Flat washer 1309 Non-metal insert hexagonal lock nut 1310 Swing arm assembly 1311 Lock nut elbow 1312...
- Page 73 1335 O-ring 1336 O-ring 1337 Cylinder body 1338 Oil bearing 1339 O-ring 1340 Ptfe gasket 1341 O-ring 1342 Cylinder lower cover 1343 Adjustable Elbow 1344 Hexagon socket cap screws (galvanize) 1345 Rubber cushion 1346 Cylinder piston rod 1347 Oil bearing 1348 Head shaft 1349...
- Page 74 1412 Y-type(dust proof) 1413 Front cover 1414 Front cut cylinder 1415 Front cut cylinder assembly Part Number Description 1501 Motor 1502 Small cylinder 1503 Flat washer 1504 Motor underplate welded parts 1505 Hexagon nut 1506 Hexagon head bolt 1507 Hexagon socket head screw 1508 Triangular belt 1509...
- Page 75 Part Number Description 1601 Gas meter support 1602 Atmolysis head skeleton 1603 Vent valve 1604 Pressure gauge with back connection 1605 Meter box cover 1606 Plug 1/8 inch 1607 Cross socket head screw 1608 Hexagon socket head screw 1609 Lock nut elbow 1610 Air inflation indicator RV1 Wheel Guardian™...
- Page 76 Part Number Description 1701 Bead breaker lower cable assembly 5328451 1702 Bead breaker lower cable assembly 5328451 1703 Bead breaker lower cable assembly 5328451 1704 Synchronizing cable wheel 5328487 1705 Synchronizing wheel bushing 5328475 1706 Bead breaker lower cable assembly 5328451 1707 Bead breaker lower cable assembly...
- Page 77 1734 Flat washer 1735 Elastic washer 1736 Hex nut 1737 T handle 5328488 1738 Hex nut 1739 Hex nut 1740 Hexagon socket cap screws 1741 Reducer connection 1742 Lock nut tee 1743 Lock nut tee 1744 Three position five-way valve 1745 Adjustable elbow 1746...
- Page 78 Part Number Description 1901 Hexagon socket cap screws 1902 Elastic washer 1903 Flat washer 1904 Laser support welding pieces 1905 Hexagon socket cap screws 1906 Flat washer 1907 Battery cover 1908 Cross recessed countersunk head screw 1909 Cell box 1910 Hexagon socket set screw 1911 Hex nut...
-
Page 79: Maintenance Log
Maintenance Log RV1 Wheel Guardian™ Tire Changer P/N 5900089 — Rev. A — March 2019... - Page 80 1645 Lemonwood Drive Santa Paula, CA 93060 USA © 2019 BendPak Inc. All rights reserved. bendpak.com...
Need help?
Do you have a question about the Wheel Guardian RV1 and is the answer not in the manual?
Questions and answers