RIDGID 1233 Manual
Threading machine
Hide thumbs
Also See for 1233:
- Parts manual (9 pages) ,
- Manual (87 pages) ,
- Operating instructions (4 pages)

Related Manuals for RIDGID 1233


Summary of Contents for RIDGID 1233
- Page 1 Threading Machines Manual 300 Compact/1233 300 Compact 1233 • Français – 21 Türkçe – 67 • Castellano – 43 Русский – 89 • •...
-
Page 2: Table Of Contents
300 Compact/1233 Threading Machines Table of Contents Recording Form For Machine Serial Number..........................1 Safety Symbols ....................................2 General Power Tool Safety Warnings Work Area Safety ....................................2 Electrical Safety ....................................2 Personal Safety ....................................3 Tool Use And Care..................................3 Service ......................................4 Specific Safety Information Safety Instructions for Transportable Threading Machines ......................4... -
Page 3: Recording Form For Machine Serial Number
Failure to understand and follow the contents of 300 Compact/1233 Threading Machines this manual may result in Record Serial Number below and retain product serial number which is located on name plate. electrical shock, fire and/or serious personal injury. -
Page 4: Safety Symbols
300 Compact/1233 Threading Machines Safety Symbols In this operator’s manual and on the product, safety symbols and signal words are used to communicate important safe- ty information. This section is provided to improve understanding of these signal words and symbols. -
Page 5: Personal Safety
300 Compact/1233 Threading Machines fied plugs and matching outlets will reduce risk of elec- jewelry. Keep your hair, and clothing away from tric shock. moving parts. Loose clothes, jewelry, or long hair can be caught in moving parts. • Avoid body contact with earthed or grounded sur- faces such as pipes, radiators, ranges and refrig- •... -
Page 6: Service
® Model 300 a complete stop before touching the pipe. This Compact and 1233 Threading Machines can be used to practice will reduce the chance of entanglement in thread 2 " – 4" pipe, short or close nipples or for roll rotating parts. -
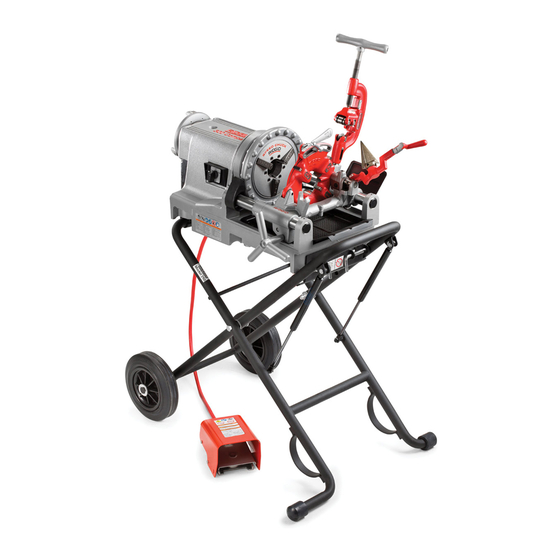
Page 7: Specifications
Chip Tray Label Tray Switch Label Switch Handwheel Hold Figure 2 – 1233 Threading Machine Figure 1 – 300 Compact Threading Machine Specifications Parameter 300 Compact Threading Machine 1233 Threading Machine Pipe Threading Capacity to 2 inch (3 to 50 mm) -
Page 8: Standard Equipment
REV/OFF/FWD switch should be OFF and machine unplugged before assembly. Use proper lifting techniques. The RIDGID 300 Com - pact weighs 141 lb (64 kg) and the 1233 weighs 165 lb (75 kg). Figure 4 – Threading Machine Mounted On Pipe Legs... -
Page 9: Pre-Operation Inspection
300 Compact/1233 Threading Machines Pre-Operation Inspection Machine and Work Area Set-Up WARNING WARNING Before each use, inspect your threading machine Set up the Threading Machine and the work area according to these procedures to reduce the risk of and correct any problems to reduce the risk of... -
Page 10: Die Head Set-Up And Use
• Is in good condition. The 300 Compact and 1233 Threading Machines can • Has a three-prong plug like on the threading be used with a variety of RIDGID Die Heads to cut pipe machine. and bolt threads. Information is included here for Quick- •... -
Page 11: Removing/Installing Die Head
Line are recommended for use on 52 rpm machines. Move washer to end of slot (Figure 8). See the RIDGID catalog for dies available for your die Indicator head. 5. Remove dies from the Line die head. -
Page 12: Opening The Die Head At The End Of The Thread
300 Compact/1233 Threading Machines Self-Opening Die Heads 7. Move size bar so in dex line on lock screw is a - Indicator The Model 815A Die Heads are self-opening die heads. Indicator ligned with desired size Line Line " through 2" pipe sizes, a trigger can be used to open mark. -
Page 13: Receding Self-Opening Die Heads
Receding Self-Opening Die Heads 1. Loosen the adjustment nut for the desired pipe size. The Model 728 and 928 receding self-opening die heads are used on 1233 threading machine for 2 " and 3" pipe 2. When setting for new dies, sizes. -
Page 14: Preparing The Die Head To Thread
300 Compact/1233 Threading Machines arm or other body parts with enough force to crush Preparing the Die Head to Thread or break bones or cause striking or other injuries. Lower the die head down into the threading position. One person must control both the work process Firmly push on adjusting slide to set/close the die head and the foot switch. -
Page 15: Cutting
300 Compact/1233 Threading Machines Cutting Use repeated and forceful counterclockwise spins of the handwheel to secure the pipe in front chuck. 1. Open cutter by turning the feed screw counterclock- wise. Lower the cutter into cutting position over the 6. Assume a proper operating position to help maintain pipe. -
Page 16: Threading Pipe
300 Compact/1233 Threading Machines 4. With both hands, grasp the carriage handwheel. 5. Turn carriage handwheel to move the reamer to the end of the pipe. Apply slight pressure to the hand- 5. Depress the foot switch. wheel to feed the reamer into pipe to remove the burr 6. -
Page 17: Removing Pipe From The Machine
300 Compact/1233 Threading Machines Pump In (REV) Holes Holes From Filter Figure 26 – Retaining LH Die Head in Place Pump Out (FWD) To Carriage Removing Pipe from the Machine 1. With the REV/OFF/FWD switch in the OFF position and the pipe stationary, use repeated and forceful clockwise spins of the handwheel to loosen the pipe in the chuck. -
Page 18: Preparing Machine For Transport
(Extreme Pressure) grease through the grease fittings in 4. Coil up the power cord and foot switch cord. the lubrication points. 1233: Fill the lubrication points with lubricating oil. Press the ball in the lubrication point to allow the oil to reach bearings. -
Page 19: Replacing Cutter Wheel
Follow all local laws and regulations when disposing of oil. Clean build up Check motor brushes every 6 months. Replace when from the bottom of the reservoir. Use RIDGID Thread Cut - worn to less than ". -
Page 20: Optional Equipment
815A 1/8" - 2" BSPT, Self-Opening, RH EUR. RT 97070 811A 1/8" - 2" BSPT, Quick-Opening, RH Die Head Center or returned to the factory. Only use RIDGID service 97045 1/4" - 1" Bolt, Quick-Opening, RH/LH Die Head Parts. 97050 "... -
Page 21: Troubleshooting
300 Compact/1233 Threading Machines Troubleshooting PROBLEM POSSIBLE REASONS SOLUTION Torn threads. Damaged, chipped or worn out dies. Replace dies. Incorrect cutting oil. Only use RIDGID ® Thread Cutting Oil. Insufficient cutting oil. Check oil flow rate and adjust as needed. - Page 22 300 Compact/1233 Threading Machines...
Need help?
Do you have a question about the 1233 and is the answer not in the manual?
Questions and answers