Table of Contents
Advertisement
Quick Links
This manual is intended to be used as part of an employee training program as required by OSHA.
WARNING:
This product is part of an emergency rescue system. The user must follow manufacturer's instructions for each
part of the system. These instructions must be provided to the user of this equipment. The user must read and understand
these instructions before using this equipment. Manufacturer's instructions must be followed for proper use and maintenance
of this equipment. Alterations or misuse of this equipment, or failure to follow instructions, may result in serious injury or
death.
IMPORTANT:
If you have questions on the use, care, or suitability of this equipment for your application, contact 3M Fall
Protection.
IMPORTANT:
Record the product identification information from the ID label in the inspection and maintenance log in
Section 9 of this manual.
DESCRIPTION:
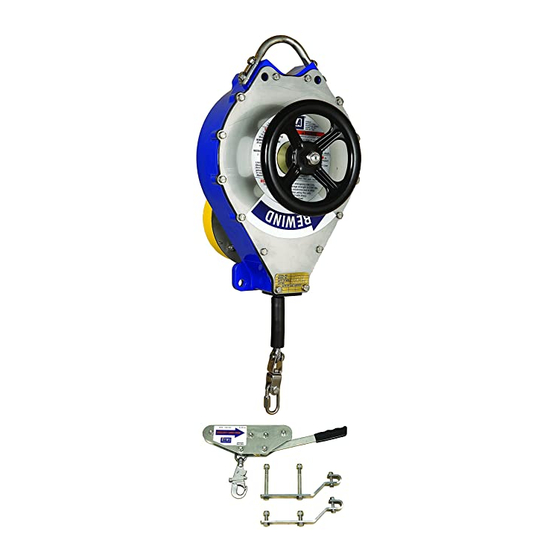
The Rollgliss™ High Speed 200 foot Emergency Descent Devices with Auto-Retract are comprised of a wire rope lifeline housed
in a cast aluminum enclosure. An internal brake controls sloped descent speed of a single user attached to a manual brake
trolley at the end of the lifeline.
Figure 1 - 200 Ft (61m) Emergency Sloped Descent Device Models
Descent Device Model
Galvanized
3303015
Stainless Steel
3303016
Form: 5903739 Rev: D
USER INSTRUCTION MANUAl
ROllGlISS
EMERGENCY DESCENT DEVICE
®
Rollgliss
200 Ft Emergency Sloped Descent Device
High Speed with Auto-Retract
Model Numbers: See Figure 1
Brake Trolley Model
With Yellow Zinc Plated Snap
Hook, included with 3303015.
With Stainless Steel Snap Hook,
included with 3303016.
®
2103144
2103145
© 3M 2017
Advertisement
Table of Contents

Summary of Contents for 3M Rollgliss
- Page 1 DESCRIPTION: The Rollgliss™ High Speed 200 foot Emergency Descent Devices with Auto-Retract are comprised of a wire rope lifeline housed in a cast aluminum enclosure. An internal brake controls sloped descent speed of a single user attached to a manual brake trolley at the end of the lifeline.
-
Page 2: Safety Information
Avoid surfaces and objects that can damage the user or equipment. Ensure there is adequate fall clearance when working at height. Never modify or alter your fall protection equipment. Only 3M or parties authorized in writing by 3M may make repairs to the equipment. -
Page 3: System Requirements
1.0 APPLICATION PURPOSE: The Rollgliss™ Emergency Descent Device is intended for emergency sloped descent only. It controls the descent speed of one user, wearing a full Body harness, attached to the manual brake trolley on the end of the Emergency Descent Device’s Lifeline. -
Page 4: Installation And Use
TEST THE SYSTEM: 3M Fall Protection recommends performing a test descent using a 120 lb (55 kg) test weight. The descent speed should be uniform and allow the user to reach the landing area safely. The descent speed should be approximately as stated in Section 1.2.B. - Page 5 INSTALL GUIDE CABLE SUSPENSION BARS: See Figure 3. Step 1. Remove four 1/4-20 x 1-1/4 Bolts. Step 2. Position Suspension Bars. Step 3. Install four 1/4-20 x 1-1/2 Bolts included in kit, torque to 60 in lbs. Figure 3 - Install Guide Cable Suspension Bars CONNECT THE EMERGENCY DESCENT DEvICE TO AN ANCHORAGE: Figure 4 illustrates connection of the Emergency Descent Device to an anchorage.
- Page 6 Figure 5 - Connect the Emergency Descent Device to a Guide Cable INSTALL DESCENDER SWIvEL AND GUIDE CABLE IN BRAKE TROLLEY: See Figure 6. Step 1. Remove two Brake Trolley lower bolts, nuts and snap hook. Step 2. Remove the Brake Handle and enclose the Guide Cable inside the Brake Trolley . Step 3.
- Page 7 Figure 7 - Connect to a CONNECT TO YOUR BODY SUPPORT: A full body harness or other means of supporting the user must be used with the Full Body Harness Emergency Descent Device device. Do not use a body belt with the Emergency Descent Device.
-
Page 8: Specifications
NOTE: Only 3M Fall Protection or parties authorized in writing may make repairs to this equipment. STORAGE AND TRANSPORT: Store and transport the Emergency Descent Device in a cool, dry, clean environment, out of direct sunlight. Avoid areas where chemical or organic vapors are present. Thoroughly inspect the Emergency Descent Device after extended storage. - Page 9 8.0 LABELING The following labels should be securely attached to the Emergency Descent Device and should be fully legible: www.capitalsafety.com USA: (800) 328-6146 9510230 Rev. A...
-
Page 10: Inspection And Maintenance Log
9.0 INSPECTION AND MAINTENANCE LOG SERIAL NUMBER: MODEL NUMBER: DATE PURCHASED: DATE OF FIRST USE: INSPECTION DATE INSPECTION ITEMS CORRECTIvE ACTION MAINTENANCE NOTED PERFORMED Approved By: Approved By: Approved By: Approved By: Approved By: Approved By: Approved By: Approved By: Approved By: Approved By: Approved By:... - Page 11 INSPECTION DATE INSPECTION ITEMS CORRECTIvE ACTION MAINTENANCE NOTED PERFORMED Approved By: Approved By: Approved By: Approved By: Approved By: Approved By: Approved By: Approved By: Approved By: Approved By: Approved By: Approved By: Approved By: Approved By: Approved By: Approved By: Approved By: Approved By: Approved By:...
- Page 12 LIMITED REMEDY: Upon written notice to 3M, 3M will repair or replace any product determined by 3M to have a factory defect in workmanship or materials. 3M reserves the right to require product be returned to its facility for evaluation of warranty claims. This warranty does not cover product damage due to wear, abuse, misuse, damage in transit, failure to maintain the product or other damage beyond 3M’s control.


Need help?
Do you have a question about the Rollgliss and is the answer not in the manual?
Questions and answers