Table of Contents
Advertisement
Available languages
Available languages
Advertisement
Table of Contents

Subscribe to Our Youtube Channel
Related Manuals for BIOS WEATHER WEATHER CUBE


Summary of Contents for BIOS WEATHER WEATHER CUBE
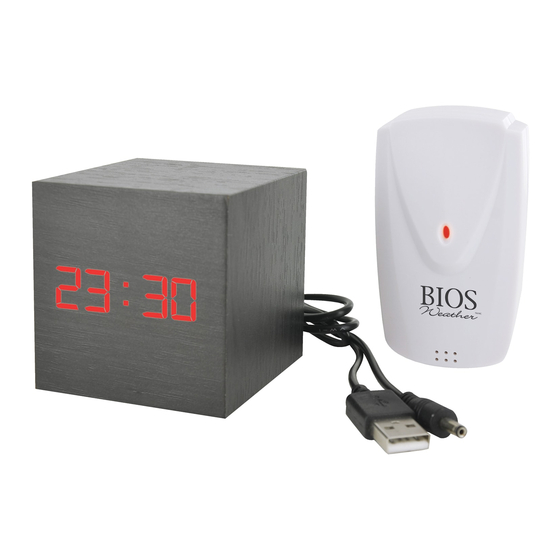
- Page 1 Wireless WEATHER CUBE 387BC Year Instruction Manual...
- Page 2 PM Indicator 9 00 BACK OF UNIT Battery compartment 12 / 24 Hour Time USB adapter port DOWN DOWN button Date SET button UP button Indoor Temperature Transmission Battery Indication Compartment FRONT OF BACK OF SENSOR SENSOR Outdoor Temperature...
- Page 3 1.0 Care of Device • Avoid exposing units to extreme temperatures or severe shock. • Avoid contact with any corrosive materials such as perfume, alcohol or cleaning agents. • Do not subject the units to excessive force, shock, dust, temperature or humidity. Any of these conditions may shorten the life of the units.
- Page 4 2.0 Setup Procedure 1. Insert the USB adapter into the Weather Cube, you can then plug the USB adapter into a USB port. Or you can power the Weather Cube with 3 x AAA batteries. 2. The Weather Cube will go through a sequence of numbers and then will beep once and display the TIME.
- Page 5 4.0 Setting the Date 1. When the DATE is displayed on the Weather Cube, press and hold the SET button. NOTE: If the Weather Cube is not displaying the DATE, press the SET button to go through the different screens until DATE appears.
- Page 6 Alarm will activate on the weekend on the weekend 6. Once the Weather Cube is in normal mode, the TIME screen will display differently, to indicate that an alarm is ON. Alarm ON indicator 7. When the alarm sounds, press any button to turn it off. The alarm will sound for 1 minute.
- Page 7 3. The transmission indication LED will flash on the outdoor sensor indicating that the signal has been sent to the Weather Cube. Once the signal is received, the dashes will change to the current outdoor temperature and the Weather Cube will go to normal mode.
- Page 8 4. Neighbours using electrical devices operating on the 433MHz signal frequency can also cause interference. 5. Signals from other household devices, such as door bells and home security systems, may temporarily interfere with the units and cause reception failure. The transmission and reception of temperature reading will resume once the interference has stopped.
- Page 9 OUTDOOR TEMPERATURE (7 seconds). 9.0 Power Saving Mode In power saving mode you can have the Weather Cube turn ON for 10 seconds and than turn OFF, or permanently stay ON. 1. To turn the power saving mode ON, in normal mode press the DOWN button, “...
- Page 10 Full Brightness 11.0 Built in Battery There is 1 x CR2032 battery built into the Weather Cube. The battery keeps the time running when the Power Saving Mode is ON (see section 9.0). If the time doesn’t work, replace the built-in battery located behind the battery compartment.
- Page 11 -30°C to 60°C / -22°F to 140°F Outdoor Sensor When temperature is above 60°C (140°F) screen will display HH. When temperature is below -30°C (-22°F) screen will display LL. Accuracy +/- 2°C / 4°F Power Source 3 x AAA batteries 1.5V (not included), 1 x CR2032 (built-in), or USB Monitor Adapter (included) Outdoor...
- Page 12 Thermor Ltd. 16975 Leslie Street Newmarket, ON L3Y 9A1 1-800-387-8520 14.0 FCC and IC Statement Operation is subject to the following two conditions: (1) this device may not cause interference, and (2) this device must accept any interference, including interference that may cause undesired operation of the device.
- Page 13 • Reorient or relocate the receiving antenna. • Increase the separation between the equipment and receiver. • Connect the equipment into an outlet on a circuit different from that to which the receiver is connected. • Consult the dealer or an experienced radio/TV technician for help. This device complies with Industry Canada licence-exempt RSS standard(s).
- Page 14 Sans fil CUBE MÉTÉO 387BC Year Mode d’emploi...
- Page 15 Indicateur P.M. 9 00 VUE ARRIÈRE DE L’INSTRUMENT Compartiment de pile Format de l’horloge 12/24 heures Port de l’adaptateur USB DOWN Bouton Bas (DOWN) Date Bouton réglage SET Bouton Haut (UP) Température intérieure Voyant Compartiment DEL de de pile transmission VUE AVANT VUE ARRIÈRE DU CAPTEUR...
- Page 16 1.0 Entretien de l’instrument • Évitez d’exposer les unités de l’instrument à des températures extrêmes ou à des chocs violents. • Évitez le contact avec des matières corrosives comme du parfum, de l’alcool ou des produits d’entretien. • Ne soumettez pas les unités de l’instrument à une force excessive, choc, poussière, température ou humidité.
- Page 17 2.0 Procédure d’installation 1. Introduisez l’adaptateur USB au cube météo; vous pouvez ensuite brancher l’adaptateur USB à un port USB ou bien vous pouvez alimenter le cube météo avec 3 piles AAA. 2. Le cube météo effectuera une séquence de chiffres, émettra un bip et affichera l’HEURE. 3.
- Page 18 4.0 Réglage de la date 1. Lorsque la DATE s’affiche sur le cube météo, appuyez et tenez enfoncé le bouton SET. NOTE : Si le cube météo n’affiche pas la DATE, appuyez sur le bouton SET pour passer les différents écrans jusqu’à ce que la DATE s’affiche. 2.
- Page 19 bouton SET. Suivez les mêmes étapes pour régler les chiffres des minutes. 4. Suivez les mêmes étapes décrites ci-dessus pour régler l’alarme 2 et l’alarme 3. 5. Une fois les alarmes réglées “ ” clignotera. Si vous ne voulez pas que les alarmes s’activent le samedi et le dimanche, appuyez sur le bouton UP ou DOWN jusqu’à...
- Page 20 6.0 Température intérieure 1. Quand la TEMPÉRATURE INTÉRIEURE s’affiche sur le cube météo, appuyez et tenez enfoncé le bouton DOWN. NOTE : Si le cube météo n’affiche pas la TEMPÉRATURE INTÉRIEURE, appuyez sur le bouton SET pour passer les différents écrans jusqu’à ce que la TEMPÉRATURE INTÉRIEURE s’affiche.
- Page 21 2. Évitez de déposer le moniteur sur ou à proximité immédiate de châssis de fenêtres métalliques. 3. L’utilisation d’autres produits électriques tels que casques d’écoute ou haut-parleurs fonctionnant sur la même fréquence (433 MHz) peuvent empêcher la transmission et la réception normales du signal.
- Page 22 sur le bouton UP jusqu’à ce que “ ” s’affiche. Appuyez de nouveau sur le bouton SET pour confirmer. Séquence ACTIVÉE --- Séquence DÉSACTIVÉE HEURE (10 secondes), DATE (2 secondes) TEMPÉRATURE INTÉRIEURE (7 secondes) TEMPÉRATURE EXTÉRIEURE (7 secondes) 9.0 Mode d’économie d’énergie Dans le mode d’économie d’énergie, vous avez l’option d’avoir le cube météo ALLUMÉ...
- Page 23 Mode d’économie d’énergie Mode d’économie d’énergie activé (ON---) désactivé (OFF---) Le cube météo s’allumera pendant 10 secondes L’afficheur demeurera activé puis s’éteindra. Pour activer le cube météo, de façon permanente. taper dans vos mains, faire du bruit ou toucher la tête du cube. 10.0 LUMINOSITÉ...
- Page 24 12.0 Spécifications du produit Plage de mesure de la température 0 °C à 50 °C / 32 °F à 122 °F Cube météo Si la température est supérieure à 50 °C (122 °F), l’écran affichera HH. Si la température est inférieure à 0 °C (32 °F), l’écran affichera LL. -30 °C à...
- Page 25 13.0 Garantie limitée d’un an Si ce produit se révèle défectueux en raison de vices de matériaux ou de fabrication dans l’année qui suit la date d’achat, veuillez le renvoyer à l’adresse spécifiée ci-dessous. Le produit sera réparé ou remplacé, sans frais, après réception du produit port payé et d’un montant de 5,00 $ pour couvrir les frais de manutention, emballage et port de retour.
- Page 26 NOTE : Cet équipement a été testé et rencontre les limites de la Classe B des appareils numériques, conformément à la Clause 15 des règlements de la FCC. Ces limites ont été établies pour fournir une protection raisonnable contre une interférence nuisible dans une installation résidentielle.
Need help?
Do you have a question about the WEATHER CUBE and is the answer not in the manual?
Questions and answers