Table of Contents
Advertisement
Quick Links
Advertisement
Table of Contents

Related Manuals for Kingston Technology DataTraveler Bolt Duo


Summary of Contents for Kingston Technology DataTraveler Bolt Duo
- Page 1 User Manual DataTraveler Bolt...
-
Page 2: Table Of Contents
Live the Moment™ TABLE OF CONTENTS INTRODUCTION BOLT OVERVIEW INCLUDED IN THE BOX SPECIFICATIONS REQUIREMENTS GENERAL FILE FORMAT SUPPORT INSTALLING THE BOLT APPLICATION APPLICATION OVERVIEW TRANSFER OVERVIEW Photos Videos Favourites Select CAPTURE OVERVIEW Photo Video VIEW Share sheet SETTINGS OVERVIEW Automatic transfer App passcode lock Camera options... -
Page 3: Introduction
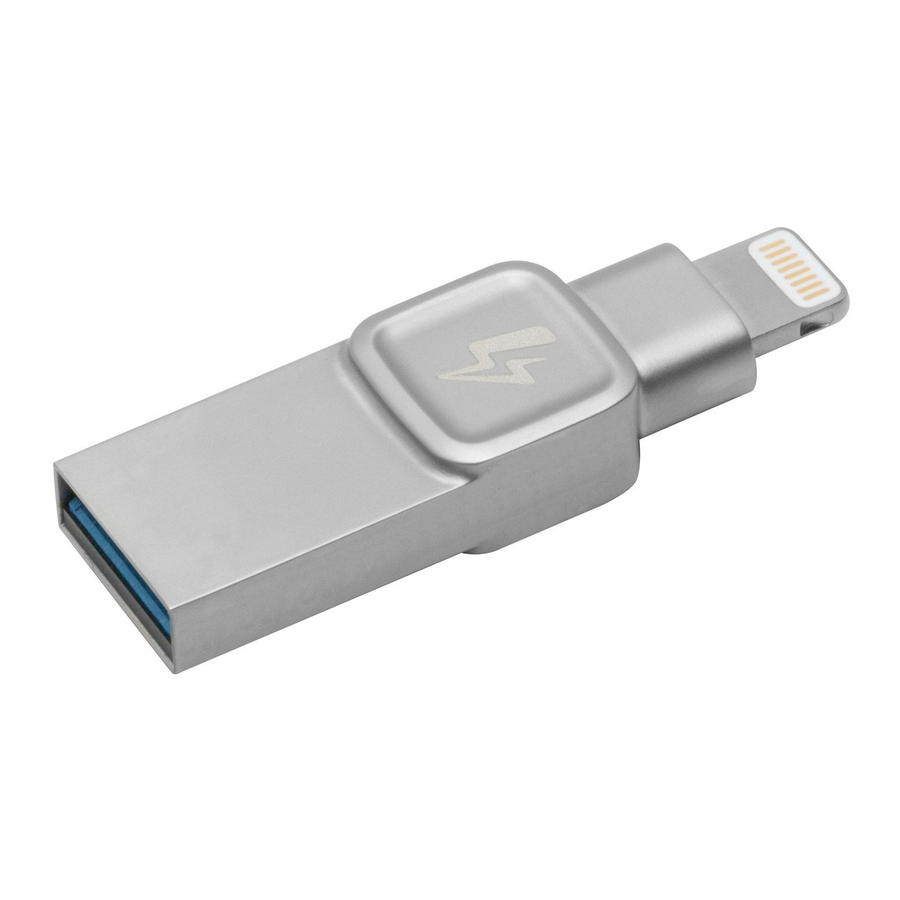
Introduction The Bolt is an easy way to extend storage space to your iPhone® or iPad®. Use the Bolt flash drive along with the Bolt app to back up your camera roll or capture photos and videos directly to the Bolt flash drive. The Lightning connector works with most phone cases and the USB 3.1 Gen 1 connector plugs into your Mac computer or PC, making file transfers quick and easy. -
Page 4: Included In The Box
Included in the box 1 – Bolt flash drive 1 – Rubber case with key ring Specifications • USB 3.1 Type A + MFi Certified Lightning connector. • USB 3.1 Gen 1 speeds (120MB/s read and 19MB/s write). • Capacities 32GB, 64GB, 128GB •... -
Page 5: Installing The Bolt Application
Installing the Bolt application To access the Bolt flash drive, you must first install the free Bolt app to your iOS device from the App Store (Internet access required). The Bolt app is free and allows you to access the Bolt flash drive to transfer your photos and videos. -
Page 6: Application Overview
Application overview Figure 2.1 - Overview Settings – provides access to various app configuration options, including the automatic transfer to Bolt flash drive feature. Capacity meters – shows the available capacity for your iOS device and Bolt drive. Transfer – allows you to transfer photos and/or videos to the Bolt drive. Selecting Transfer will reveal additional transfer options for your photos and videos (see figure 3.1). -
Page 7: Transfer Overview
Transfer overview The Bolt app makes it simple for you to transfer all photos and videos, only photos, only videos, the Favourites album, or you can select specific photo(s) and/or video(s) to transfer. Figure 3.1 – Transfer overview iOS device and Bolt flash drive capacity meter – keep track of the capacity of your iOS device and Bolt flash drive to ensure you have enough space to transfer your selected items. -
Page 8: All
Select – choose the photos and/or videos that you want to transfer from your iOS device to the Bolt flash drive. Transfer all photos and videos from the iOS device to the Bolt. To transfer all photos and videos: Press Transfer (see figure 4.1). Press All (see figure 4.2). -
Page 9: Photos
Photos To transfer only photos (all photos) on the iOS device to the Bolt: Press Transfer. Press Photos Figure 5.1 – Transfer 2 Figure 5.2 – Transfer photos Choose whether to delete or keep the original items on your iOS device or select Cancel (see figure 4.3). -
Page 10: Favourites
Figure 5.3 – Transfer 3 Figure 5.4 – Transfer videos Choose whether to delete or keep the original items on your iOS device or select Cancel (see figure 4.3). That’s it! Wait or continue using your device while the items are being transferred. To cancel the transfer, press the X at the top right of the screen and select Undo to revert the transfer (see figure 4.4). -
Page 11: Select
Select To select specific photo(s) and/or video(s) to transfer to the Bolt flash drive: Press Transfer. Press Select. Figure 7.1 – Transfer 5 Figure 7.2 – Transfer selected Select the photo(s) and/or video(s) to transfer. Press ‘Transfer’ located at the bottom of the screen, see figure 7.2. - Page 12 Figure 7.3 – Select photos Figure 7.4 – Selected photos Choose whether to delete or keep the original items on your iOS device or select Cancel (see figure 4.3). That’s it! Wait or continue using your device while the items are being transferred. To cancel the transfer, press the X at the top right of the screen and select Undo to revert the transfer (see figure 4.4).
-
Page 13: Capture Overview
Capture overview Save time and storage space by capturing photos and videos directly to the Bolt. The Bolt app will create a folder on the Bolt flash drive where it will save the pictures and videos captured using the app. Figure 8.1 –... -
Page 14: Photo
Photo To take a picture directly to the Bolt flash drive: Press Capture. Make sure that Photo (default) is selected and press the shutter button to take the picture. Swipe left or press square to take a squared photo. Press the front-facing camera icon on the bottom right of the screen to take a selfie. Figure 9.1 - Capture Figure 9.2 –... -
Page 15: View
View View photos and videos saved on the Bolt. The Bolt app will create folders when you use the capture and transfer features. When you use the transfer option, it will name the folder after the name of your iOS device;... -
Page 16: Share Sheet
Share sheet In the View option, you can use the share sheet to upload your pictures/videos to your favourite social media accounts, e-mail your pictures/videos or save them to your iOS device to access later, along with other options. You can select an album (see figure 11.2) to view the pictures/videos (see figure 12.1). Figure 11.3 –... -
Page 17: Settings Overview
Delete – delete your items saved on your Bolt flash drive (see figure 11.4). Settings overview Using the Bolt app, you can enable automatic transfer, lock the app with a passcode and customise photo and video, along with other options. Figure 12.1 –... -
Page 18: Automatic Transfer
Format Drive – formats your Bolt flash drive. Formatting your drive will delete all data on your Bolt flash drive. If you have not backed up your Bolt drive, you should do so before continuing with a format. Contact Support – the Bolt app makes it easy to send an e-mail directly to our Technical Support team if you experience any issues with the product. -
Page 19: App Passcode Lock
Figure 13.3 – Select auto-backup Figure 13.4 – Enable Delete Originals App passcode lock Keep the app locked with a numeric passcode to block any unauthorised use of the Bolt app. App passcode lock only prevents access to the Bolt app. If the Bolt flash drive is used in another iOS device, the app passcode lock must be enabled again. -
Page 20: Camera Options
Figure 14.3 – Enter passcode Figure 14.4 – Enable Touch ID Camera options The app has the following camera options: Show Grid – allows you compose the perfect picture or video. Record Video – select your favourite resolution to record your videos. The higher the resolution, the more capacity the video will use. -
Page 21: Format Drive
Format drive The Bolt app allows you to format the Bolt flash drive. Formatting your drive will delete all data on your Bolt flash drive. If you have not backed up your Bolt drive, you should do so before continuing with a format. To format: Press Settings. - Page 22 Figure 14.3 – Enter passcode Figure 14.4 – Enable Touch ID Camera options The app has the following camera options: Show Grid – allows you compose the perfect picture or video. Record Video – select your favourite resolution to record your videos. The higher the resolution, the more capacity the video will use.
- Page 23 Format drive The Bolt app allows you to format the Bolt flash drive. Formatting your drive will delete all data on your Bolt flash drive. If you have not backed up your Bolt drive, you should do so before continuing with a format. To format: Press Settings.
Need help?
Do you have a question about the DataTraveler Bolt Duo and is the answer not in the manual?
Questions and answers
I need the app for model number C – USB 3L – SR128 – EN, serial number 0707944A987F5C64 I need to install the app on iPhone 12 mini. It is not available in the iPhone App Store.