Table of Contents
Advertisement
Quick Links
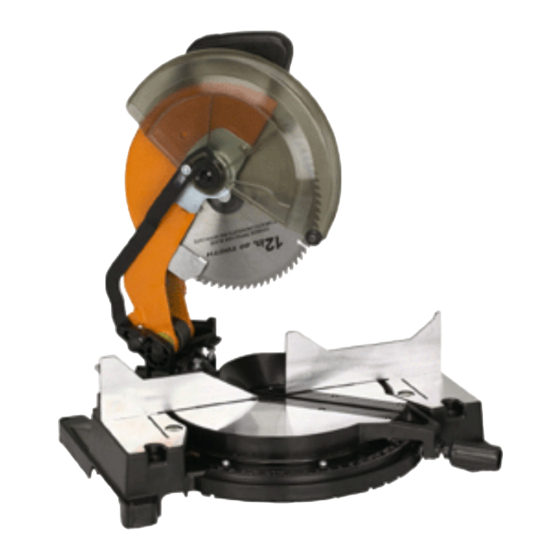
12 INCH COMPOUND
12 INCH COMPOUND
12 INCH COMPOUND
12 INCH COMPOUND
12 INCH COMPOUND
ASSEMBLY AND OPERATING INSTRUCTIONS
3491 Mission Oaks Blvd., Camarillo, CA 93011
Visit our Web site at http://www.harborfreight.com
Copyright © 2001 by Harbor Freight Tools
this manual or any artwork contained herein may be reproduced in any shape or
form without the express written consent of Harbor Freight Tools.
For technical questions and replacement parts, please call 1-800-444-3353
MITER SA
MITER SA W W W W W
MITER SA
MITER SA
MITER SA
42624
Revised 04/03
®
. All rights reserved. No portion of
Advertisement
Table of Contents

Subscribe to Our Youtube Channel
Related Manuals for Chicago Electric 42624


Summary of Contents for Chicago Electric 42624
- Page 1 MITER SA MITER SA W W W W W MITER SA MITER SA MITER SA 42624 ASSEMBLY AND OPERATING INSTRUCTIONS 3491 Mission Oaks Blvd., Camarillo, CA 93011 Visit our Web site at http://www.harborfreight.com ® Copyright © 2001 by Harbor Freight Tools .
-
Page 2: Specifications
Observe work area conditions. Do not use machines or power tools in damp or wet locations. Don’t expose to rain. Keep work area well lighted. Do not use electrically powered tools in the presence of flammable gases or liquids. SKU 42624 Page 2 REV 06/05... - Page 3 Do not use the tool if any switch does not turn On and Off properly. SKU 42624 Page 3...
- Page 4 Keep hands away from moving saw blade. If the workpiece to be cut is less than 4 inches long, do not hold with your hand, use a clamp. Do not remove jammed or cutoff pieces until the saw blade has stopped and the Line Cord is unplugged. SKU 42624 Page 4...
- Page 5 Caution: The wood to be cut needs to be positioned under the center of the saw blade. If you are cutting a small workpiece, use a spacer block to move the workpiece to be cut so that the cut is lined up with the center of the saw blade. SKU 42624 Page 5...
-
Page 6: Getting To Know Your Saw
1). Gently release the downward pressure and allow the arm to rise to its full height. Use the Lock Down Pin when carrying the saw from one place to another. Always carry using the Carrying Handle or Hand Indentation on the base. SKU 42624 Page 6... -
Page 7: Bench Mounting
Installing a New Saw Blade Always use 12 inch saw blades with one inch arbor holes. The saw blade speed rating must be at least 4800 RPM. Refer to the following table for saw blade applications and types. REV 04/03 SKU 42624 Page 7... - Page 8 Place the Outer Clamp Washer over the arbor hole, then insert the Blade Screw. Tighten the screw (counterclockwise) using the Blade Wrench. 10. Hold the Guard Bracket down and firmly tighten the Guard Bracket Screw (Figure 3). Failure to do so will cause serious damage to the saw. SKU 42624 Page 8...
-
Page 9: Rear Lower Guard Adjustment
Hand Indentations on each side of the saw Base. Adjustments Miter Scale The Miter Saw comes fully and accurately adjusted from the factory. If readjustment is necessary due to shipping and handling, or any other reason, use the following steps to readjust. SKU 42624 Page 9... - Page 10 Observe the Pointer and Miter Scale through the viewing opening (See Figure 8). If the Pointer does not indicate exactly zero, use a screwdriver to gently pry it left or right as required. Once adjusted, tighten the Miter Clamp Knob. SKU 42624 Page 10 REV 04/03...
-
Page 11: Operation
Align the wood stock on the table, and flush against the Fence. Hold or clamp in place. Squeeze the Trigger Handle and slowly bring down the saw arm to complete the cut. Release the Trigger Handle and wait for the saw blade to stop turning before raising the saw arm. SKU 42624 Page 11... - Page 12 • Always make dry runs (without power) before finish cuts so that you can check the path of the saw blade. • Keep both feet firmly planted on the floor and maintain proper balance. REV 04/03 SKU 42624 Page 12...
- Page 13 Set the miter angle to the nearest whole degree desired by aligning the center mark in the vernier scale (See Figure 11), with the whole degree number etched in the miter scale. (Examine Figure 11 closely; the setting shown is 24 degrees right miter.) SKU 42624 Page 13...
- Page 14 Table. Set the miter angles as follows. Inside corner: (left side) A. Miter left 45 degrees B. Save left side of cut (right side) A. Miter right 45 degrees B. Save left side of cut SKU 42624 Page 14...
- Page 15 Caution: Never make any cut without firmly clamping down the workpiece. Aluminum Cutting -- Aluminum extrusions such as those used when making aluminum screen and storm windows can easily be cut with the miter saw. SKU 42624 Page 15 REV 04/03...
-
Page 16: Maintenance
Warning: Do not empty Dust Collection Bag around any sparks or flame. An explosion could occur. Periodically wipe down all metal parts with a clean cloth and a light oil. Never use solvents to clean plastic parts. All motor bearings are factory lubricated and do not require maintenance. SKU 42624 Page 16... -
Page 17: Parts List
Parts List NOTE: Some parts are listed and shown for illustration purposes only and are not available individually as replacement parts. SKU 42624 Page 17 REV 04/03... - Page 18 Assembly Drawing REV 04/03 SKU 42624 Page 18...
- Page 19 SHOULD BE UNDERTAKEN BY CERTIFIED AND LICENSED TECHNICIANS AND NOT BY THE BUYER. THE BUYER ASSUMES ALL RISK AND LIABILITY ARISING OUT OF HIS OR HER REPAIRS TO THE ORIGINAL PRODUCT OR REPLACEMENT PARTS THERETO, OR ARISING OUT OF HIS OR HER INSTALLATION OF REPLACEMENT PARTS THERETO. SKU 42624 Page 19...
Need help?
Do you have a question about the 42624 and is the answer not in the manual?
Questions and answers