Table of Contents
Advertisement
Quick Links
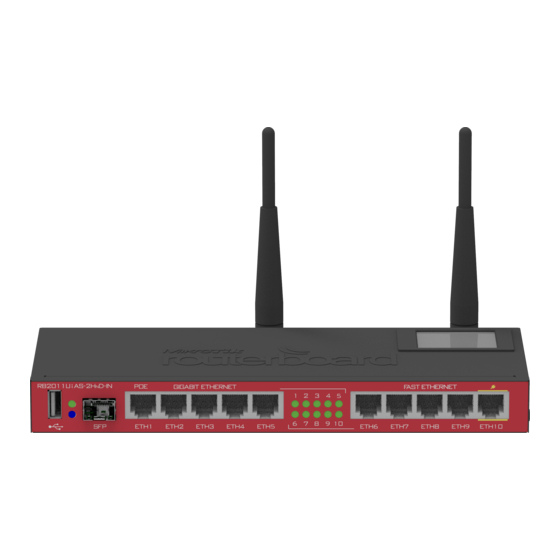
RouterBOARD 2011U series
Quick Setup Guide and Warranty Information
The RB2011U is a small form factor ethernet router with 5 Gigabit Ethernet ports and 5 Fast Ethernet ports and
an SFP cage. Port 10 supports passive PoE output to power other RouterBOARD products directly over Ethernet.
First use
The device comes preinstalled with RouterOS and is ready to use. RB2011 is compatible with RouterOS v6 and
newer, if your device comes preinstalled with an earlier version, please upgrade before using it.
The Ethernet ports 2-10 have a default IP address for connecting: 192.168.88.1 username is admin and there
is no password. Please connect with your web browser to this IP address and choose Webfig to configure it.
Ether1 is configured as a DHCP client, for connecting to your ISP. See this page for connection and
configuration guides:
Powering
The device accepts powering from either the power jack, or from the LAN1 Ethernet port:
Direct-input power jack (5.5mm outside and 2mm inside diameter, female, pin positive plug) accepts
8-30V DC (overvoltage protection starts at 30V).
Eth1 port accepts 8-30V DC input (at the board; higher voltage needed to compensate for power loss
on long cables) from non-standard (passive) Power over Ethernet injectors. The board does not work
with IEEE802.3af compliant 48V power injectors
Extension Slots and Ports
Five 10/100/1000 (Gigabit) Ethernet ports (Auto MDI/X)
Five 10/100 (Fast) Ethernet ports (Auto MDI/X)
Ether10 supports 500mA output power, ~2V below input voltage. Power out support auto-detect to pro-
tect non PoE devices.
One 8-30V DC power jack
SFP port for SFP module (module not included, works only with Gigabit modules)
(only on RB2011UAS-2HnD-IN) built in wireless AP (2GHz , 802.11b/g/n), with external antennas.
Reset button
The reset button is located on the back of the device, labeled RESET
Power output
The PoE on Ether5 outputs approximately 2V below input voltage, and supports up to 0.58A (So provided 24V
PSU will provide 22V/0.58A output to the Ether5 PoE port).
Loading the backup RouterBOOT loader: Hold this button before applying power, release after three sec-
onds since powering, to load backup Boot loader. This might be necessary if the device is not operation because
of a failed RouterBOOT upgrade. When you have started the device with the backup loader, you can either set
RouterOS to force backup loader in the RouterBOARD settings, or have a chance to reinstall the failed Router-
BOOT from a fwf file (total 3 seconds)
Resetting the RouterOS configuration: If you keep holding this button for 2 more seconds until LED
•
light starts flashing, release the button to reset RouterOS configuration (total 5 seconds)
Enabling CAPs mode: To connect this device to a wireless network managed by CAPsMAN, keep hold-
•
ing the button for 5 more seconds, LED turns solid, release now to turn on CAPs mode (total 10 sec-
onds)
See
www.routerboard.com
for more information. Contact
http://wiki.mikrotik.com/wiki/Category:Manual
support@mikrotik.com
for support questions.
07/09/15
Advertisement
Table of Contents

Related Manuals for MikroTik RouterBOARD 2011U Series


Summary of Contents for MikroTik RouterBOARD 2011U Series
-
Page 1: First Use
RouterBOARD 2011U series Quick Setup Guide and Warranty Information The RB2011U is a small form factor ethernet router with 5 Gigabit Ethernet ports and 5 Fast Ethernet ports and an SFP cage. Port 10 supports passive PoE output to power other RouterBOARD products directly over Ethernet. -
Page 2: Operating System Support
ONLY if you purchased your equipment directly from MikroTik in Latvia. 2. MikroTik does not offer repairs for products that are not covered by warranty. Exceptions can be made for: CCR1009-8G-1S, CCR1009-8G-1S-1S+, CCR1009-8G-1S-1S+PC, CCR1016-12G, CCR1016-12S-... -
Page 3: Ce Declaration Of Conformity
Connect the power adapter to turn on the device. Open 192.168.88.1 in your web browser, to configure it. More in- formation on http://wiki.mikrotik.com Инструкция: Свържете адаптера на захранване, за да включите устройството. Отворете 192.168.88.1 в уеб браузър, за да настроите продукта. Повече информация в...
Need help?
Do you have a question about the RouterBOARD 2011U Series and is the answer not in the manual?
Questions and answers