Advertisement
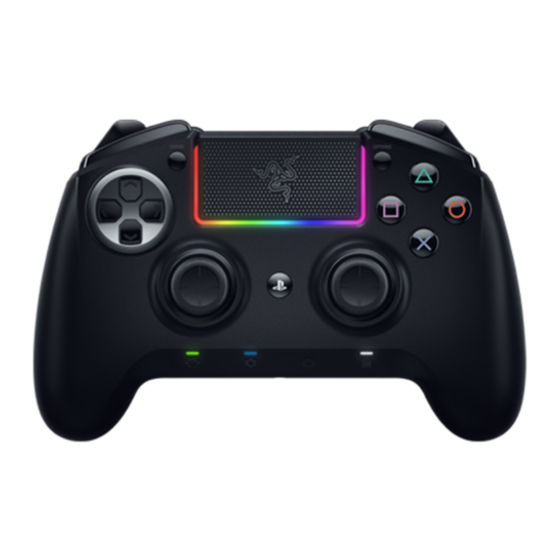
When it comes to console gaming, your controller is the most crucial weapon in your
arsenal. Every component of the Razer Raiju for PlayStation®4 has been optimized to
give you every possible competitive advantage—from four additional fully-
programmable buttons, to the weight and shape of the controller, and even a Quick
Control Panel. Made from incredibly durable materials and extensively tested by esports
athletes, dominate your game with this unrivalled controller.
Advertisement

Related Manuals for Razer Raiju


Summary of Contents for Razer Raiju
- Page 1 When it comes to console gaming, your controller is the most crucial weapon in your arsenal. Every component of the Razer Raiju for PlayStation®4 has been optimized to give you every possible competitive advantage—from four additional fully- programmable buttons, to the weight and shape of the controller, and even a Quick Control Panel.
-
Page 2: Table Of Contents
1. PACKAGE CONTENTS / SYSTEM REQUIREMENTS ......... 3 2. REGISTRATION / TECHNICAL SUPPORT............4 3. DEVICE LAYOUT .................... 5 4. SETTING UP YOUR RAZER RAIJU ..............7 5. ADDITIONAL ACCESSORIES ................. 10 6. USING YOUR RAZER RAIJU ................. 11 7. SAFETY AND MAINTENANCE ..............18... -
Page 3: Package Contents / System Requirements
1. PACKAGE CONTENTS / SYSTEM REQUIREMENTS PACKAGE CONTENTS Razer Raiju Gaming Controller for PS4® Carrying case Screwdriver Detachable braided fiber cable 2 analog stick rubber grip caps Important Product Information Guide SYSTEM REQUIREMENTS PlayStation®4 / PC (Windows 7 and above) -
Page 4: Registration / Technical Support
Razer Synapse. To learn more about Razer Synapse and all its features, visit razerzone.com/synapse. If you already have a Razer ID, register your product by clicking on your email address within the Razer Synapse application and select Warranty Status from the dropdown list. -
Page 5: Device Layout
3. DEVICE LAYOUT A. Touchpad (Touchpad button) B. Share button C. Options button D. Directional pad E. Action buttons F. Profile indicators G. Analog sticks (L3 / R3 buttons) H. PS button I. Remap button J. Profile cycle button K. Mic mute button L. - Page 6 Q. Trigger buttons (R2 / L2) R. Multi-function bumpers (M1 / M2) S. Detachable cable port T. Shoulder buttons (R1 / L1) U. Detachable braided fiber cable* *This cable is dedicated for the Razer Raiju controller and not intended to be used with other devices.
-
Page 7: Setting Up Your Razer Raiju
1. Plug the micro USB connector of the detachable braided fiber cable into your Razer Raiju. 2. Plug the USB connector of your Razer Raiju into the USB port of your PlayStation®4 console. 3. Press the PS button and your Razer Raiju is ready to go. - Page 8 REMOVING THE MULTI-FUNCTION TRIGGERS 1. Insert the tip of the screwdriver into the Multi-Function Trigger. 2. Turn the screwdriver counterclockwise until the screw is loose.
- Page 9 3. Remove the Multi-Function Trigger from the controller. 4. Close the trigger cover. To open the trigger cover, simply pull aside the cover release switches.
-
Page 10: Additional Accessories
5. ADDITIONAL ACCESSORIES ANALOG STICK RUBBER GRIP CAPS The additional texture on the rubber grip caps prevent your thumbs from slipping off the analog sticks during intense gaming sessions. -
Page 11: Using Your Razer Raiju
6. USING YOUR RAZER RAIJU SELECTING A PROFILE The Razer Raiju has a default profile and 2 custom profiles which you can use to customize the Multi-function bumpers and triggers. *user customizable Pressing the Profile button will cycle the profiles between Profile 1 and Profile 2. - Page 12 REMAPPING THE MULTI-FUNCTION TRIGGERS (MFT) AND BUMPERS (MFB) To remap the Multi-function triggers and Multi-function bumpers, you will first need to select either Profile 1 or Profile 2. After you have selected a profile, follow these instructions: 1. Press and hold the Remap button until the active Profile Indicator blinks. 2.
- Page 13 3.5mm headset port. The button will light up to indicate that the microphone is muted. USING THE AUDIO CONTROL BUTTON The Razer Raiju has a multi-purpose audio control button which you can use to increase or decrease the headphone volume. To increase the volume, simply press the audio...
- Page 14 To fine-tune the volume, press and hold the audio control button then press the dire tio al pad’s up or do utto to i rease or de rease the olu e respe ti el . To increase the voice chat volume and decrease the game volume, press and hold the audio control button then press the directional pad’s left utto .
- Page 15 USING THE TRIGGER STOP SWITCHES The Trigger Stops allow you to activate the Left and Right Triggers faster by shortening their travel distance. To enable the Trigger Stops, simply slide the switches outwards; and to disable the Trigger Stops, slide the switches inwards. USING THE HAIR TRIGGER MODE The Hair Trigger Mode is another alternative for activating the Left and Right Triggers faster by reducing their response time.
- Page 16 3. Press the utto to a ti ate the Hair Trigger Mode. 4. Release your fingers once you feel the controller vibrate. To disable the Hair Trigger Mode: 1. Press and hold the Remap button until the active Profile Indicator blinks.
- Page 17 2. Press and hold the Trigger you wish to configure. 3. Press the utto to dea ti ate the Hair Trigger Mode. 4. Release your fingers once you feel the controller vibrate. Tip: Activate both the Trigger Stop switches and the Hair Trigger Mode at the same time for unparalleled gaming performance.
-
Page 18: Safety And Maintenance
7. SAFETY AND MAINTENANCE SAFETY GUIDELINES In order to achieve maximum safety while using your Razer Raiju, we suggest that you adopt the following guidelines: 1. Should you have trouble operating the device properly and troubleshooting does not work, unplug the device and contact the Razer hotline or go to razersupport.com... -
Page 19: Legalese
LIMITATION OF LIABILITY Razer shall in no event be liable for any lost profits, loss of information or data, special, incidental, indirect, punitive or consequential or incidental damages, arising in any way out of distribution of, sale of, resale of, use of, or inability to use the Product. In no event... - Page 20 COSTS OF PROCUREMENT For the avoidance of doubt, in no event will Razer be liable for any costs of procurement unless it has been advised of the possibility of such damages, and in no case shall Razer be liable for any costs of procurement liability exceeding the retail purchase price of the Product.
Need help?
Do you have a question about the Raiju and is the answer not in the manual?
Questions and answers