Table of Contents
Advertisement
Advertisement
Table of Contents

Related Manuals for Maxcom MM824


Summary of Contents for Maxcom MM824
- Page 1 USER MANUAL GSM Mobile Telephone Maxcom MM824...
-
Page 3: Table Of Contents
Introduction ............9 Accessories ............10 Safety Precautions ..........11 Phone Description ..........14 SIM & MicroSD Card Installation ....... 16 SIM Card Precautions ........20 Battery & Back Cover Installation ..... 22 Charging ........... 22 7.1.1 Desktop Charger (Option) ....24 External Display 1,44”... - Page 4 9.7.1 Speakerphone Mode ......33 9.7.2 Call Waiting ......... 34 Phonebook ............35 Entering a New Contact ......35 Speed Dial ..........36 10.2.1 Assigning Phone Number to Keys 2-9 . 37 10.2.2 Programming M1 & M2 Keys ....37 Managing Entries in the Phonebook ..
- Page 5 Call Log ............ 54 Radio FM ............56 Multimedia ............59 Photo & Video Camera ......59 Audio Player ..........60 Video Player ..........61 Voice Recorder ........62 Tools ..............63 My Files ........... 63 Calendar ..........64 Calculator ..........65 Alarm Clock ..........
- Page 6 16.2.5 Factory Settings ........72 Display Screen ......... 73 16.3.1 Powering On/Off Animation ....73 16.3.2 Wallpaper Setting ....... 73 16.3.3 Desktop Settings ......... 74 16.3.4 Contrast ..........74 16.3.5 Backlight ..........75 16.3.6 Keypad Backlight ......... 75 16.3.7 Clock While Charging ......75 MENU Settings –...
- Page 7 16.7.4 Data Connection ......... 83 16.7.5 Network Selection ....... 84 Internet ............. 84 Safe Use ............86 FAQ (Troubleshooting) ........89 Technical Specs ..........94 Battery Information .......... 95 SAR Information ..........97 Protect Your Environment ......... 98 Terms of Warranty .......... 101 Declaration of Conformity ......
- Page 8 If there is any technical assistance required, please call the hotline at (+48) 32 325 07 00, or email us at serwis@maxcom.pl Our website: http://www.maxcom.pl/ The Set Includes GSM Mobile Phone Charger USB Cable 800mAh Battery Headset Desktop Charger User Manual...
-
Page 9: Introduction
900/1800 MHz. Prior to switching on the phone, a SIM Card must be correctly inserted. Introduction Thank you for choosing the Maxcom telephone. This User Manual has been published by the Manufacturer. Any corrections or modifications arising from mistakes, inaccuracies, and the phone or software upgrades might be made without prior notifications;... -
Page 10: Accessories
All and any content of this User Manual is the copyright of the Manufacturer. Copyrights and trademarks as mentioned in this documents are an exclusive property their owner. Copying, distributing, storing or disseminating of the copyright material, in part or in whole without prior written consent of the author is strictly prohibited. -
Page 11: Safety Precautions
Safety Precautions Reading the guidelines below will minimize the risk of misusing the phone. • USING – The telephone emits electromagnetic field that might negatively interfere with other electronic devices including medical equipment. • Never use the phone wherever such use is prohibited, in hospitals, airplanes, refueling points or at proximity to flammable materials. - Page 12 chemicals or corrosives. • TORCH – Never look directly into the beam of light. • HEARING AID– If you have a hearing aid, the phone volume should be carefully adjusted in line with the hearing aid sensitivity. • ELECTRONIC MEDICAL EQUIPMENT – Your phone is a radio transmitter, that might interfere with the performance of electronic medical equipment or implants, heart pace makers, insulin pumps, etc.
- Page 13 LCD display screen and using sharp tools; otherwise the display screen might be damaged. • Never use any metal objects to press the battery contacts together as doing so might cause an explosion. • Never expose the phone to either low or high temperature, direct sunlight, and high humidity.
-
Page 14: Phone Description
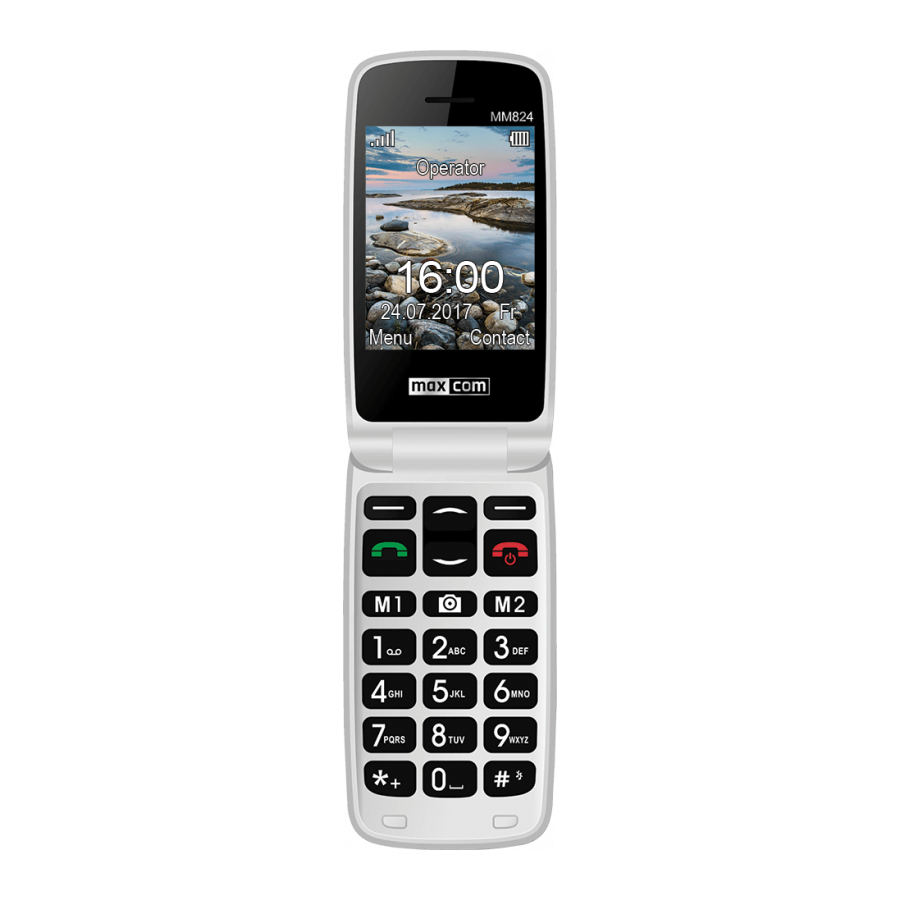
Phone Description... - Page 15 1. Speakerphone 2. LCD Display Screen 3. Left Function Key, LFK 4. Make Call Button 5. M1 / Left 6. Voicemail 7. Numeric Keypad 8. Microphone 9. Star 10. Profile: Outdoors 11. Profiles: Silent, Vibrations 12. Photo Camera 13. M2 / Right 14.
-
Page 16: Sim & Microsd Card Installation
20. Charging Slot / USB 21. Torch Button 22. Desktop Charger Charging Slot 23. Volume Down 24. Volume Up 25. Torch Diode 26. Headset Slot 27. Flip LCD Screen SIM & MicroSD Card Installation The SIM Card slot is located under the battery. Before installing the card, make sure the phone is switched off, and it is not connected to an AC adapter or any other accessories. - Page 17 Carefully insert the SIM Card into the slot, and close the slot with the metal contacts facing downwards. Make sure the notch on the Card is located on the right down corner.
- Page 18 There is a MicroSD memory card next to the SIM Card slot. Move the pin towards OPEN (to the side closer to the edge), and then lift it up. Insert the microSD Card so that the microSD Card contacts will touch the phone contacts, close the pin towards LOCK.
- Page 19 Be careful while using memory cards especially while inserting and removing the card. Some memory cards must be formatted on a computer before the first use. Regularly make backup copies of data stored on cards used in other devices, if you use SD Cards! Misuse or...
-
Page 20: Sim Card Precautions
other factors might damage the card or make the card lose its content. Insert the battery so that the contacts +/- will go to the front of the phone. SIM Card Precautions Switch off the phone and wait several seconds prior to inserting or removing the SIM Card. - Page 21 Be careful while handling the SIM Card, do not bend it or scratch it. If the SIM Card is not properly installed or damaged, a message „Insert SIM Card” will appear on the screen after switching on the phone. Make sure the Card is properly inserted and it is not damaged, and then switch on the phone again.
-
Page 22: Battery & Back Cover Installation
Battery & Back Cover Installation Gently insert the battery; make sure to properly position its metal contacts. To install the back cover, slide it upwards, until it clicks. Charging Never use a charger or battery that is damaged or not... - Page 23 manufactured by the Manufacturer. Accessories of different type or modifications might damage the phone and might give basis for violation of regulations pertaining to radio devices, and might void the warranty. When the battery is discharged, there will be an icon of the empty battery displayed on the screen, and you will hear a sound alert (if warning alerts are enabled).
-
Page 24: Desktop Charger (Option)
Important! While charging, the air temperature must be between 0°C and +40°C. After certain time, batteries wear out; therefore, their performance time will get shorter and shorter over time. 7.1.1 Desktop Charger (Option) If you use a desktop charger, first you need to plug the small plug into the desktop charger slot, and then plug the other end of the charger into the power outlet. -
Page 25: External Display 1,44
External Display 1,44” There is a display screen on the external side of the flip cover, displaying the most important information. To backlight the display screen for a moment and to see time, date, and the day of the week press the keys „+” or „-”. -
Page 26: Using The Phone
digits, while creating a text message, press “#”, press keys Up/Down to select the method you need and press the Left Function Key to confirm. The selected text input method will be visible in the right top corner of the display screen. To enter symbols: Press“*”... -
Page 27: Update Time &Date
the code, and press the LFK to confirm. Use the right key to delete digits if you have entered any digits by mistake. Important! If PIN & PUK codes were not provided along with the SIM Card, contact your service provider. If the PIN has been inserted incorrectly 3 times, the SIM will be locked, and entering the PUK will be required. -
Page 28: Making Phone Calls
and date will be automatically downloaded from the GSM network. If, for whatever reason, the date and time are not automatically updated, such information might be manually entered. In menu select Settings>Phone Settings>Time & Date. Use the numeric keys to enter the correct time. If you make a mistake, press keys M1 and M2 to navigate right/left between characters. -
Page 29: Dialing Number From Phone Book
Press to select a number you wish to call. Press „End Call” to quit. Press to end a phone call. Important! While making an international phone call, press “*” twice in order to get an international prefix “+” before the country code (instead of 00). 9.3.1 Dialing Number from Phone Book In Idle mode, press the LFK Menu, to enter the main... -
Page 30: Answering Phone Calls
for. Press to make a phone call. Speed Dial : in Idle Mode press the RFK Phonebook to enter the Phonebook. Answering Phone Calls Open a flip to answer a phone call (if such an option is enabled). With the flip open, or when answering phone by opening a flip cover is disabled, press to answer a phone call. -
Page 31: Symbols On The Display Screen
conversation volume. Volume level indicator is visible on the display screen. Important! Using a headset at high volume might damage your hearing. Carefully adjust volume while using the phone. Symbols on the Display Screen Signal Headphones Strength Silent Battery Level Ringtone + Unread Text Vibration... -
Page 32: Additional Functions While Talking
Vibration Roaming Active Only Missed Phone Alarm Active Call Additional Functions While Talking While having a phone conversation, press the Left Function Key to enter phone call options -in Options, you can select the following: Suspend/Hang Up Suspending a Conversation Speakerphone Enabling the Speakerphone Mode Enabling a connection while using... -
Page 33: Speakerphone Mode
Searching the Phonebook to make Phonebook a phone call or to edit data Entering the list of made and Call Log received phone calls Messages Entering Messages Start Recording Recording Conversation Mute Muting the Microphone 9.7.1 Speakerphone Mode While having a phone conversation, press the RFK to enable the speakerphone mode. -
Page 34: Call Waiting
talk to the mike from a distance of about 0,5 m for your voice to be understandable. Use side keys +/- to adjust volume. Press this key again to return to the normal mode. 9.7.2 Call Waiting It is a feature provided by your service provider. If, while having a phone conversation, somebody tries to call you, you will be notified about it by a special beep. -
Page 35: Phonebook
If the Caller ID option is disabled, a message „Unavailable” or “Unknown” or “Private” will appear on the screen. Phonebook You can store up to 300 Contacts in the Phonebook. Entering a New Contact Press Menu, there is the Phonebook at the top of the list. -
Page 36: Speed Dial
number, a special ringtone, or add him/her to the group. Use Up/Down to move on, and select Edit. To save a Contact, select Save. Press , to see a home screen, Delete, to delete a letter/digit, Return to return to the previous Menu. -
Page 37: Assigning Phone Number To Keys
10.2.1 Assigning Phone Number to Keys 2-9 To assign phone numbers to keys 2-9 to be dialed in speed dialing, follow the steps below: Press Menu> Phonebook. Press OK. Select Options>Other> Speed Dial. Press OK. Use keys Up/Down to select the key you wish to assign a phone number to, press Options>Edit Enter the number or press Phonebook and find the Contact you need using the keypad, keys... -
Page 38: Managing Entries In The Phonebook
box Number, and enter the phone number. Press Save (Left Function Key). You can also program M1 and M2 keys in menu: SOS>Family/Friend Phone Number M1/M2. Select the key you wish to program, press Options, and select if you want to add the Contacts from the Phonebook or manually. - Page 39 Gives you an opportunity to Edit update the Contact’s name or phone number, or both Create Sending Message to Selected Text/Multimedia Numbers Message Make a phone call to selected Make Call numbers Delete Deleting a Selected Contact Delete Selected Delete Multiple Contacts Copying Contact to SIM Copy Card/phone memory...
-
Page 40: Text Messages
Others>Service If available, service numbers Numbers are displayed A number of Contacts on the Others>Memory SIM Card and in the phone Status memory is displayed Text Messages Creating and Sending Text Messages Select Menu and go to Messages Select Create Message, and then New Text Message. - Page 41 number. Or you can get it from the Phonebook. You can select multiple recipients for this message. If you want to select the Recipient from the Phonebook, use keys Up/Down to select the Contact, press the Camera button to mark/unmark the Contact. As soon as you mark all Contacts, press Options>Done.
- Page 42 Quit, leaves the text input mode. While creating a multimedia message, you can add: Recipients Message subject Message content Photos Audio file Other attachments: Text, Slide, Previous Slide, Photo, Audio, Video Important: Polish diacritics (ą,ć,ę,ł,ń,ó,ś,ź,ż) take up more memory, and therefore using them limits the number of total characters you can send in a single text...
-
Page 43: Inbox
message. A text message might be sent even if it is longer than the allowed number of characters for a single message. Longer message are sent in two or more messages. A charge for each message might apply as per your service provider’s price list. Inbox Select Menu and go to Messages Select Inbox. - Page 44 Press Options > Connect to dial the Sender’s number. Press Options > Forward to forward the message. Press Options> Delete to delete the message Press Options> Transfer to transfer the message to SIM Card or the phone Press Options> Copy to copy the message to SIM or phone Press Options >...
-
Page 45: Sentbox
Sentbox Select Menu and go to Messages Select Sent. Select Options>Open to see the entire message. In Options you can forward, delete, transfer the message, call the Sender and get details displayed. Drafts Select Menu and go to Messages Select Drafts Select the message from the list by clicking Options and then Open In Options you can send a message, insert a... -
Page 46: Outbox
Outbox Select Menu and go to Messages Select Outbox Select the message from the list by clicking Options and then Open In Options you can send a message again, insert a template, insert the Contact or save a message. Text & Multimedia Message Settings Select Menu and go to Messages Select Message Settings. - Page 47 You can update the Text Message Message Center Center Number (provided by the Service Provider) Message Set the time to prioritize your Priority messages Delivery Enable/disable message delivery Reports reports Select whether you want sent Save sent messages to be automatically messages saved Memory...
- Page 48 following options: Select an account you need. It is MMS Account necessary to receive/send multimedia messages. Receiving Enable/disable automatic Options download, ads, receive report Set priority time, delivery report, Options receive confirmation request, send anonymously Select the location for messages to File Storage be saved...
-
Page 49: Message Memory Status
Enable/Disable playing audio in Audio Player received messages Restore factory settings for Restore Default multimedia messages If there are any problems with sending multimedia messages, please contact your service provider to enter the required settings. Message Memory Status Select Menu>Messages>Memory Status, to see how much of the phone memory has been taken up by text and multimedia messages. -
Page 50: Multimedia Messages Mms
Multimedia Messages MMS To create a multimedia message: Select MENU, next Messages > Create Message >New MMS Multimedia message might include photos, videos, and audio files. To add a selected file, use keys Up/Down to select the symbol of a photo/music note/plus, click Options>Edit and select an item. -
Page 51: Emergency Button
active or there is no SIM Card at all. To learn more, contact your service provider. If the phone is switched off, switch it back on. If you don’t know the phone code or PIN Code, in the code input box enter the number 112, and press the LFK. Emergency Button To make an emergency phone call, press and hold the emergency key SOS on the back of the phone for 3... -
Page 52: Emergency [Sos] Settings
Emergency Contacts and it will remain in the emergency mode for an hour to automatically answer the first incoming phone call. In emergency mode, to call the next person listed as an Emergency Contact, press the RFK. To finish the emergency procedure, press and hold the emergency button again. - Page 53 Select Emergency Contacts, to enter phone numbers (Contacts) for the phone to dial in case of emergency procedure. You can list up to 5 numbers. Select the entry number from the list, press Options>From Phonebook to select a number from the Phonebook, or Options>Enter to manually enter the number using the keypad.
-
Page 54: Call Log
Select the Emergency SMS for the phone not only to dial the listed phone numbers, but also to text Emergency Contacts. Click Edit Message to update the message content. Select Alarm SOS, to enable/disable sound signal. Call Log All received, missed, and dialed phone numbers are recorded in the Call Log. - Page 55 view phone calls grouped into: 1. Missed phone calls 2. Dialed phone calls 3. Received phone calls 4. Restricted phone calls (attempted phone calls from blacklisted phone numbers). You can also clear Call Log and check duration of phone calls. Press to select the number or select Options to view the following:...
-
Page 56: Radio Fm
Details Displays the phone call details Makes a phone call to a selected Connect number Create Sends a text/multimedia message to SMS/MMS a selected number Add to Saves the number in the Phonebook Phonebook Add to Black List Blacklists the number Clear All Deletes all phone calls from the list Deletes selected phone calls from... - Page 57 The telephone can receive radio waves at frequencies of 87.5 up to 108.0 MHz. Important: If the reception is low, connect the headset to the phone. The headset wire doubles as an antenna. In Idle mode, press Menu, use keys Up/Down to find Radio FM.
- Page 58 - Manual Search - Use Speakers - Play in Background - Recording - Playlist - Memory You can save selected radio stations under numbers 1-40 and use keys M1/M2 to scroll up and down, or enter the number and wait a moment to choose.
-
Page 59: Multimedia
Multimedia Photo & Video Camera The phone can take photos and record videos. To enable the camera, in Idle mode press the key or select Menu>Multimedia>Camera. To take a photo, press the key . If the feature Autosave is not enabled, after taking a photo press the LFK (save) to save the image. -
Page 60: Audio Player
To use this feature, installing MicroSD Card (not included in the set) and selecting saving on the memory card are required. Options>Memory>select the option Memory Card. Audio Player Play audio files saved on the phone or in the phone memory. The phone supports AAC, WAV, AMR files. Some audio files can’t be played on the phone as the phone “does not see”... -
Page 61: Video Player
Press the LFK [Options], to enter the player menu. If the playlist is not empty, you can do the following: - Set a playlist - Set a track as a ringtone - Set replay, random play, and playing in the background. -
Page 62: Voice Recorder
start/pause playing a video file, press the camera key. Enter the video file player, press the key Options to do the following: Open, Full Screen, Brightness Adjustment, Details, Settings Reset. Voice Recorder You can record phone conversations, music, and other sounds. Select Menu >Multimedia >... -
Page 63: Tools
You can change the location to save files to the memory card; quality of recording might be also changed. To do so, select Options>Memory or Options>File Format. Tools My Files To view files saved in the phone and on the memory card, select: MENU >... -
Page 64: Calendar
phone; format a selected memory. Calendar The phone has a calendar available at MENU > Tools > Calendar. Not only can you view the calendar, but also you can add your own entries, set an exact time, date, repeat, and sound alert. To plan a task/event, use keys to go to the date you need, and press the LFK to get the following... -
Page 65: Calculator
- Single – one time reminder about the task at selected time and date, - Every day – every day reminder about the task at selected time and date - Every week – every week reminder - Every month – every month reminder - Every year –... -
Page 66: Alarm Clock
Alarm Clock It is possible to set 3 independent alarm clocks. They might be either one time or repeated on selected days. When the alarm clock goes off, press Dismiss to stop it or Snooze to put it off in time. To set the alarm clock: Select Menu>Tools>Alarm Clock Select one out of available alarms. -
Page 67: Sim Card Service
SIM Card Service Independently from the phone features, the SIM Card offers additional service. Name and functions of such menu depend on the type of available service. Settings Call Settings Most of the features listed below are network services, offered by a service provider. If the service provider offers such features, they must be configured. - Page 68 Select Menu > Settings>Call Settings and Description next select one out of following options: Call Waiting Ability to enable Call Waiting Ability to forward phone calls in certain Call Forwarding scenarios Ability to restrict certain type of phone Call Barring calls Enable/disable the Caller ID to be Number Withhold...
-
Page 69: Phone Settings
soon the flip cover is open, - Answering by Pressing Any Key – an incoming phone is answered by pressing any key, - Automatic Answering When Bluetooth On – an incoming phone call is automatically answered if Bluetooth is enabled - End by Closing the Flip Cover –... -
Page 70: Language
M1 and M2. To navigate between options, use keys up/down. You can set the date and time format, or enable/disable an automatic update. After correct data has been entered, press the RFK (Do). 16.2.2 Language Select Menu > Settings > Phone Settings> Language A default language for the phone Menu and spelling checker are defined by the SIM Card. -
Page 71: Shortcut Settings
• 1x Down • 1x LFK • 1x Down • 2x LFK • Press the language you need and press the LFK, and then the RFK (right function key). 16.2.3 Shortcut Settings Select Menu > Settings > Phone Settings> Shortcut Settings You can decide what options to assign to keys Up/Down in Idle mode. -
Page 72: Automatic Phone Powering On/Off
16.2.4 Automatic Phone Powering On/Off Select Menu > Settings > Phone Settings> Phone Auto Power On/Off This feature allows you to set time for the phone to automatically switch on or off. Select this feature, if you want to set time for the phone to automatically switch on or off. -
Page 73: Display Screen
factory settings will be restored. Display Screen 16.3.1 Powering On/Off Animation Select Menu > Settings> Display Screen> Animation Default powering on/off animations might be updated. A selected animation will be displayed on the screen while powering the phone on or off. 16.3.2 Wallpaper Setting Select Menu >... -
Page 74: Desktop Settings
Select a gallery to choose from, your own (more images) or the system gallery. Use keys Up/Down to view wallpapers. Confirm your selection. 16.3.3 Desktop Settings Select Menu > Settings > Display Screen> Desktop Settings You can decide for the date and time, and the Service Provider name to be displayed or not on the display screen. -
Page 75: Backlight
brightness. 16.3.5 Backlight Select Menu > Settings > Display Screen> Backlight Select time for the display screen backlight to switch off. 16.3.6 Keypad Backlight Menu > Settings > Display Screen> Keypad Backlight. Select time for the keypad backlight to automatically switch off. -
Page 76: Menu Settings - Basic/Advanced
Clock While Charging If this option is enabled, a clock will be displayed on the small display screen (if the flip cover is closed) as long as the phone is charged or on the big display screen (if the flip cover is open). MENU Settings –... -
Page 77: Pin1 / Pin2
then press the key OK to confirm. If you enter the wrong password, press the Right Function Key to delete characters you have entered by mistake, and then enter the correct characters. There are various PIN Code, phone password and black list options in Menu >... -
Page 78: Phone Lock
16.5.2 Phone Lock Select Menu > Settings>Security>Phone Lock You can enable/disable the phone lock code and update the code. A default code is 1234. 16.5.3 Update the Phone Password Select Menu > Settings >Security>Update Phone Password to update the default password. -
Page 79: Ringtone Settings
want to select it from the Phonebook. If the option is enabled (Black List Settings>Reject Call), every incoming phone call from the blacklisted number will automatically be rejected. Additionally, messages sent from the blacklisted number might be rejected as well (Black List Settings>Never Show Messages). Ringtone Settings Select Menu >... - Page 80 Select Volume, to set volume for call ringtone, message alert, phone power on/off, and keypad. Select Ringtone Type to enable/disable a ringtone and phone vibration. Select Other Notification Alerts, to select ringtone for keys, low battery alert, phone powering on/off, dialing signal, flip opening/closing beep.
-
Page 81: Connections
Connections 16.7.1 Bluetooth Bluetooth connectivity allows you to send and receive files. You can also connect other devices such as wireless headset. Select Menu and go to Settings Select Connections, and then Bluetooth In Menu Bluetooth you can select one of the following options:... -
Page 82: Data Account
Enable/Disable Enable or disable Bluetooth Bluetooth Enable, so that other people will find Visibility your phone Devices you have been connected to My Devices before. You can also add new devices Select which file you wish to share Shared Settings and what characteristics it is to have My Name Select a name for your device... -
Page 83: Gprs Service
edit/delete/add an account, select: Menu > Settings > Connections>Account You can get the correct configuration from your service provider. Some service providers allow a remote configuration. 16.7.3 GPRS Service Select: Menu > Settings > Connection>GPRS Service, to enable or disable GPRS. 16.7.4 Data Connection Select: Menu >... -
Page 84: Network Selection
16.7.5 Network Selection Select Menu > Settings >Connections>Network Selection to Select Network and set Selecting Mode between Manual and Automatic. Internet The Internet browser on the phone allows you to use variety of WAP service. The phone has preinstalled settings of certain service providers. - Page 85 To learn more about such service availability, pricelist or manuals, contact your service provider. Configuration settings necessary to browse the Internet might be obtained from the Service Provider. Some service providers allow a remote telephone configuration.
-
Page 86: Safe Use
Safe Use Please read the following rules. Non- compliance with such regulations might be dangerous or illegal. Read the entire User Manual to get more information. Switch off the phone in proximity to chemical plants, refueling points, and other places that might store explosives. - Page 87 Only original accessories are covered under warranty. Never attempt to disassemble the phone on your own. For any problems related to the device, contact the Manufacturer. Never charge the phone if the battery is not in place. For your safety, never talk on the phone while charging.
- Page 88 sunlight. Never place the phone next to heating devices such as radiators, heaters, ovens, furnaces, camp fire, barbeques, etc. Never expose the phone to sun, high humidity or dusted air. Keep it away from metal chips that might cause the phone to malfunction. Do not use liquids or rags soaked in detergents to clean the phone.
-
Page 89: Faq (Troubleshooting)
FAQ (Troubleshooting) Only qualified service workers are authorized to repair the phone. Any attempts of unauthorized repair and modifications void the Manufacturer’s warranty! „Cannot make a Make sure the number you are dialing phone call” is correct. If you make an international phone call, dial a country code before the actual number (eg. - Page 90 “SIM Card in Make sure the SIM Card is installed place, correctly. emergency calls only (112)” “The phone does The phone might be switched off; to not work, the switch on the phone, press and hold phone does not the red receiver key for about 3 charge when seconds.
- Page 91 „Can I make a If you are out of the country and phone call while ROAMING is enabled, your phone abroad?” automatically will use the foreign telephone network. To learn more, contact your service provider. „Can I make an If you are in the area with no emergency call if reception by any network, no phone there is no...
- Page 92 „How to get the If there is a message „Does not work” most of or “No Service” on the display, it reception?” means there is no signal or sufficient funds on the account. In such a case, only making emergency call 112 is possible as long as the User is in the area covered by another service provider.
- Page 93 What is the Text It is the service provider’s center „ Message number storing all text messages. The Center”? number is stored on the SIM Card, but you can change the number in the phone MENU and enter another number. When is the fee A fee for making a phone call is „...
-
Page 94: Technical Specs
“Is there any Enable Delivery Report option. As way to make soon as the text message is delivered sure my to the recipient, you will get a return message was message (network service). delivered to the recipient?” Technical Specs Frequency: GSM: 900/1800MHz. Weight: About 88g (including battery) Dimensions: 50,5 x 100 x 19 mm Battery Type: Li-ion 3,7V... -
Page 95: Battery Information
Battery Information There is a battery in the phone. The battery can be recharged using a charger that is included in the set. The battery life depends on conditions in which the phone is used. Your distance from a relay transmitter, number and the length of phone calls significantly reduce the battery life. - Page 96 Never leave the charger connected longer than 2-3 days. Never keep the phone in excessively hot places. High temperatures might negatively impact both the battery and the phone. Never use a battery that is clearly damaged. Doing so might cause a short circuit, and might damage the phone.
-
Page 97: Sar Information
SAR Information Information about the impact of radio waves and Specific Absorption Rate [SAR]. This phone model has been designed to meet all international standards pertaining to the impact of radio waves as recommended by international guidelines. These guidelines were developed by the International Commission on Non-Ionizing Radiation Protection (ICNIRP), an independent scientific organization with a safety margin to protect all people regardless their age... -
Page 98: Protect Your Environment
working might be much lower than the maximum level. Such discrepancies result from automatic changes in device power necessary to ensure that the device operates at a minimum power level required to be connected with network. In case of this model, the highest SAR (10g) value in tests is: 0.373W/kg –... - Page 99 the symbol of waste electricals. Such a symbol tells us that the device, after use, must not be disposed of in the normal household waste stream. Important: Never throw the phone nor accessories to municipal solid waste!!! The product should be utilized in authorized places only.
- Page 100 Manual might vary depending on software installed and the country. If any technical assistance is required, we strongly encourage you to contact the technical department at +48 32 325 07 00 or via email at serwis@maxcom.pl.
-
Page 101: Terms Of Warranty
The above information is presented for information purposes only. Our website: http://www.maxcom.pl/ Important: The battery performance depends on local network environment, SIM Cards, and the conditions in which the phone has been used. The Manufacturer shall not be liable for any problems or... - Page 102 Trademarks mentioned or used in this material remain a sole property of their owners. Complains or device defects can be reported via website: http://www.comtek.co.uk/maxcom-rma-service/ Mobile service address: Comtek Network Systems Unit 108, Tenth Avenue (Zone 3) Deeside Industrial Estate...
-
Page 103: Declaration Of Conformity
Deklaracja Zgodności... - Page 105 MAXCOM S.A. 43-100 Tychy, ul Towarowa 23a POLAND tel. +48 32 327 70 89 fax +48 32 327 78 60 www.maxcom.pl office@maxcom.pl...
Need help?
Do you have a question about the MM824 and is the answer not in the manual?
Questions and answers