Siemens Simatic 620 Owner's Manual
Box pc
Hide thumbs
Also See for Simatic 620:
- Manual (226 pages) ,
- Operating manual (78 pages) ,
- Getting started (22 pages)
Table of Contents
Advertisement
Quick Links
SIMATIC
Box PC 620
Manual
Valid for devices with the order number
6ES7647-5...
Edition 03/2002
A5E00131465-01
Preface, Contents
Important Information
Welcome to the Box PC 620
Setting-up and Operating
the Box PC 620
Box PC 620 Expansions
Configuring the Box PC 620
Error Diagnosis
Hardware Information
Reinstallation of the Software
Appendix
Guidelines for ESD
Technical Specifications
Glossary, Index
1
2
3
4
5
6
7
8
A
B
Advertisement
Table of Contents

Related Manuals for Siemens Simatic 620


Summary of Contents for Siemens Simatic 620
- Page 1 SIMATIC Box PC 620 Manual Valid for devices with the order number 6ES7647-5... Edition 03/2002 A5E00131465-01 Preface, Contents Important Information Welcome to the Box PC 620 Setting-up and Operating the Box PC 620 Box PC 620 Expansions Configuring the Box PC 620 Error Diagnosis Hardware Information Reinstallation of the Software...
- Page 2 Trademarks SIMATIC, SIMATIC HMI and SIMATIC NET are registered trademarks of SIEMENS AG. Third parties using for their own purposes any other names in this document which refer to trademarks might infringe upon the rights of the trademark owners.
-
Page 3: Preface
Preface Purpose of the Manual This manual contains all the information you need for commissioning and using the SIMATIC Box PC 620. It is intended both for programming and testing/debugging personnel who commission the device itself and connect it with other units (automation systems, further programming devices) as well as for service and maintenance personnel who install expansions or carry out fault/error analyses. - Page 4 Structure of the Manual In Chapters 1 to 4 the manual contains the most important instructions for starting up and using the Box PC 620. Chapters 5 to 9 are reference sections you will only require in special cases. Important Information This chapter provides information about safety instructions, certificates, directives and approvals.
- Page 5 Siemens representative in your local agency. http://www.ad.siemens.de/partner Training Center Siemens offers a number of training courses to familiarize you with the SIMATIC S7 automation system. Please contact your regional training center or our central training center in D 90327 Nuremberg, Germany for details:...
- Page 6 Technical Support (Free Contact) Local time: Mo.–Fr. 7:00 to 17:00 Phone: +49 (180) 5050 222 Fax: +49 (180) 5050 223 E-mail: techsupport@ ad.siemens.de GMT: +1:00 Europe / Africa (Nuremberg) Authorization Local time: Mo.–Fr. 7:00 to 17:00 Phone: +49 (911) 895-7200 Fax:...
- Page 7 Service & Support on the Internet In addition to our documentation, we offer our Know-how online on the internet at: http://www.ad.siemens.de/support where you will find the following: S Current Product Information leaflets, FAQs (Frequently Asked Questions), Downloads, Tips and Tricks.
- Page 8 Preface SIMATIC Box PC 620 Manual viii A5E00131465-01...
-
Page 9: Table Of Contents
Table of contents Preface ..............Important Information Safety Instructions Certificates, Directives and Declarations... - Page 10 SIMATIC Box PC 620 Expansions Opening the Unit 4.1.1 Prerequisites ........... 4.1.2 Opening the SIMATIC Box PC 620 4.1.3...
- Page 11 Hardware Information ........... Current Requirement of the Components (Maximum Values) Overview of the Components and Ports System Resources...
- Page 12 Table of contents SIMATIC Box PC 620 Manual A5E00131465-01...
-
Page 13: B Technical Specifications
Important Information Safety Instructions Caution The safety instructions given on the reverse of the title page of this manual must be observed. Before expanding your Box PC refer to Chapter 4 and read the relevant safety instructions. This device corresponds to the relevant safety measures according to IEC, EN, VDE, UL, and CSA. - Page 14 Power Connection Install the cables so that no one can step on them or trip over them. When you connect the device, adhere to the relevant instructions in Chapter 2 of this manual. Do not connect or disconnect power supply cables and data transmission lines during thunderstorms.
- Page 15 Country-Specific Information For the United States and Canada: In the United States and Canada USA, a CSA or UL-listed power supply cable must be used. The male plug is a 5-15 style. For operation with 120 V: Use a UL Listed, CSA Labelles Cord Set, consisting of a min. 18 AWG. Type SVT or STJ three conductor flexible cord, max.
- Page 16 Battery There is a battery in this device on the motherboard. Batteries may only be exchanged by technical personnel. Observe the local regulations on disposal of special waste when disposing of dead batteries. Caution There is the danger of an explosion, if the battery is not exchanged as directed. Replace only with the same type or an equivalent type recommended by the manufacturer.
-
Page 17: Certificates, Directives And Declarations
Certificates, Directives and Declarations Notes on the CE Symbol The following applies to the SIMATIC product described in this manual: EMC Directive Devices with a power supply performance of 85W are in accordance with the EU Directive 89/336/EEC “Electromagnetic Compatibility.” In accordance with the CE label for this product, the following areas of application are relevant: Field of Application Domestic, business and commercial... - Page 18 Declaration of Conformity The EC declarations of conformity and the documentation relating to this are available to the authorities concerned, according to the above EC directive, from: Siemens AG Group Automation & Drives A&D AS RD 4 Postfach 1963 D-92209 Amberg Tel.: +49 (9621) 80-3283...
-
Page 19: Certification For The Usa, Canada And Autralia
Certification for the USA, Canada and Autralia Security One of the following markings on a device is indicative of the corresponding approval: Underwriters Laboratories (UL) to the UL 1950 Standard (I.T.E) or to the UL508 (IND.CONT.EQ) Underwriters Laboratories (UL) to the Canadian Standard C22.2 No. 950 (I.T.E) or to the C22.2 No. - Page 20 This equipment has been tested and found to comply with the limits for a Class A digital device, pursuant to Part 15 of the FCC Rules. These limits are designed to provide reasonable protection against harmful interference when the equipment is operated in a commercial environment.
-
Page 21: Transport
Transport Transporting Despite the fact that the Box PC is of rugged design, its internal components are sensitive to severe vibrations or shock. You must therefore protect the PC from severe mechanical stress when transporting it. Use the original packing material if you have to ship the Box PC from one location to another. - Page 22 Important Information SIMATIC Box PC 620 Manual 1-10 A5E00131465-01...
-
Page 23: Welcome To The Simatic Box Pc 620
Welcome to the SIMATIC Box PC 620 Overview of Chapter In chapter Port Side View Drive Side View Side View Bottom View Ports Drives Backup Battery SIMATIC Box PC 620 Manual A5E00131465-01 you will find on page 2-12... -
Page 24: Port Side View
Port Side View Figure 2-1 Ports PS/2 socket for connecting a PS/2 mouse. The COM 1 (TTY) port is used to connect, for example, S5 automation units (AG). The supplied adapter can be used to convert the port into a 25-pole standard V.24 port for connecting serial port devices such as modem, mouse or printer. - Page 25 RJ 45-Ethernet connector. Ethernet is a local network with a bus structure for data communication with a data transfer rate of 10 or 100 megabit per second (Mbps). You can connect the Box PC to an S7 automation system or to a PROFIBUS network via the PROFIBUS/MPI port with galvanic isolation.
-
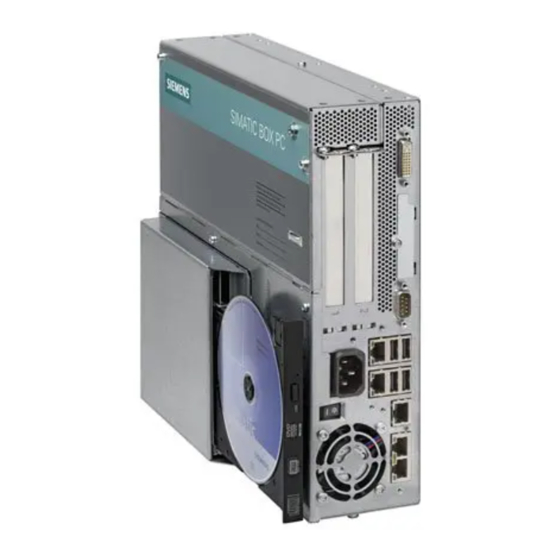
Page 26: Drive Side View
Drive Side View Figure 2-2 Drive Side View Here are openings for device ventilation. Caution The air venting slots for outgoing air must not be obstructed. Otherwise, there is a risk of overheating. You can find the order number and the serial number of your device on the type label. -
Page 27: Bottom View
Bottom View Figure 2-3 Bottom View The connection with the equipotential grounding on the system housing to the central earth terminal of the cabinet or the unit into which the computer is fitted, ensures that faults arising from external power supply cables, signalling cables or cables to peripheral units are diverted. -
Page 28: Side View
Side View Figure 2-4 Side View You can mount the SIMATIC WinAC CPU41x-2PCI backup battery here. Use the battery holder without a slot plate supplied with the WinAC module to do this. To distinguish between both performances of the power supply unit, the power sup- ply unit with a 105W performance been marked with P You need the Microsoft Windows “Product Key”... -
Page 29: Ports
Ports Front Ports The front ports are located behind the cover below the floppy disk drive. They are used for connection of the following front elements: S I/O port for the connection of front components S LVDS display port S CMOS display port The front ports can be accessed as follows: 1. -
Page 30: Drives
Drives The Box PC is equipped as standard with a 3.5” disk drive or an LS240 drive and a 3.5” hard disk drive. 2.6.1 Disk Drive (Depending on the Device Configuration) You can store programs and data on diskettes with the disk drive and load them from diskettes into the Box PC. - Page 31 Handling Disks with the LS 240 Drive Depending on the fitting position, the disks are inserted into the disk drive as illustrated below: Access hole for emergency ejection (only LS240) Access LED Figure 2-5 Handling Disks Caution Risk of loss of data! When the green access LED of the LS 240 drive is lit, the ejector may not be actuated.
- Page 32 Authorization with Authors W V2.x To authorize STEP 7 and other SIMATIC components you must use AuthorsW. Start this program on the PG via the taskbar under Start > Simatic > AuthorsW. Usage Notes for LS240 Superdisks LS240 drives are suitable for floppy disks up to 1.44 Mbytes as well as Superdisks up to 120 Mbytes.
-
Page 33: Hard Disk Drive
2.6.3 Hard Disk Drive The hard disk drive is used for the storage of large quantities of data. it is fitted in a mounting which is easily exchangeable and damped against vibration. Caution Risk of loss of data and damage to the drive! Drives are sensitive to vibrations and shock. -
Page 34: Backup Battery
Do not recharge the battery, do not open the battery by force. The correct lithium battery is available from Siemens (order no.: W79084-E1003-B1). Return used batteries to the manufacturer/recycler or dispose of them according to local regulations. -
Page 35: Setting Up And Operating The Simatic Box Pc
Setting Up and Operating the SIMATIC Box PC 620 Chapter Overview In chapter Unpacking and Checking the Scope of Delivery Installing the SIMATIC Box PC 620 Preparing for Operation Connecting Peripheral Devices Working with PC Cards Connecting the SIMATIC Box PC 620 to other SIMATIC S5 Connecting the SIMATIC Box PC 620 to a SIMATIC S7 Network (PROFIBUS/MPI) Networking the SIMATIC Box PC 620 with Other Stations on... -
Page 36: Unpacking And Checking The Scope Of Delivery
Unpacking and Checking the Scope of Delivery Unpacking the SIMATIC Box PC 620 Unpack your Box PC as follows: 1. Remove the Box PC from the packaging. 2. Do not throw the original packing away. Keep it in case you have to transport the unit again sometime in the future. - Page 37 Installing the SIMATIC Box PC 620 The Box PC 620 can be operated in several fitting positions. It is particularly suitable for fitting in consoles, switch boards and control panels. The Box PC 620 with AC power supply meets the requirements for a fire enclosure to EN60950.
- Page 38 Depending on the configuration of the device, two mounting brackets are included in the scope of delivery. You can attach these to the housing with 6 screws (M3x6). Equipotential grounding connection Figure 3-1 Screw Connection Points for Mounting Brackets (Cover Side Downwards) Instructions for wall and ceiling mounting To install the Box PC in a concrete wall or ceiling proceed as follows: 1.
- Page 39 Setting Up and Operating the SIMATIC Box PC 620 297.2 80.1 11.2 Figure 3-2 Dimension Drawings for Fitting in Control Panel with Installation Angle (Device without CD ROM Drive) SIMATIC Box PC 620 Manual A5E00131465-01...
- Page 40 Setting Up and Operating the SIMATIC Box PC 620 297.2 99.1 Figure 3-3 Dimension Drawings for Fitting in Control Panel with Installation Angle (Device with CD ROM Drive) SIMATIC Box PC 620 Manual A5E00131465-01...
- Page 41 Setting Up and Operating the SIMATIC Box PC 620 297.2 80.1 11.2 Figure 3-4 Dimension Drawings for Fitting in Control Panel without Installation Angle SIMATIC Box PC 620 Manual A5E00131465-01...
- Page 42 Setting Up and Operating the SIMATIC Box PC 620 Permissible Fitting Positions of the PC to UL1950/EN60950/CSA22.2 No. 950 An inclined position of ± 20_ is allowed in each of the permissible fitting positions. Position 1 (Preferred Position) Position 2 *) Position 3 (Desktop) *) Position 4 (Ceiling) **) *) not permissible for installed LS240 Drive...
- Page 43 Additional Permissible Fitting Positions of the PC to UL508/CSA 22.2 No. 142 An inclined position of $15_ is allowed in each of the permissible fitting positions. An external fire protection housing is not necessary. Position 5 (Fan Side Down) ***) ***) not permissible for installed Floppy Disk, CD ROM, CD RW/DVD or LS240 Drive Caution The fitting position with the fan side down is only permitted with additional...
-
Page 44: Preparing For Operation
Preparing for Operation Connection to the Power Supply Unit Connection to power supply Inlet connector for non- heating appliances Figure 3-5 Connection to Power Supply (Inlet Connector for Non-Heating Appliances) Caution The Box PC is equipped with a safety-tested mains cable and may only be con- nected to a grounded grounding outlet. - Page 45 Equipotential Measures Low-impedance ground connections ensure that faults arising from external power supply cables, signalling cables or cables to peripheral units are diverted. Therefore connect the equipotential grounding connection on the system housing to the central earth terminal of the cabinet or the unit, into which the computer is fitted, in such a way that it has low impedance (large surface area, large contacts).
-
Page 46: Connecting Peripheral Devices
Connecting Peripheral Devices Notice When connecting peripheral units, ensure that the components have industrial capability. Connecting the Printer to the Parallel Port Proceed as follows to connect your printer: 1. Disconnect the Box PC and switch off the printer. 2. Plug the printer cable into the LPT1 parallel port. 3. - Page 47 You connect external multisynchronous monitors using the standard VGA connector on the left-hand panel side of the unit. We recommend that you use a Siemens monitor. You must switch the Box PC off before connecting the monitor cable. You will find further information about the connector pinout in Chapter 7.
- Page 48 Using a Mouse You can connect both a PS/2-USB and a serial mouse to the Box PC. Connecting a PS/2 Mouse You can connect an external PS/2 mouse or another external pointing device to an additional PS/2-compatible mouse connector. Port for PS/2 mouse (socket) Figure 3-8 Connecting the Mouse To connect the mouse, proceed as follows:...
- Page 49 Connecting a PS/2 Keyboard A PS/2 keyboard of your choice can be connected to the Box PC. PS/2 keyboard connection Figure 3-9 Connecting a PS/2 Keyboard To connect the keyboard, proceed as follows: 1. Disconnect the Box PC from the power supply. 2.
- Page 50 Connecting Devices to an USB Interface You can connect single or multiple USB devices (mouse, keyboard or printer) to the USB interfaces. 1. Plug the USB device cable into one of the USB interfaces. The Plug and Play operating system recognizes the device. Any drivers are requested by the operating system, if necessary.
-
Page 51: Working With Pc Cards
Working with PC Cards PC Cards The PC card interface supports Cardbus-Cards (32 Bit) and PCMCIA-Cards (16 Bit). The Box PC has one PC card port. You can plug communication mod- ules for MODEM, FAX-MODEM, ISDN, Token Ring, ETHERNET, memory ex- pansion and SCSI interface modules in credit-card format into these ports. - Page 52 Note Peak currents of 650 mA at 5 V based on 3 s are permitted! Examples of PCMCIA cards connected to PC card interface for Hard Disk (Maxtor MXL-131-III) ......Fax/modem (Dr.
-
Page 53: Connecting The Simatic Box Pc 620 To Other Simatic S5
Connecting the SIMATIC Box PC 620 to other SIMATIC S5 Point-To-Point Connection In this section, you will learn how to connect your SIMATIC Box PC 620 to a programming device or S5 programmable logic controller using a point-to-point connection. You can stablish a point-to-point connection by connecting the SIMATIC Box PC 620 to another programming device or a programmable logic controller using S A V.24 connection... - Page 54 Connecting the SIMATIC Box PC 620 to an S5 Programmable Logic Controller You can connect the Box PC to a SIMATIC S5 programmable logic controller using the COM1/TTY interface port. COM 1 (socket) Figure 3-12 Connecting the You connect your Box PC to a SIMATIC S5 programmable logic controller as follows: 1.
- Page 55 Connecting the SIMATIC Box PC 620 via an Adapter The connecting cable 6ES5 734-2BD20 is supplied with the Box PC. An adapter is available for connecting the programmable controller using old standard cables. Tabelle 3-1 Adapter for SIMATIC Box PC 620 Connection Interface TTY interface Box PC to SIMATIC-S5 program-...
- Page 56 SIMATIC Box PC 620 to PG Connection (V.24, TTY) If you want to connect your Box PC to another programming device, you can plug the appropriate connecting cable into the V.24 or TTY interface port Tabelle 3-2 Connection of the SIMATIC Box PC 620 to other PUs Interface COM 1 as a with PG 7xx...
-
Page 57: Connecting The Simatic Box Pc 620 To A Simatic S7 Network
Connecting the SIMATIC Box PC 620 to a SIMATIC S7 Network (PROFIBUS/MPI) Connecting an S7 Programmable Controller via PROFIBUS/MPI Interface You can connect the SIMATIC Box PC 620 to a SIMATIC S7 automation system or to a PROFIBUS network via the potentially isolated*) PROFIBUS/MPI port**). The MPI cable (5m) for connection to SIMATIC S7 CPUs (order no.: 6ES7901-0BF00-0AA0) is supplied with the SIMATIC Box PC 620. - Page 58 Connecting Via the PROFIBUS/MPI interface, you can connect your PC to S MPI networks (S7-200, S7-300, and S7-400) or S PROFIBUS DP networks (DP components). PROFIBUS/MPI Network Up to 32 devices (PC, programming device, or programmable controller) can be connected to the PROFIBUS/MPI interface to form a network segment. The physi- cal connection to the network is via a floating RS485 interface which is a compo- nent of the PC basic module.
- Page 59 Networking the SIMATIC Box PC 620 with Other Stations on PROFIBUS Networking the Box PC on PROFIBUS PROFIBUS is an open and robust bus system for industrial use. It can be used to configure networks with up to 32 stations per segment. PROFIBUS-DP supports data-transfer rates from 9.6 Kbaud to 12 Mbaud.
-
Page 60: Ethernet (Rj45 Ethernet Interface)
Ethernet (RJ45 Ethernet Interface) Networking Box PC via RJ45 Ethernet Interface The RJ45 Ethernet interface is a Twisted-Pair (TP) Interface for data transfer rates of 10/100 Mbaud. This on-board interface is compatible with Intel pro/100+ PCI Adapters. The Plug & Play interface is automatically recognized in Windows. Protocols are configured in the Windows system control. -
Page 61: Simatic Box Pc 620 Expansions
SIMATIC Box PC 620 Expansions What Does This Chapter Contain? You can enhance the performance of your Box PC by adding additional memory. This chapter describes how to expand your PC. Please observe the relevant safety guidelines. Chapter Overview In chapter Opening the Unit Installation of a Memory Extension Replacing the Backup Battery... -
Page 62: Opening The Unit
Limitation of Liability All technical specifications and licences apply only to expansion functions approved by SIEMENS. No liability can be accepted for impairment of functions caused by the use of devices and components of other manufacturers. - Page 63 Before Opening the Unit Note the following rules before opening the unit: S Before you disconnect the power supply cable, discharge any electrostatic charge on your body. You can do this by touching the metal mounting plate for the interfaces on the left-hand side panel of the unit. S Discharge any electrostatic charge from tools that you are using.
-
Page 64: Opening The Simatic Box Pc 620
4.1.2 Opening the SIMATIC Box PC 620 To open the Box PC, proceed as follows: 1. Pull out the power supply connector, and remove all connecting cables from the unit, including the keyboard cable. 2. Remove the PC from its mounting/cabinet (only necessary if screws which have to be removed are inaccessible in the fitted position). -
Page 65: Components Visible After Opening The Unit
4.1.3 Components Visible After Opening the Unit Components Once you have removed the top cover of your unit, the components are visible. Power supply unit Bus board Figure 4-2 Box PC 620 Open SIMATIC Box PC 620 Manual A5E00131465-01 Memory extension Processor Floppy drive or LS 240... -
Page 66: The Motherboard
4.1.4 The Motherboard The motherboard is the heart of the Box PC. Here, data is processed and stored, and interfaces and device I/Os are controlled and managed. Figure 4-3 Motherboard SIMATIC Box PC 620 Manual A5E00131465-01... - Page 67 Components on the Motherboard The following components are located on the motherboard of the Box PC 620 V2: Number Processor module with heat sink IDE connector for CD-ROM IDE connector for 2.5 “ hard disk Floppy drive connector PS/2 mouse connection PS/2 keyboard connection Serial port COM 1/TTY Parallel port LPT 1...
-
Page 68: Installing Memory Expansion Submodules
Installing Memory Expansion Submodules Standard Memory The motherboard has 2 slots for 144 pin SO DIMM memory submodules. This allows you to expand the memory capacity of your Box PC 620 to a maximum of 512 Mbytes. Either one or two modules can be installed. Memory 64 Mbytes 128 Mbytes... - Page 69 Caution The electronic components of the printed circuit boards are extremely sensitive to electrostatic discharge. Certain precautionary measures are therefore necessary when handling such components. These measures are explained in the guidelines for handling electrostatically sensitive devices at the end of this manual. Installing the SO DIMM Cards To plug in expansion submodules, proceed as follows: 1.
-
Page 70: Replacing The Backup Battery
Replacing the Backup Battery Battery Power Supply for Real-Time Clock and Configuration A backup battery (3.6 V-lithium battery) powers the the real-time clock even after the device is switched off. In addition to the time of day, all the information about the Box PC (device configuration) is stored in RAM. - Page 71 Figure 4-5 Position of the Backup Battery Caution Risk of damage! Only replace the lithium battery with an identical battery or with a type recommended by the manufacturer (Order No.: W79084-E1003-B1). Dispose of used batteries in keeping with local regulations. Changing SETUP If you change the battery or unplug the battery connector you must run the SETUP program to reset your programming device’s configuration data (see Chapter 5).
-
Page 72: Installation Of Expansion Cards
Installation of Expansion Cards Notes about the Cards The Box PC is designed for the use with cards as per the AT/PCI specification.The dimensions of the cards may not exceed the stated dimensions. If the height is ex- ceeded, contact problems, malfunctions and difficulties with the assembly cannot be excluded. - Page 73 Figure 4-8 Short PCI Cards (5 V) Figure 4-9 Long PCI Cards (5 V) Note about Long PCI Cards Before long PCI cards can be inserted into the guides of the fan trough, they must be fitted with a so-called extender (this should form part of the scope of supply of long PCI boards).
-
Page 74: Removal And Installation Of The Device For Holding Down The Modules
4.4.1 Removal and Installation of the Device for Holding Down the modules The device for holding down the modules is attached to the housing with a screw. It has three slits, through which the slide elements are inserted. Proceed as follows: 1. - Page 75 Aligning the Holding-Down Device Proceed as follows to install the holding-down device. 1. Insert the slide element through the guide slit until it is resting firmly on the module. The module must now be introduced into the notch. Caution No pressure may be exerted on the module! Therefore, do not use force to press the slide element onto the module.
-
Page 76: Removal And Installation Of An Expansion Card
4.4.2 Removal and Installation of an Expansion Card Proceed as follows: 1. Open the housing as described in Section 4.1. 2. Remove all connectors from the expansion card and note the assignment. 3. Remove the device for holding down the modules as described in Section 4.4.1. 4. -
Page 77: Removal And Installation Of Drives
Removal and Installation of Drives 4.5.1 Removal and Installation of the Hard Disk Drive 1. Undo the 4 screws on the back of the housing. 2. Open the drive holder. 3. Detach the drive holder from the mounting and lay the drive holder with its top on the housing. - Page 78 SIMATIC Box PC 620 Expansions Figure 4-13 Hard Disk Drive with Holder Removed SIMATIC Box PC 620 Manual 4-18 A5E00131465-01...
-
Page 79: Removal And Installation Of A Cd Rom Drive
4.5.2 Removal and Installation of a CD ROM Drive Depending on the device equipment, a CD ROM drive is installed in the Box PC. 1. Undo the 2 screws on the back of the housing. 2. Remove the cover of the CD ROM drive. 3. -
Page 80: Removal And Installation Of The Floppy Drive
4.5.3 Removal and Installation of the Floppy Drive 1. Open the housing as described in Section 4.1. 2. Remove the drive holder as described in Section 4.5.1. 3. Release the interlock of the controller flex-lead on the motherboard and pull the flex-lead out of the connector assembly. -
Page 81: Removal And Installation Of The Ls 240 Drive
4.5.4 Removal and Installation of the LS 240 Drive The removal and installation of the LS240 drive takes place with the same steps as for the floppy drive. 1. Open the housing as described in Section 4.1. 2. Remove the drive holder as described in Section 4.5.1. 3. -
Page 82: Removal And Installation Of The Power Supply Unit
Removal and Installation of the Power Supply Unit 1. Open the system housing as described in Section 4.1. 2. Remove the drive holder as described in Section 4.5.1. 3. Undo and remove the 3 screws of the cover of the power supply unit from the housing 4. -
Page 83: Removal And Installation Of The Bus Board
Removal and Installation of the Bus Board 1. Open the housing as described in Section 4.1. 2. Remove all the modules from the slots (proceed as described in Section 4.4.2). 3. Remove the drive holder as described in Section 4.5.1. 4. -
Page 84: Removal And Installation Of The Motherboard
Removal and Installation of the Motherboard 1. Open the housing as described in Section 4.1. 2. Remove all the modules from the slots (proceed as described in Section 4.4.2). 3. Remove the drive holder as described in Section 4.5.1. 4. Remove the power supply unit as described in Section 4.6. 5. -
Page 85: Removal And Installation Of The Device Fan
Removal and Installation of the Device Fan The Box PC is cooled by means of a fan which sucks hot air out of the housing. 1. Open the housing as described in Section 4.1. 2. Pull off the fan cable connector on the basic board. 3. -
Page 86: Processor Change
4.10 Processor Change Proceed as follows to exchange the processor: 1. Pull out the fan cable plug. 2. Remove the cooling unit which is fixed using a lifting lever. 3. Then push the lever in the direction of the arrows (1) and swing it upwards as far as it will go (2). -
Page 87: Reset Button
4.11 Reset Button A hardware reset is initiated by means of the reset button on your device. The PC is restarted. In the Box PC the reset button is on the drive side beside the floppy drive. The re- set button can be only actuated with a thin pen (e.g. an opened-up paper clip). The position of the reset button is marked in the illustration of the Box PC below. - Page 88 SIMATIC Box PC 620 Expansions SIMATIC Box PC 620 Manual 4-28 A5E00131465-01...
-
Page 89: Configuring The Simatic Box Pc 620
Configuring the SIMATIC Box PC 620 What Does This Chapter Contain? In this chapter, you will learn how to configure your programming device. You need to do this if you change your system by adding, removing, or exchanging expansion modules and memory expansions, or by replacing a system module. Chapter Overview In chapter Changing the Device Configuration with BIOS SETUP... -
Page 90: Changing The Device Configuration With Bios Setup
Changing the Device Configuration with BIOS SETUP Changing the Device Configuration Your Box PC device configuration is set for working with the software supplied with the unit. You should only change the preset values if you have modified your Box PC in any way or if a fault occurs when the unit is powered up. BIOS SETUP Program The SETUP program is in the ROM-BIOS. - Page 91 Screen Display Following Power On With the default setting of your PC, the display shown below appears following power-on: Phoenix BIOS 4.0 A5E00123801–ES02 Copyright 1985-2001 Phoenix Technologies Ltd. All Rights Reserved. SIMATIC Box PC 620 V02.01.02 CPU = PentiumIII 637K System RAM Passed 119MB Extended RAM Passed 0128K Cache SRAM Passed System BIOS shadowed...
- Page 92 Menu Structure The screen is divided into four sections. In the top section, you can select the menu screens [Main], [Advanced], [Security], [Power], [Boot Sequence], [Version], [Exit]. In the left of the center section you can select various settings or submenus.
-
Page 93: The Main Menu
5.1.1 The Main Menu Main System Time: System Date: Diskette A: Primary Master Selectable Primary Slave submenu Secondary Master Secondary Slave Memory Cache: Boot Options Keyboard Features Hardware Options System Memory: Extended Memory: Help Exit Figure 5-2 SETUP Main Menu (Example) Setting in the Main Menu In the Main menu, you can move upwards and downwards using the cursor keys [↑] and [↓] to select the following system parameters:... - Page 94 System Time und System Date Uhrzeit und Datum System Time and System Date indicate the current values. Once you have selected the appropriate option, you can use the [+] and [–] keys to modify the time setting Hour:Minute:Second and the date Month/Day/Year.
- Page 95 Primary Master Primary Slave Secondary Master/ Secondary Slave The system jumps to the following submenu when you select this type of menu field: Main Type: Total Sectors: Maximum Capacity: Multi-Sector Transfers: LBA Mode Control: 32 Bit I/O: Transfer Mode: Ultra DMA Mode: Help Exit Figure 5-3...
- Page 96 “Multi Sector-Transfer” Field The entry in the Multi-Sector Transfer field defines the number of sectors transferred per interrupt. The value depends on the drive and should be set only by setting the Type field to Auto. Disabled 2,4,8,16 sectors “LBA Mode Control” field If the LBA Mode Control field (enabled,disabled) is set to ’Enabled’, the system supports hard disks with capacities greater than 528 Mbytes.
- Page 97 ”Memory Cache” Submenu The following pop-up menu appears when you select the submenu “Memory cache” in the main menu: Main System Time: System Date: Diskette A: Primary Master Primary Slave Secondary Master Secondary Slave Memory Cache: Boot Options Keyboard Features Hardware Options System Memory: Extended Memory:...
- Page 98 ”Boot Options” Submenu The following submenu appears when you select the option “Boot Options” in the main menu: Main QuickBoot Mode: SETUP prompt: POST Errors: Floppy check: Summary screen: Help Exit Figure 5-5 ”Boot Options” Submenu Quick Boot Some hardware tests are skipped to speed up the boot procedure. Mode SETUP prompt The message PRESS <F2>...
- Page 99 Floppy check The floppy head is stepped inward and then back to its original position during the system run-up phase. This test is useful because it reinitializes the drive. Summary The most important system parameters are displayed when the system screen run-up phase completes.
- Page 100 “Keyboard Features” Submenu The following submenu appears if you select the “Keyboard Features” field in the main menu: Main NumLock: Key Click: Keyboard auto-repeat rate: Keyboard auto-repeat delay: Help Exit Figure 5-7 ”Keyboard Features”Submenu Numlock Key Click Keyboard auto-repeat rate 5-12 PhoenixBIOS Setup Utility Keyboard Features...
- Page 101 ”Hardware Options” Submenu The following submenu appears when you select the “Hardware Options” field in the main menu: Main PCI – MPI / DP: Onboard Ethernet: Ethernet Address: LAN Remote Boot: Cardbus/PCMCIA Slot: SafeCard functions: Legacy USB Support: Fan Control: CRT / LCD selection: LCD-Screensize: DSTN Contrast:...
- Page 102 Entry Cardbus / [Disabled] PCMCIA Slot [Enabled] SafeCard [Enabled] functions [Disabled] The relevant driver and the application must be started for operation of the monitoring functions. Legacy USB [Disabled] Support [Enabled] Fan Control [Enabled] [Disabled] CRT / LCD [LCD Enabled] selection [CRT Enabled] [SIMULTAN]...
-
Page 103: The Advanced Menu
5.1.2 The Advanced Menu Menu Structure Main Setting items on this menu to incorrect values may cause your system to malfunction COM/LPT Configuration PCI Configuration Installed O/S: Reset Configuration Data: Floppy disk controller: Local Bus IDE adapter: Large Disk Access Mode: Memory Gap at 15 Mbyte: Video Adapter Settings Help... - Page 104 Local Bus IDE [Primary] adapter [Secondary] [Both] [Disabled] Large Disk [DOS] Access Mode [OTHER] Memory Gap at [Disabled] 15 MByte [Enabled] Submenu COM/LPT Configuration COM/LPT Configuration Internal COM 1: Base I/O address: Interrupt: Internal COM2: Base I/O address: Interrupt: Internal LPT1: Mode: Base I/O address: Interrupt:...
-
Page 105: Pci Configuration Submenu
Printer Port Internal LPT1 Mode: Use this setting to set the operating mode of the printer interface. Refer to the table below to ensure that the setting matches the printer connected to the printer port. Settable Mode Output Only Standard parallel port – unidirectional (SPP) Bidirectional Standard parallel port –... - Page 106 ”PCI Devices” Submenu If the PCI devices field is selected, the following submenu appears: PCI Devices, Slot #1 Option Rom Scan Enable Master: Latency Timer Help Exit Figure 5-12 ”PCI Devices, Slot #1” Submenu Option ROM [Enabled] Scan: [Disabled] Enable Master: [Enabled] [Disabled] Latency Timer...
- Page 107 Submenu “PCI/PNP ISA IRQ Resource Exclusion” Available means that the Plug and Play mechanism in BIOS can allocate the IRQ to Plug and Play submodules or motherboard functions. Use the ’Reserved’ setting only if the interrupt has to be assigned specifically to PCMCIA submodules with no Plug and Play capability.
- Page 108 “PCI IRQ line” Field PCI Configuration PCI Device, Slot #1 PCI Device, Slot #2 PCI/PNP ISA IRQ Resource Exclusion PCI IRQ line 1: PCI IRQ line 2: PCI IRQ line 3: PCI IRQ line 4: Help Exit Figure 5-14 ”PCI Configuration” Submenu Disabled No interrupt possible for this PCI-IRQ line AutoSelect...
- Page 109 Submenu “Video Adapter Settings” Video Adapter Settings Frame Buffer Size: AGP Rate: Default Primary Video Adapter: Help Exit Figure 5-15 Submenu”Video Adapter Settings” Frame Buffer Size AGP Rate Default Primary Video Adapter SIMATIC Box PC 620 Manual A5E00131465-01 PhoenixBIOS Setup Utility Advanced [8 MB] [2x]...
-
Page 110: The Security Menu
5.1.3 The Security Menu Summary You can only edit the fields enclosed in square brackets. You can assign two passwords to protect your PC from unauthorized use. With the supervisor password, the setup access can be restricted or denied to normal users. Main Advanced Supervisor Password is... - Page 111 Fixed disk boot [Normal] Sector [Write protect] No operating system can be installed. Diskette This mode of protection is not active unless ”Password on boot ” is set to access [enabled]. [Supervisor] Diskette access is not possible unless the supervisor [User] SIMATIC Box PC 620 Manual A5E00131465-01...
-
Page 112: The Power Menu
5.1.4 The Power Menu Summary This menu has the following structure. Main APM: Power Savings: Standby Timeout: Hard Disk Timeout: Help Exit Figure 5-17 “Power” Menu The Power menu offers a number of power saver modes for environmentally friendly computing: [Enabled] (Advanced [Disabled]... -
Page 113: The Boot Sequence Menu
5.1.5 The Boot Sequence Menu Summary This menu allows you to prioritize the boot devices. Main + Removable Device + Hard Drive ATAPI CD-ROM Drive Help Exit Figure 5-18 “Boot Sequence” Menu This menu lists the boot devices in groups. The group with the highest priority is at the top. - Page 114 Groups marked + can contain more than one device. When you select a group marked in this way, hit Enter to view the list of devices in the group. See the figure below for an illustration: Main Advanced –Removable Devices Legacy Floppy Drive –Hard Drive CD-ROM Drive...
-
Page 115: The Version Menu
5.1.6 The Version Menu This menu contains the information you will have to quote when you send us technical questions about your system. Main SIMATIC Bios Version Bios Number Board Revision MPI/DP Firmware Ethernet Config Version CPU Type CPU Speed CPU ID Code Revision Help... -
Page 116: The Exit Menu
5.1.7 The Exit Menu The Exit Menu The setup program is always terminated using this menu. Main Exit Saving Changes Exit Discarding Changes Setup Defaults Load Discard Changes Save Changes Help Exit Figure 5-21 Menü “Exit” Save Changes All changes are saved; a system restart is carried out with the new &... -
Page 117: Default Setup Settings
5.1.8 Default Setup Settings Documenting Your Device Configuration If you have made any modifications to the default Setup settings, you can enter them in the following table. You can then refer to these entries if you need to make any hardware modifications later. Note Print the following table out and keep the pages in a safe place once you have filled in your entries. - Page 118 Systemparameter Fan Control CRT/LCD selection LCD Screensize DSTN Contrast PS2 Mouse Advanced COM/LPT Configuration Internal COM1 Base I/O address Interupt Internal COM2 Base I/O address Interrupt Internal LPT1 Mode Base I/O address Interrupt DMA Channel (nur bei ECP) PCI-Configuration PCI Device Slot 1 Option ROM Scan Enable Master Latency timer...
- Page 119 Systemparameter Video Adapter Settings Frame Buffer Size AGP Rate Default Primary Video Adapter Security Supervisor Password Is User Password Is Set Supervisor Password Set User Password Password on boot Fixed disk boot sector Diskette Access Power Power Savings Standby Timeout Hard Disk Timeout Fan Control Boot Sequence...
-
Page 120: Configuring The Pc Card
S Card Services S Client Drivers S Flash File System from the nearest Siemens sales office or representative. Your PC comes supplied with Windows 98 / NT4 / 2000 already installed; this sup- ports the PC Card interface. After configuration, the computer must be rebooted. -
Page 121: Error Diagnosis
Error Diagnosis Overview of Chapter In chapter Problems When Using Modules from Other Manufacturers The Monitor Remains Dark The Screen Display Does not Appear or Drifts No Mouse Pointer Appears on the Screen The Clock Time and/or the Date in Your PC Is Incorrect USB-Device does not function An Error Message Appears on the Screen Diagnostic Messages (Port 80) -
Page 122: Problems When Using Modules From Other Manufacturers
– If the PC still crashes, you must contact your technical support team. – If the error no longer occurs, the module you used from another manufactu- rer was the cause of the fault. Replace this module with a Siemens module, or contact the module supplier. -
Page 123: The Monitor Remains Dark
The Monitor Remains Dark Cause and Remedy The following causes are possible: The monitor has been switched off. S Switch on the monitor. The monitor is in “powersave” mode. S Press any key on the keyboard. The brightness button has been set to dark. S Set the screen’s brightness button to obtain more light. -
Page 124: The Screen Display Does Not Appear Or Drifts
The Screen Display Does not Appear or Drifts Cause and Remedy Either the incorrect line frequency and/or the incorrect resolution is set for the screen or for the user program. S Stop the user program. If the error still occurs after you have ended the pro- gram, switch off the monitor. -
Page 125: The Clock Time And/Or The Date In Your Pc Is Incorrect
The Clock Time and/or the Date in Your PC Is Incorrect Remedy Set the clock time and the date in the setup menu. Press <F2> to call setup when booting the computer. Note The battery is dead if the clock time and the date are still incorrect after you switch off your PC and switch it back on again. -
Page 126: An Error Message Appears On The Screen
An Error Message Appears on the Screen Error Messages The following table describes the error messages that the BIOS system outputs. Error messages the operating system or program outputs are described in the manuals for these programs. Press <F2> to call Setup when booting the computer. Error Message on the Screen Address conflict Plug and Play Problem... - Page 127 Error Message on the Screen Operating system not found Possible causes: No operating system present Incorrect drive addressed (diskette in drive A/B) Incorrect active boot partition Incorrect entries in SETUP for the BOOT drive Previous boot incomplete Abort of the previous BOOT procedure, for example, due to a power Default configuration used failure.
-
Page 128: Diagnostic Messages (Port 80)
Diagnostic Messages (Port 80) When the SIMATIC PC is powered up, it runs a self-test (POST = Power On Self-Test). If the POST detects a fault, it outputs the sequence of beeps (beep code) assigned for the fault. Each beep code consists of 2 x 2 sequences. In addition, the individual self-test steps are output at I/O port 80h. - Page 129 The POST codes in order of occurrence: Display (hex) TP_VERIFY_REAL TP_RESET_PIC TP_RESTORE_CRO TP_PCI_BM_RESET TP_CHK_SUTDOWN TP_SET_HUGE_ES TP_DISABLE_NMI TP_CPU_INIT TP_GET_CPU_TYPE TP_CLEAR_BOOT TP_HW_INIT TP_TIMER_INIT TP_CS_INIT TP_PEM_SIZER_INIT TP_IO_INIT TP_CACHE_INIT TP_CHECKSUM TP_SIZE_RAM TP_CACHE_AUTO TP_ZERO_BASE TP_ADDR_TEST TP_BASERAML TP_CPU_INIT TP_SYS_SHADOW TP_CPU_CACHE_ON TP_FDISK_INIT TP_PM_INIT TP_8742_INIT TP_DMA_INIT TP_RESET_PIC TP_COMPUTE_SPEED TP_740_INIT TP_CMOS_TEST TP_ADV_CS_CONFIG...
- Page 130 Display (hex) TP_PCI_INIT TP_CONFIG TP_VIDEO TP_VID_SHADOW TP_SET_HUGE_ES TP_8742_TEST TP_KB_TEST TP_KEY_CLICK TP_KEYBOARD TP_HOT_INT TP_QUIETBOOT_START TP_CR_DISPLAY TP_CPU_DISPLAY TP_DISPLAY_F2 TP_CPU_CACHE_OFF TP_MEMORY_TEST TP_EXT_MEMORY TP_EXT_ADDR TP_USERPATCH1 TP_CACHE_ADVNCD TP_CACHE_CONFIG TP_DISP_CACHE TP_DISP_SHADOWS TP_DISP_NONDISP TP_ERROR_MSGS TP_TEST_CONFIG TP_HW_INTS TP_COPROC TP_CLEAR_HUGE_ES TP_IO_BEFORE TP_BIOS_INIT TP_INIT_EXT_BDA TP_PCI_PCC TP_RS232 TP_LPT 6-10 Meaning Initialize the PCI interface Check the configuration Initialize the video interface Copy the video BIOS to RAM...
- Page 131 Display (hex) TP_IO_AFTER TP_FDISK_CFG_IDE_CTRLR TP_ENABLE_NMI TP_FLOPPY TP_FDISK TP_MOUSE TP_CD TP_USERPATCH2 TP_ROM_SCAN TP_PM_SETUP TP_IRQS TP_TIME_OF_DAY TP_KEYLOCK_TEST TP_PEM_LOCK TP_PEM_DISPLAY TP_ERASE_F2 TP_SCAN_FOR_F2 TP_SETUP_CHEK TP_CLEAR_BOOT TP_ERROR_CHECK TP_POST_DONE TP_CLEAR_SCREEN TP_PASSWORD TP_PARITY TP_BOOT_MENU TP_PREPARE_BOOT TP_INT19 SIMATIC Box PC 620 Manual A5E00131465-01 Meaning Re-enable the IO circuits Configure the IDE controller Enable the NMI Initialize the floppy controller...
- Page 132 Error Diagnosis SIMATIC Box PC 620 Manual 6-12 A5E00131465-01...
-
Page 133: Hardware Information
Hardware Information Overview of Chapter In chapter Current Requirement of the Components (Maximum Values) Overview of the Components and Ports System Resources Monitoring Functions Ports Bus Unit Power Supply Unit with 85W Leistungsabgabe (AC and DC) Power Supply Unit with 105W Leistungsabgabe (AC and DC) Connecting Cables SIMATIC Box PC 620 Manual A5E00131465-01... -
Page 134: Current Requirement Of The Components (Maximum Values)
Current Requirement of the Components (Maximum Values) Basic System with Power Supply Unit 85W Component Pentium III Motherboard Processor Pentium III 1260 Floppy disk drive / LS 240 Hard disk CD RW/DVD drive Sum (basic configuration) ISA/PCI slots (Sum) PC-Card slot Sum (max. -
Page 135: Overview Of The Components And Ports
Overview of the Components and Ports Component/Port Chipset VIA PN133T BIOS Update via software Pentium III / Celeron (type FC-PGA370) Memory DIMM modules up to max. 256MB/DIMM Graphics UXGA LCD Controller on the AG Bus is integrated Chip set (S3) Hard Disk ATA-33 mode CD ROM... -
Page 136: System Resources
Component/Port Parallel Standard, bidirectional, EPP and ECP mode DP12 * Communication port SIMATIC S7 Universal Serial Bus Ethernet 10BaseT/100Base-TX (Intel 82559) Electrically isolated in a safety extra-low voltage circuit (SELV) Optional product feature System Resources All system resources (hardware address, memory configuration, IRQ, DMA channel) are assigned dynamically by the Windows OS, depending on the hardware configuration, drivers and connected peripheral devices. -
Page 137: Monitoring Functions
Monitoring functions The LEDs described in the following passages exist only for specific device models. The basic model of the Box PC 620 has no LEDs. The hardware signals are described in Section 7.5.2. 7.4.1 Overview Function The following individual functions are implemented: S Temperature monitoring and excess/insufficient temperature indication S Watchdog S Monitoring the processor fan... -
Page 138: Temperature Monitoring/Indication
7.4.3 Temperature Monitoring/Indication Temperature Monitoring The temperature is measured by means of three temperature sensors. One sensor monitors the processor temperature, the second the temperature in the area of the memory module and the expansion cards and the third the temperature in the area of the power supply unit. -
Page 139: Watchdog (Wd)
7.4.4 Watchdog (WD) Function The watchdog monitors the execution of a program. The purpose of the WD is to notify the user of a program crash through various reactions. The watchdog is idle when the PC is switched on or after a HW-RESET(cold start), i.e. -
Page 140: Fan Monitoring
7.4.5 Fan Monitoring Processor fan operation is monitored. If the fan should fail, the following reactions are triggered: SOM application is displayed The temperature error remains stored until the cause of the fan failure has been corrected in one of the following ways: S Acknowledgement of the error message via the SOM program. -
Page 141: External Ports
Ports The following ports are available on the motherboard of the Box PC 620: S External ports for the connection of external devices S Interfaces for the connection of display devices S Ports for internal connections (drives, bus boards etc.) The connector assignments of the individual ports are described in the following chapters. - Page 142 Serial Port COM1 (PLC/V.24/Modem) * The serial port (COM 1) on the Box PC has the following pinout: Figure 7-1 COM 1 Serial Port (Socket Connector) Pin No. Designation TxD (D1) RxD (D2) RTS (S2) CTS (M2) DSR (M1) GND (E2) DCD (M5) +TTY RxD 10 - 17...
- Page 143 Gender Changer for COM1 You can convert the COM1/V24 / AG port of the SIMATIC PC family into the usual 25 pin male connector by means of the enclosed gender changer (25 pin / 25 pin). For this, you only have to plug the gender changer onto the COM1 socket and secure it with the two hexagon head screws.
-
Page 144: Parallel Port Lpt1
Parallel Port LPT1 The parallel port (LPT 1) on the Box PC has the following pinout: Figure 7-3 Parallel Port LPT 1 (Socket) Pin No. Designation / Strobe (CLK) Data - Bit 0 Data - Bit 1 Data - Bit 2 Data - Bit 3 Data - Bit 4 Data - Bit 5... - Page 145 PS/2 Mouse Port You can connect an external PS/2 mouse to your Box PC. The connector has the following pinout: Figure 7-4 Connector Pinout for a PS/2 Mouse Pin No. Designation PS/2 Keyboard You can connect an external keyboard to your Box PC. The connector has the fol- lowing pinout: Figure 7-5 Connector Pinout for an External Keyboard Connecting Cable Pin-No.
- Page 146 USB Port The Universal Serial Bus ports have the following pinout: Figure 7-6 USB port Pin-No. Designation - Data + Data The connector is of type A. The port is rated as a high current USB (500mA). 7-14 Description +5V (fused) Data line Data line Ground...
- Page 147 PROFIBUS/MPI Socket Connector * The PROFIBUS/MPI socket connector on the Box PC has the following pinout: Figure 7-7 PROFIBUS/MPI Socket Connector Pin No. Designation LTG_B RTS_AS M5EXT P5 EXT LTG_A RTS_PG Screen Optional product feature SIMATIC Box PC 620 Manual A5E00131465-01 Description Pin 1 is not assigned...
- Page 148 Ethernet RJ45 Connection Figure 7-8 Ethernet port Pin-No. Designation TD– 4, 5 * SYMR 7, 8 * SYMT LED green LED yellow * is not necessary for data transfer 7-16 LED yellow LED green Description Transmitted data Transmitted data Received data Internal 75 Ω...
- Page 149 VGA Socket Connector The VGA socket connector on the Box PC has the following pinout: Figure 7-9 VGA Socket Connector Pin No. Designation DDC_DAT EXT_H EXT_V DDC_CLK SIMATIC Box PC 620 Manual A5E00131465-01 Description Green Blue Unassigned Ground Ground Ground Ground 5 V (fused) Ground...
-
Page 150: Assignment Of The Front Ports On The Motherboard
7.5.2 Assignment of the Front Ports on the Motherboard Port Position Display (CMOS) Display (LVDS) I/O Front COM2 Display Port (CMOS, X420) D-STN and TFT displays with 5V CMOS port and VGA resolution (640x480) can be connected to this port. The display is selected and the D-STN/TFT signals allocated automatically in accordance with the coding of the Display Select inputs. - Page 151 Signal Meaning DSTN P5V_D_fused +5V (fused) Display VCC P5V_D_fused +5V (fused) Display VCC Shift Clock Horizontal Sync Vertical Sync Upper Data Bit 6 Upper Data Bit 7 Upper Data Bit 2 Upper Data Bit 3 Upper Data Bit 1 Upper Data Bit 0 Lower Data Bit 3 Lower Data Bit 2 Lower Data Bit 1...
- Page 152 Display Port (LVDS) TFT displays with an LVDS port can be connected to this port. The connection of 18 bit displays up to a resolution of 1024x768 pixels is possible. The permissible display clock rate is 20MHz to 66Mhz. The display is selected automatically in accordance with the coding of the Select Inputs display.
- Page 153 Allocation of the Display to Display Select Pins The automatic configuration of one of 15 possible displays is effected via the Display Select Inputs. The Display Select inputs are fitted with Pull-Up resistors, i.e. if these inputs are not connected, they have a high level. In order to generate a low level, the input must be connected to GND.
- Page 154 I/O Port for Front Control Elements All the signals in addition to the Display and COM2 port which are necessary for the connection of front control elements are applied to this port. The maximum cable length is 50cm with a USB data transfer rate of 12MBaud. Pin No.
-
Page 155: Assignment Of The Internal Ports On The Motherboard
Internal Serial Port COM2 (V.24) This port is connected in parallel to the external COM2 port. Both ports can therefore only be used alternatively. The assignment is executed in such a way that a 1:1 connection to a 9 pin subminiature Cannon socket can be made when using insulation piercing connecting devices. - Page 156 2.5” hard disks internal CD ROM internal LS240 internal TTY transmitter/ internal receiver PS connection internal for 3.5” hard disk PS connection internal for CPU fan PS connection internal for device fan Backup battery internal Optional product feature Port to the Bus Unit The Box PC has a bus unit with a PCI slot and a shared ISA /PCI slot.
- Page 157 DC Port of the Power Supply Unit 85W The power supply unit has a connector (X2) through which all the signals on the DC side are connected with the motherboard. Row A Description PS_PWROK Power Good Signal TTY_VCC Potential–free VCC (15V ± 3V) for TTY port TTY_GND TTY_GND...
- Page 158 DC Port of the Power Supply Unit 105W The power supply unit has a connector (X2) through which all the signals on the DC side are connected with the motherboard. Pin no. Designation PS_NAU_N PS_PWROK N12V P12V P12V 7-26 Description Power failure early warning alarm Power Good Signal Ground...
-
Page 159: Index
Port to the Floppy Disk Drive This port is intended for the connection of a notebook floppy disk drive. The maximum connection length of the data cable may not exceed 40cm. Pin no. Designation INDEX_N DS_N0 DCHG_N n.c. n.c. Reserved MOT_N0 Reserved DIR_SL_N... - Page 160 Meaning RESET Reset Data signal D7 Data signal D8 Data signal D6 Data signal D9 Data signal D5 Data signal D10 Data signal D4 Data signal D11 Data signal D3 Data signal D12 Data signal D2 Data signal D13 Data signal D1 Data signal D14 Data signal D0 Data signal D15...
- Page 161 Connection for LS240 Drive The optional LS240 drive is connected via this port. This port is connected in parallel with the secondary IDE port. The connected LS240 drive is automatically master (i.e. bootable drive) as the result of a special RC circuit. The maximum connection length of the data cable may not exceed 40cm.
- Page 162 PS Connection for Hard Disk The power supply of the 3.5” hard disk is effected via this connection. Pin No. Designation P12V Connection for CPU Fan The CPU fan is connected via this connection. Pin No. Designation +12V CPU FAN_CLK Connection for Device Fan The device fan is connected via this connection.
-
Page 163: Bus Board
Bus Board 7.6.1 Design and Mode of Operation The bus board is designed as a passive link between the motherboard and the expansion modules The bus board has two ISA slots and two PCI slots, as well as a shared ISA /PCI slot. -
Page 164: Isa Slot Pin Assignment
7.6.2 ISA Slot Pin Assignment Designation –IOCHCK SD 07 SD 06 SD 05 SD 04 SD 03 SD 02 SD 01 SD 00 –IOCHRDY SA 19 SA 18 SA 17 SA 16 SA 15 SA 14 SA 13 SA 12 SA 11 SA 10 SA 09... - Page 165 Designation –SBHE# LA 23 LA 22 LA 21 LA 20 LA 19 LA 18 LA 17 –MEMR# –MEMW# SD 08 SD 09 SD 10 SD 11 SD 12 SD 13 SD 14 SD 15 low active Under normal conditions, the signals -SBHE, LA17 - LA23, -MEMR and MEMW are operated as outputs (sending from the CPU).
-
Page 166: Pci Slot Pin Assignment
7.6.3 PCI Slot Pin Assignment 5V System Environment Side B Side A -12V TRST# +12V Ground INTA# INTB# INTC# INTD# PRSNT1# Reserved Reserved PRSNT2# Reserved Ground Ground Ground Ground Reserved Reserved Ground RST# Ground GNT# REQ# Ground +5V (I/O) Reserved AD[31] AD[30] AD[29]... - Page 167 Assignment of the Slot Specific PCI Bus Signals PCI Socket Pin No. SIMATIC Box PC 620 Manual A5E00131465-01 PCI Slot 1 shared ISA PCI Slot clk (slot 1) inta# intc# intb# intd# req1 gnt1 ad29 clk (slot2) intb# intd# intc# inta# req0 gnt0...
-
Page 168: Power Supply With 85W Power Output (Ac And Dc)
Power Supply with 85W power output (AC and DC) Technical Specifications Voltage + 12 V – 12 V + 5 V + 3.3 V Power-Good-Signal Power-Good-Signal: preset time hold–up time save time Figure 7-11 Time Characteristics of the Power Good Signal 7-36 Max. -
Page 169: Power Supply With 105W Power Output (Ac And Dc)
Power Supply with 105W power output (AC and DC) Technical Specifications Voltage + 12 V – 12 V + 5 V + 3.3 V Power-Good-Signal Power–Good–Signal: preset time hold–up time save time Figure 7-12 Time Characteristics of the Power Good Signal SIMATIC Box PC 620 Manual A5E00131465-01 Max. -
Page 170: Connecting Cables
Connecting Cables SIMATIC S5 Connecting Cable You can use the SIMATIC S5 connecting cable (not supplied with all variants) to connect your PC to a SIMATIC S5 programmable controller. Please read the notes in Chapter 3. PU 7xx side 25 pin male connector aktiv –U –U... -
Page 171: Reinstallation Of The Software
Reinstallation of the Software What Does This Chapter Contain? This chapter describes how to reinstall software in case the preinstalled software should be faulty. Chapter Overview Section Restoring the Hard Disk Installation of the Windows Operating System Installing Drivers and Software Installing and Operating the Burner Software SIMATIC Box PC 620 Manual A5E00131465-01... -
Page 172: Restoring The Hard Disk
Restoring the Hard Disk 8.1.1 Creating Partitions under Microsoft Windows 98 After installing a new hard disk it is necessary to create partitions with the program “FDisk” when the partitions have errors or need to be changed. Caution By deleting or creating partitions or logical DOS hard drives all saved data is lost on the hard disk. -
Page 173: Creating Partitions Under Windows Nt
Creating an Extended Partition In order to create an extended partition, you have to first boot from the Windows Me Recovery CD as described in steps 1 to 4 above. Using ”A:\>FDisk” start the Microsoft Windows Me hard disk configuration program. -
Page 174: Creating Partitions Under Windows 2000
To restore the partitions to their original condition, please do the following: Primary Partition 1. To boot from the Recovery CD proceed as follows: When the message Press <F2> to enter Setup appears on the screen press the ESC key. After initialization a boot menu to select the boot options is displayed. - Page 175 Primary Partition, FAT32 File System 1. Boot from the Recovery CD and press ESC when the BIOS message Press <F2> to enter Setup appears. After initialization, select the boot options in the boot menu. 2. Select ”ATAPI CD-ROM Drive”. 3. Select ”2. Boot for FDISK, FORMAT or Windows 98 Setup” in the ”Microsoft Windows Startup Menu”...
-
Page 176: Installing The Windows Operating System
If the hard disk has not been installed, first select “2. Boot for FDISK, FORMAT or Windows-Setup (Section 8.1). 5. You have to acknowledge the “SIEMENS End User License Agreement” with the F8 function key. Pressing ESC allows you to decline the agreement and cancels the installation. -
Page 177: Installing The Recovery Cd For Microsoft Windows Nt
9. After having started setup.exe please follow the screen instructions. 8.2.2 Installing the Recovery CD for Microsoft Windows NT This CD contains encoded data which can only be transferred to a SIEMENS SIMATIC PC. Data transfer is carried out with the OEMSETUP.EXE program on the CD ROM or, after booting, from the CD-ROM with the recovery function. -
Page 178: Installing The Recovery Cd For Microsoft Windows 2000
8.2.3 Installing the Recovery CD for Microsoft Windows 2000 This CD contains encoded files which can only be transferred to a SIEMENS SIMATIC PC. Data transfer is made with the OEMSETUP.EXE program on the CD ROM, or after booting from the CD ROM with the recovery function. - Page 179 If the hard disk has not been installed, first select “2. Boot for FDISK, FORMAT or Windows-Setup (Section 8.1). 5. You have to acknowledge the “SIEMENS End User License Agreement” with the F8 function key. Pressing ESC allows you to decline the agreement and cancels the installation.
- Page 180 Setting the Language Selection for Windows 2000 The Multilanguage User Interface (MUI) allows you to set the Windows 2000 menus and dialogs to another language. In order to install the MUI, run the program MUISETUP.EXE in the CD_DRIVE:\MUI folder on the Recovery CD and follow the screen dialog to install the desired languages.
-
Page 181: Installing Drivers And Software
Installing Drivers and Software To install the drivers and software from the “Documentation and Drivers” CD supplied, proceed as follows: S Place the CD in the CD ROM drive. S Start the Start programm on the CD.The Acrobat Reader is started by the CD. S Navigate to the driver list (language, operating system and device dependent). - Page 182 Reinstallation of the Software SIMATIC Box PC 620 Manual 8-12 A5E00131465-01...
- Page 183 Guidelines for handling electrostatic sensitive devices (ESD) Overview of chapter In chapter What does ESD mean? Electrostatic charging Basic protective measures against discharge of static electricity SIMATIC Box PC 620 Manual A5E00131465-01 you will find on page...
-
Page 184: A.1 What Does Esd Mean?
What does ESD mean? Definition All electronic components are equipped with high–integrated modules or components. Conditioned by their technology, these electronic components are extremely sensitive to overvoltages and therefore to discharges of static electricity. The short term ESD has been adopted for these Electrostatic Sensitive Devices/ assemblies. -
Page 185: A.2 Electrostatic Charging
Electrostatic charging Charging Anyone who is not conductively connected to the electrical potential of their surroundings can be electrostatically charged. The maximum electrostatic voltage values which an operator can be charged with when contacting the materials stated in the illustration are shown in Fig. A–1. These values correspond to the specifications of IEC 801–2. -
Page 186: A.3 Basic Protective Measures Against Discharge Of Static Electricity
Basic protective measures against discharge of static electricity Ensuring a good ground connection When handling electrostatic sensitive devices, ensure that your person, the workplace and packaging are grounded. In this manner you avoid static charge. Avoid direct contact As a general principle, only touch electrostatic sensitive devices when this is unavoidable (e.g. -
Page 187: B Technical Specifications
Technical Specifications SIMATIC Box PC 620 Manual A5E00131465-01... - Page 188 Technical Specifications of the SIMATIC Box PC 620 General Order nos. Dimensions (w x h x d) Weight Supply voltage (U Line voltage frequency, AC Brief voltage interruption acc. to Namur max. power consumption for 85W power supply max. power consumption for 105W power supply max.
- Page 189 Ambient Conditions Temperature – operation – storage/transport – gradient Relative humidity – operation – storage/transport – gradient Mechanical Specifications Vibration *) – operation – storage/transport Shock – operation – storage/transport Special Features Quality assurance Motherboard Processor Internal processor cache Main memory 2.
- Page 190 Graphics Graphic controller Graphic store Resolutions/frequencies/colors Ports COM1 COM2 LPT1 Keyboard Mouse Card bus DP12 port, potentially isolated Transfer rate • Operating mode • Physical interface • Memory address area • Interrupts • Ethernet Function Indicators (LEDs) on the Device SIMATIC Box PC 620 The line current (TTY) interface is an optional product feature Optional product feature...
-
Page 191: Glossary
Glossary What Does this Chapter Contain? This chapter contains a glossary in which you will find a list of the terminology used in conjunction with the SIMATIC range of personal computers and programming devices and a brief explanation of each of the terms. SIMATIC Box PC 620 Manual A5E00131465-01 Glossary-1... - Page 192 Alternating Current. Current that changes its direction at regular intervals. Access Protection Access to the programs and data of a programming device can be protected by passwords. The user password or Superuser password can be assigned in the BIOS Setup. ACPI Advanced Configuration and Power Interface enables the operating system to supervise the power supply of each device connected to the computer.
- Page 193 Backup Duplicate of a program, storage medium or database. Created to backup or to protect irreplaceable data of working copies as a precaution against corruption or destruction. Some applications automatically create backup copies, while managing both the current version as well as the previous version that is stored on the hard disk drive.
- Page 194 Cache The cache memory buffers often used data to increase the speed of access. The computer has two cache levels. Cardbus interface This interface is compatible with 32-bit Cardbus Cards with PCI performance compliant with the PC Card standard. CD ROM Compact Disc Read Only Memory.
- Page 195 Controller Integrated hardware and software controllers that control the functions of certain internal or peripheral devices (for example, the keyboard controller). Cursor Collective term for mouse pointer and text cursor. Cursor Control Keypad on the keyboard for controlling the cursor. Direct Current.
- Page 196 Diskette The diskette (floppy disk) is an external data access memory on which all types of files and programs can be stored. The storage medium is a round magnetic disk in a plastic cover to protect it from getting scratched. Display Flat screen monitor of the PG.
- Page 197 EIDE Enhanced Integrated Drive Electronics. An extension of the IDE standard, EIDE is a hardware interface standard for disk drive designs that house control circuits in the drives themselves. It allows for standardized interfaces to the system bus while providing for advanced features, such as burst data transfer and direct data access.
- Page 198 Function Keys Function keys can be divided into two different types; the normal function keys which are assigned a particular function of the computer (for example, delete key), and programmable function keys (softkeys). Gender Changer The Gender Changer is used to convert the COM1/V24/PLC interface of the SIMATIC PC family to a common socket.
- Page 199 In a network, a device joining communication lines at a central location, providing a common connection to all devices on the network. The term is an analogy to the hub of a wheel. Hyperlink A connection between an element in a hypertext document, such as a word, phrase, symbol, or image, and a different element in the document, another document, a file, or a script.
- Page 200 Interface S An interface is the connection between individual hardware elements such as PLCs, programming devices, printers, or monitors via physical connections (cables). S An interface is also the connection between different programs, to enable them to work together. Interface Module Module which controls and extends the hardware periphery.
- Page 201 Liquid Crystal Display. Display type on the base of liquid crystals with a thin film polarized molecular structure, enclosed between two transparent electrodes. Light Emitting Diode (for example, status display). Semiconductor diode that transforms electrical energy into light. Lid Switch The device is switched off by closing the display lid.
- Page 202 Modem Communications device that enables a computer to send and receive data over a telephone line. Modulator and demodulator of a signal transmission facility. It converts the digital pulses from a computer into analog signals (and vice versa). Module Modules are boards (printed circuit boards) which can be plugged into a programmable logic controller or programming device.
- Page 203 Information is transmitted byte for byte via a parallel interface (port). This means that the transmission rate is very fast. The programming devices have one parallel interface (LPT1). Password Unique sequence of characters that is entered for user identification. See Access Protection. Personal computer SIMATIC Box PC 620 Manual A5E00131465-01 Glossary-13...
- Page 204 PC Card Trademark of the Personal Computer Memory Card International Association (PCMCIA). Designation for auxiliary cards that conform with PCMCIA specifications. The PC Card that has roughly the size of a credit card can be plugged into a PCMCIA slot. Version 1 specifies cards of Type I with a thickness of 3.3 millimeters, which is conceived mainly for use as external memory.
- Page 205 Plug and Play Generally, a reference to the ability of a computer to automatically configure the system for communication with peripheral devices (for example monitors, modems or printers). The user can plug in a peripheral and ”play” it at once without manually configuring the system.
- Page 206 RAM (Random Access Memory) is a volatile read/write memory in which every memory location can be addressed individually and its contents changed. RAM is used to store data and programs. Rechargeable Battery Reachargeable battery is used as a power source for laptop and notebook computers independent of external power supply.
- Page 207 SETUP A program in which information about the device configuration (that is, the configuration of the hardware on the programming device) is defined. The device configuration of the programming device is preset with defaults. Changes must therefore be entered in the SETUP if a memory extension, new modules, or a new drive are added to the hardware configuration.
- Page 208 STEP 7 Programming software for the creation of user programs for SIMATIC S7 control. STN Display Super Twist Nematic passive display Suspend to Disk Transition to power-off status, with prior saving of the system contents to the hard disk drive. Suspend to RAM Transition to power-saving status, with prior saving of the system contents to the RAM.
- Page 209 Touchscreen The Touchscreen is a computer monitor developed and modified to recognize a touch on the screen surface. The user can move the cursor or select an option by touching the screen. Uniform Resource Locator is an address for a resource on the Internet. URLs are used by Web browsers to locate Internet resources.
- Page 210 Video Adapter Also known as Video Controller, this electronic component generates the video signal sent through a cable to a video display. The video adapter is usually located on the computer’s main system board or on an expansion board, but it is sometimes built into the terminal.
- Page 211 Write Protection Write protection for files or diskettes S Write protection for files; this type of write protection is stored in the computer and is allocated by the system manager. S Floppy disk write protection; for 3 1/2 in. diskettes by opening the write protection hole.
- Page 212 Glossary SIMATIC Box PC 620 Manual Glossary-22 A5E00131465-01...
- Page 213 Index AC Power Supply, 1-2, 2-2, 3-3 Acclimatization time, 1-1 Additional Software, 2-12 Ambient conditions, 1-1 Approvals, iii AT Cards, 4-12 Backup Battery, 2-12, 4-10 Safety instructions, 1-4, 2-12 BIOS Setup, 5-2 Error messages, 6-6 Menus, 5-2 System date, 5-6 System time, 5-6 Bottom View, 2-5 Burner Software, 8-11...
- Page 214 Gender Changer, 7-11 Hard Disk Drive, 2-11 removal and installation, 4-17 Hardware Information, 7-1 Installing Burner Software, 8-11 Drivers, 8-11 Software, 8-11 the PC, 1-1, 3-3 the Recovery CD for Microsoft Windows 2000, 8-8 the Recovery CD for Microsoft Windows 98, 8-6, 8-7 Interface, RJ45 Ethernet, 3-26 Keyboard, 2-3...
- Page 215 Removal and installation bus board, 4-23 CD ROM drive, 4-19 device for holding down the modules, 4-14 expansion cards, 4-16 fan, 4-25 floppy disk drive, 4-20 LS 240 drive, 4-21 motherboard, 4-24 power supply unit, 4-22 Repairs, safety instructions, 1-3 Reset Button, 2-4, 4-27 RJ45 Ethernet Interface, 3-26 Safety instructions...
- Page 216 Index SIMATIC Box PC 620 Manual Index-4 A5E00131465-01...