Table of Contents
Advertisement
WI-FI
WIND & WEATHER STATI ON
WITH
FORECAST
INSTRUCTION MANUAL
Welcome!
Congratulations on your new Wind & Weather Station and welcome to the
La Crosse Technology family! This product was designed with you in mind by our
hometown team of weather enthusiasts based in La Crosse, Wisconsin.
Model: S82950
DC: 082318
Wi-Fi Wind & Weather Station
Page | 1
Advertisement
Table of Contents

Related Manuals for La Crosse S82950


Summary of Contents for La Crosse S82950
- Page 1 INSTRUCTION MANUAL Welcome! Congratulations on your new Wind & Weather Station and welcome to the La Crosse Technology family! This product was designed with you in mind by our hometown team of weather enthusiasts based in La Crosse, Wisconsin. Model: S82950 DC: 082318 Wi-Fi Wind &...
-
Page 2: Table Of Contents
Button Functions Alerts Weather Station Icons Feels Like Temperature Connect to La Crosse View™ App Temperature Trend Arrows Benefits of Connecting to La Crosse View™ Relative Pressure Reading Enhanced Weather Forecasts w/La Crosse Sensor Reception Indicators View™ Sensor ID and Search Advanced Forecast &... -
Page 3: Quick Setup
2. Insert 2 - AA batteries into your LTV-WL1 Water Leak Sensor. 3. Insert 2 - AA batteries into your LTV-TH2 Thermo-Hygro Sensor. 4. Insert the power cord into your S82950 station. Remove the red insulation tab from the CR2032 battery compartment found on the back of your station. -
Page 4: Quick Mounting Tips
Q UI CK M OUNT ING T I PS WIND SPEED Ensure the sensor is mounted vertically – an unobstructed rooftop is ideal. • Your wind sensor should be the tallest object in the area to avoid educed wind speed values. WAT ER LEAK Works best placed flat on the floor. -
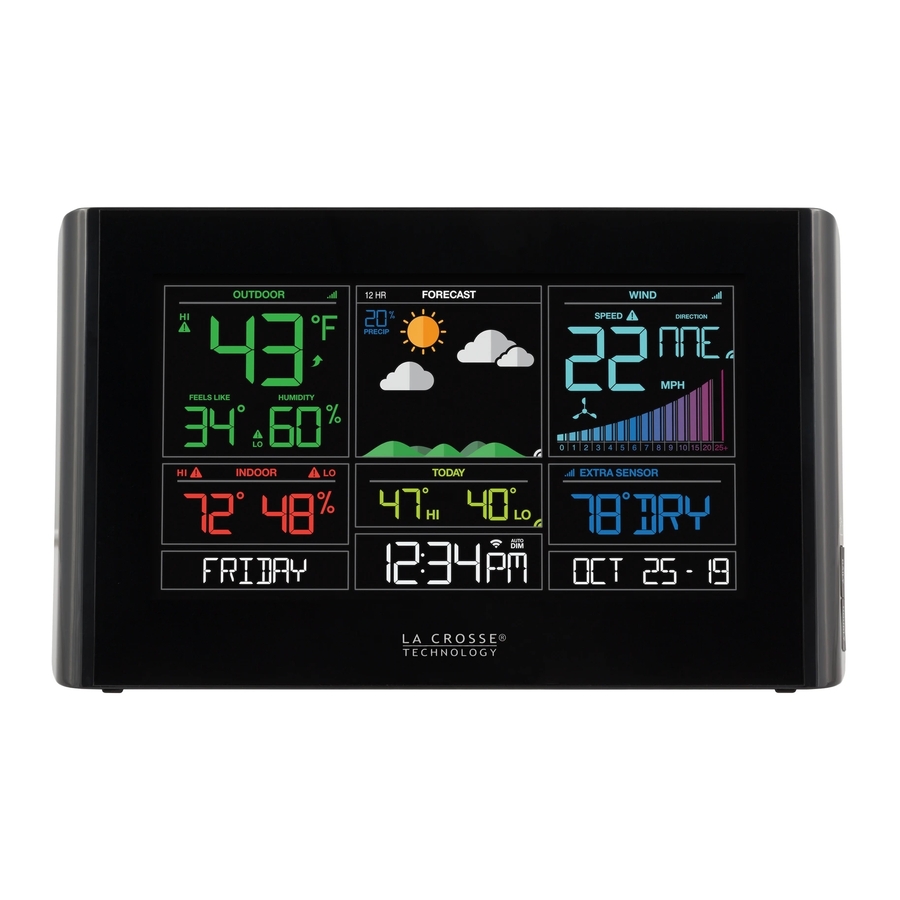
Page 5: Weather Station Icons
WE ATHE R STAT IO N I CO N S WIND SPEED DIRECTION PRESSURE 12 HR Low Battery Alert 12 Hour Indicator Indicator Forecast MPH / KMH Sensor Chance of Miles or Reception Precipitation Kilometers INHG / HPA Inches of Mercury Temperature Forecast or Hecto Pascal... -
Page 6: Connect To La Crosse View™ App
EXTRA SENSOR AREA ICONS: • The Extra Sensor area of your station will default to Pressure when you first power up. This is the area where your Water Leak sensor will read. • When you choose to add additional sensors, the Sensor Reception Indicator will show in the upper left corner whether Press ure or Sensor reading is displayed. - Page 7 • Your station’s device ID can be found on the back of the display. • Within 15 minutes after your station connects to the La Crosse View app, you should receive notifications to add your sensors. These will display in your app’s Notification Center.
-
Page 8: Benefits Of Connecting To La Crosse View
B E N EFITS OF CO NN EC T ING TO LA C RO SSE V IEW™ Connecting You to Your Home Anytime, Anywhere FEATURES STANDALONE CONNECTED Wind Speed Wind Direction Indoor & Outdoor Temperature “Feels Like” Temperature Indoor & Outdoor Humidity 12-Hour Forecast Barometric Pressure Internet Time and Calendar... - Page 9 E N HAN CED LAC RO SSE V IEW C O NNEC TED FEATUR E S. • Advanced Forecast Icons & Chance of Precipitation (12 Hour Forecast) • AccuWeather Daily & Hourly Forecasts • AccuWeather HI/LO Temperatures • AccuWeather Wind Direction •...
-
Page 10: Accuweather Daily Forecasts
AC C UWEAT HER DAI LY F ORECASTS Press the DAILY button on the side of your station to scroll through 7 days of future forecasts. You’ll see changing forecast icons, HI/LO Temperature readings. IMPORTANT: After viewing your Daily Forecast, the display will automatically revert back to the default 12 hour forecast after 10 seconds. -
Page 11: Accuweather Hi/Lo Temperatures
C USTOM DATA ST R E AM S Use the Data Stream Menu in the La Crosse View™ app to select up to 3 items to stream on your station. 1. Open the La Crosse View™ app and swipe until you find your station’s device page. -
Page 12: Additional Sensors Can Read To Your App
1. Install batteries in the sensor, and if the sensor has a TX button, press the TX button to force a signal. 2. Scan sensor bar code ID so it will read in the La Crosse View app. Details: Open your La Crosse View app to add sensors. Watch the video for adding devices to the La Crosse View app: http://bit.ly/LaCrosseView_Support_Vid_10... -
Page 13: Status Messages When Connected
CHECK APP WIND • The Wi-Fi router connection is working. SPEED DIRECTION • Check your connection to the La Crosse View app. • Check Notifications in the La Crosse View app • Is there an update to install? PRESSURE LOST WIFI WIND •... -
Page 14: Features Of Your Weather Station
FE ATURE S OF YOU R W E AT H ER STATI ON Your station provides most functionality when connected to the La Crosse View app. However it is fully functional as a standalone station. Here we have included the details for various functions of your station: •... -
Page 15: Settings Menu
Note: If you press the LIGHT button to manually adjust the backlight, the Auto Dim feature will resume at the next scheduled time to dim. SE T TI N G S ME N U 1. Hold the SET button for 3 seconds to enter settings menu. 2. -
Page 16: Water Leak & Extra Sensor Area
Note: Once sensor is found the search will stop. Sensor, ID, and type will show for 3 seconds then return to normal display. 4. Scan sensor bar code ID so it will read in the La Crosse View app. 5. Added sensors will be available for display in Extra Sensor area of station. - Page 17 1. Hold the EXTRA SENSOR button 2. Install batteries in the sensor LED Light 3. Press TX button TX Button 4. Allow up to 3 minutes to connect 5. Scan sensor bar code ID Battery Cover Sensor Barcode ID Station normal display-Pressure showing Temp/Humidity sensor added WIND SPEED...
-
Page 18: Wind Speed Readings & History
WI N D S PEE D R E AD INGS & H ISTORY Current Speed: Highest wind speed in past 31 seconds. Samples every 3 seconds Top Speed (1 HR): Highest wind speed in past 60 minute period. Wind Direction: When connected wind direction in letters will replace Top 1HR. Top 1HR will still be viewable in history. - Page 19 WIND WIND WIND WIND WIND Reset Wind Speed History: 1. Press the WIND button to view individual wind speed readings. 2. Hold the MINUS button for five seconds to reset the individual value. 3. Wind speed reading will reset to current wind speed, time and date. Wind Speed Graph •...
-
Page 20: Temperature/Humidity Readings & Hi/Lo Records
T E M P E RATUR E / H UM ID IT Y READING S & H I/ LO RECO R DS Your current Indoor and Outdoor temperature and Humidity are constantly displayed on your weather station. Your station records your HI and LO Temperature and Humidity with time and date of occurrence. 1. -
Page 21: Alerts
A LE RTS Set Alerts: 1. Hold the ALERTS button for 3 seconds to enter alert set mode. • Alert ON: 1. Press the +/- buttons to arm the alert (ON). 2. Press the ALERTS button and the alert value will flash 3. -
Page 22: Feels Like Temperature
F E ELS L IKE TE M PE R AT U RE Your “Feels Like” Temperature is a combination of outdoor temperature, humidity and wind speed. It is displayed in the Outdoor Temperature area. • When outdoor temperature is higher than 80˚F, your Feels Like Temperature is showing Heat Index. -
Page 23: Relative Pressure Reading
R E L ATIV E PR E SSU RE REA DI NG • Your station itself has a Pressure Sensor inside to provide accurate Relative Pressure readings. • The station will default to a Relative Pressure of 29.92 Inches of Mercury. PRESSURE INHG •... - Page 24 SE N S OR I D & SE N SOR SEA RC H Your station and each sensor have a unique ID number that will identify them in the La Crosse View app. This has the added bonus of locking them into your weather station until you manually delete them.
-
Page 25: Delete Sensors
3. Allow up to 3 minutes to reacquire all sensors. 4. You will need to reconnect to your La Crosse View app by selecting CONNECT WIFI from the menu in your La Crosse View App and entering your Wi-Fi password. - Page 26 DE TA ILE D SET U P & M O U NTIN G LTV-W1 Wind Speed Sensor 1. Turn the battery cover of your wind sensor to the left. 2. Install fresh “C” batteries. 3. Carefully align and turn battery cover right to tighten. 4.
- Page 27 WET readings and may damage the sensor. Note: Since your Water Leak Sensor is an “Extra Sensor”, it will need to be scanned in manually for viewing on the La Crosse View app. See this video for instructions: bit.ly/LaCrosseView_Support_Vid_10 LED Colors: BLUE LED: Normal Transmission.
- Page 28 Battery desk or counter. Power Cord 4. Your station should remain in good Wi-Fi range of your wireless router to use all the remote monitoring options using the La Crosse View app. Wi-Fi Wind & Weather Station Page | 28...
-
Page 29: Help Us, Help You
HE L P US , H EL P YO U If you require additional support, call our friendly customer support team based out of La Crosse, Wisconsin. Phone: 1.844.200.8752 Or fill out our online support request form here: bit.ly/contact_techsupport Our knowledgeable customer support team is available: Monday-Friday, 8am-6pm CST. -
Page 30: Specifications
SP E CI FICAT ION S Indoor S82950 Temperature Range: 32°F to 99°F (0°C to 37°C) Humidity Range: 10% RH to 99%RH Relative Pressure: 23.62 to 32.48 InHg (800 to 1100 hPa) Pressure is measured every 12 minutes Thermo-hygro Sensor -40°F to 140°F (-40°C to 60°C) -
Page 31: Warranty And Support
Checks Temp every 51 seconds WAR RAN TY & SU PP O RT La Crosse Technology, Ltd. provides a 1-year limited time warranty (from date of purchase) on this product relating to manufacturing defects in materials & workmanship. Before returning a product, please contact our friendly customer support with questions or visit our online... -
Page 32: Fcc Statement
FCC STATE M EN T This equipment has been tested and found to comply with the limits for a Class B digital device, pursuant to part 15 of the FCC Rules. These limits are designed to provide reasonable protection against harmful interference in a residential installation. This equipment generates, uses and can radiate radio frequency energy and, if not installed and used in accordance with the instructions, may cause harmful interference to radio communications.
Need help?
Do you have a question about the S82950 and is the answer not in the manual?
Questions and answers