Advertisement
Available languages
Available languages
Quick Links
Vector
2
TM
Quick Start Manual...............................
2
中文操作手冊....................................16
中文操作手册.................................
28
.
คู ่ ม ื อ Quick Start.................................
.45
퀵스타트 매뉴얼...............................60
Advertisement

Related Manuals for Garmin Vector 2


Summary of Contents for Garmin Vector 2
- Page 1 Vector Quick Start Manual....... 中文操作手冊........16 中文操作手册......... คู ่ ม ื อ Quick Start......... 퀵스타트 매뉴얼.......60...
-
Page 2: Tools Needed
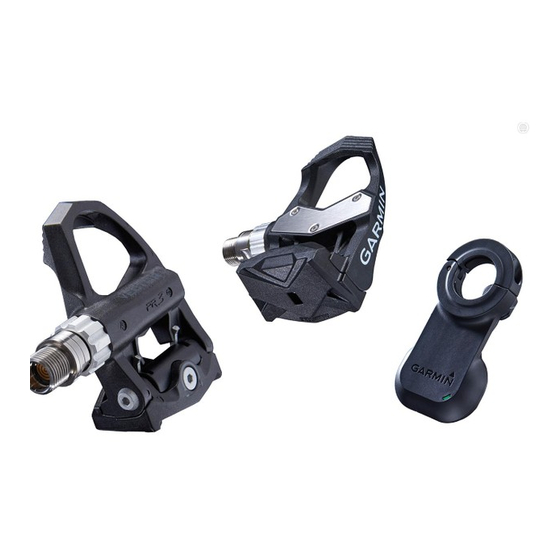
See the Important Safety and Product Information guide in the product box for product warnings and other important information. NOTICE Go to www.garmin.com/vectorowner for the latest information including bike compatibility, software updates, and video tutorials. Tools Included • 15 mm crowfoot adapter for torque wrench •... - Page 3 3 Remove the existing pedals. 4 Clean the threads, and remove old grease. Determining the Bicycle Chain Clearance Before you can install the right pedal, you must determine bicycle chain clearance. Move your bike chain to the largest chain ring and the smallest cassette gear.
- Page 4 TIP: Power and cadence calculations are not impacted by the orientation of the pedal pod. Garmin recommends placing the pedal pod on the leading edge of the crank. When the crank is in the forward position, the pedal pod should be pointing downward.
- Page 5 9 Insert the screw into the pedal ➎ pod, and use the 2.5 mm hex key to tighten the screw. 10 Rotate the crank arm to check for clearance. The pedal pod should not interfere with any part of the bike. 11 Repeat steps 2 through 10 to install the right pedal and pedal pod.
- Page 6 5 Tighten the cleat firmly to the shoe. NOTE: Garmin recommends torque of 4 to 6 lbf-ft. (5 to 8 N-m). Adjusting the Release Tension NOTICE Do not overtighten the release tension screw on the bottom of the pedal. The release tension should be adjusted equally for both pedals.
- Page 7 5 Select your sensor. When the sensor is paired with your Edge device, a message appears, and the sensor status is Connected. You can customize a data field to display Vector data. Pedal Pod Status LED Multiple green LED flashes indicate a system issue that requires your attention. NOTE: When the pedal pod battery is low, the status LED flashes red, instead of green.
- Page 8 Vector to another bike. This procedure contains instructions for the Edge 1000 device. If you have another compatible device, see your owner’s manual or go to www.garmin. com/vectorowner. Entering the Crank Length The crank length is often printed on the crank arm.
-
Page 9: Troubleshooting
2 View or download the full owner’s manual in your preferred format. Vector Storage If you are transporting your bicycle or not using Vector for an extended period of time, Garmin recommends removing Vector and storing it in the product box. - Page 10 Important Safety and Product Information WARNING Failure to avoid the following potentially hazardous situations could result in death or serious injury. Always consult your physician before beginning or modifying any exercise program. If you have a pacemaker or other implanted electronic device, consult your physician before using a heart rate monitor.
- Page 11 • Regularly check the cleats and pedals for signs of wear or deterioration. • Replace worn cleats or damaged pedal bodies with Garmin parts only. See your Garmin dealer or the Garmin website. Declaration of Conformity Hereby, Garmin declares that this product is in compliance with the essential requirements and other relevant provisions of Directive 1999/5/EC.
- Page 12 This product does not contain any user-serviceable parts. Repairs should only be made by an authorized Garmin service center. Unauthorized repairs or modifications could result in permanent damage to the equipment, and void your warranty and your authority to operate this device under Part 15 regulations.
- Page 13 ® ™ defects in materials or workmanship for 2 years from the date of purchase. Within this period, Garmin will, at its sole option, repair or replace any components that fail in normal use. Such repairs or replacement will be...
- Page 14 NOT ALLOW THE EXCLUSION OF INCIDENTAL OR CONSEQUENTIAL DAMAGES, SO THE ABOVE LIMITATIONS MAY NOT APPLY TO YOU. Garmin retains the exclusive right to repair or replace (with a new or newly-overhauled replacement product) the device or software or offer a full refund of the purchase price at its sole discretion.
- Page 15 Garmin Australasia, 30 Clay Place, Eastern Creek, NSW, Australia, 2766. Phone: 1800 235 822.
- Page 16 開始安裝 警告 請先仔細讀取所有指示,然後再開 始安裝及使用 Vector™ 系統。不 當使用可能導致嚴重的人身傷害。 如需產品警告和其他重要資訊,請 參閱手冊內的 《安全和產品重要資 訊》 指南。 注意 如需自行車相容性、軟體更新和 影片教學的最新資訊,請參見網 站 www.garmin.com.tw/minisite/ vector/。 工具配件 • 15 mm crowfoot扳手 • 2.5 mm六角扳手 所需工具 • 15 mm 踏板扳手 • 3 mm六角扳手 • 4 mm六角扳手 安裝 Vector元件 準備曲柄...
- Page 17 將自行車鍊條切換到大盤最大齒片 跟飛輪最小齒片。 自行車鍊條應該在最外側的位置, 才能判斷踏板感應片傳輸線和鍊條 間的合適間隙。 備註:鍊條和曲柄腿之間應至少保 留 5 mm 間隙 ➊ 。 安裝踏板感應片和踏板 備註:左右腳的踏板感應片皆相 同。 1. 請先安裝左腳的踏板。 2. 在踏板軸心上塗一層薄的潤滑 油 ➊。 3. 將軸心插入曲柄 ➋。 4. 用手鎖緊軸心。 備註:左腳踏板以逆時針方向 鎖緊,右腳踏板以順時針方向 鎖緊。...
- Page 18 5. 使用踏板扳手鎖緊軸心。 備註:Garmin 建議的扭力值為 25 ~ 30 lbf-ft (34 ~ 40 N-m)。 6. 使用肥皂水或者酒精清潔軸心 上多餘的潤滑油。 7. 在軸心上安裝踏板感應片 ➌。 備註:務必小心彎折傳輸線 ➍ ,以免妨礙安裝。踏板感應片 需要平貼於曲柄上。 小秘訣:功率和迴轉數的計算 不會因踏板感應片的方向而受 到影響。Garmin 建議將踏板感 應片放在曲柄腿的前端,曲柄 朝向前方時,踏板感應器應朝 下。(踏板感應片與曲柄腿之間 呈現接近直角90度) 8. 確實將傳輸線塞入軸心。 9. 螺絲 插入踏板感應片,使用 ➎ 2.5 mm六角扳手鎖緊螺絲。 10. 轉動曲柄腿,檢查是否有間...
- Page 19 3. 使用 4 mm 六角扳手,將各個 螺絲鎖入鞋底。 4. 將鞋底板調整至偏好的位置。 可試騎後再做調整。 5. 將鞋底板緊鎖於鞋底。 備註:Garmin 建議的扭力值為 4 ~ 6 lbf-ft (5 ~ 8 N-m)。 調整鬆緊度 注意 請勿過度用力鎖緊踏板底部的鬆緊 螺絲。左右兩腳踏板應調整至相同 的鬆緊度。 • 使用 3 mm 六角扳手,調整 左右腳踏板的鬆緊度。 • 踏板後方固定處有一個指示 窗,可顯示鬆緊度。 將 Vector 和 Edge 1000 配對...
- Page 20 1. Edge 與感測器的距離不得超過 3公尺。 備註:配對時,請與其他的 ANT+感測器保持 10 公尺以上 的距離。 2. 開啟 Edge。 3. 在主畫面上,點選 > 感測器 > 新增感測器 > 功率計。 4. 轉動曲柄數圈。 當感測器與 Edge 配對後,感 測器狀態會顯示已連線。您 可以自訂資料欄位,以顯示 Vector 的資料。 踏板感應片LED狀態 您需要注意多工綠色LED閃燈系 統問題。 備註:如果踏板感應片電量過低, 則會閃爍紅燈。 LED 閃爍 狀態 方式 每十秒閃爍 Vector系統運作正 一次綠燈...
- Page 21 踏板感應片電量 一次紅燈 過低。 第一次上路騎乘 第一次使用 Vector 騎乘之前,您 必須輸入曲柄長度、設定踏板內感 測器安裝的角度。每次騎乘之後 Vector 系統皆會自動校正。當你更 換自行車時Vector需要重新輸入曲 柄長度。 此程序包含適用於 Edge 1000 的 指示,如果您使用其他相容裝置, 請參閱使用手冊或參見網站 www. garmin.com.tw/minisite/vector/。 輸入曲柄長度 曲柄長度通常印在曲柄腿上。 1. 轉動踏板幾圈,啟動 Vector。 2. 在主畫面上,點選 > 感測 器 > > 感應器資訊 > 曲柄長 度。 3. 輸入曲柄長度,點選 。...
- Page 22 設定安裝角度前,您必須先設定 Edge資料欄位顯示功率和迴轉 數。 1. 您可以在訓練台或實際路面上 做短程騎乘。 2. 以 70 rpm 左右的迴轉數騎乘。 3. 穩定加速到大約 90 rpm。安 裝角度設定成功時,會出現訊 息,而且 Edge 上的資料欄位 會顯示功率資料。 疑難排解 取得操作手冊 您可以於網頁取得最新版操作手 冊。 1. 前往 www.garmin.com.tw/ minisite/vector/。 2. 查閱或下載完整的網頁版操作 手冊。 Vector2 存放說明 如果您要運送自行車,或長時間 不使用 Vector,Garmin 建議將 Vector 拆下並放置在產品包裝盒 內。...
- Page 23 安全和產品重要資訊 警告 如未能避免下列潛在危險情況,可能導致死亡 或嚴重傷害。 開始或改變運動計畫前,請務必先諮詢醫師。 若您有使用心律調節器或植入電子裝置,使用 心率監測帶前請諮詢醫師。 電池警告 裝置使用可由使用者自行替換的電池。若未遵 照下列準則,則裝置內的鋰離子電池壽命可能 會縮短或有損壞裝置、發生火災、化學品灼 傷、電解液洩漏及 / 或受傷的風險。 • 請勿將裝置暴露於熱源或處於高溫地點,例 如將 車輛停放在無人看管的太陽直射處。為 防止裝置損壞,可將裝置從車上拆下或將其 存放在如手套箱內等以避免陽光直射。 • 請勿使用尖銳物品取出電池。 • 請勿將電池或裝置焚化。 • 請勿將電池放置在兒童可取得處。 • 請勿將電池拆解、鑿孔或予以損壞。 • 請使用正確的替換電池進行更換,若另行使 用其他電池,可能發生火災或爆炸的風險。 • 處置您的裝置 / 電池時請依照適用法規,洽 詢廢棄物處置單位。 • 替換的錢幣式電池可能含有高氯酸鹽物質, 可能需使用特殊處理方式。請參見 www. dtsc.ca.gov/hazardouswaste/perchlorate。...
- Page 24 • 請先在安全的區域,利用平緩的地面練習 騎乘。 • 請保持踏板及鞋底板表面的清潔,並除去 任何泥塊。 • 請勿將元件完全浸入水中或以高壓沖洗。 • 穿著鞋底板行走時請特別注意。請勿穿著鞋 底板行走過長距離。 • 請定期檢查鞋底板和踏板是否出現任何磨損 或損壞的跡象。 • 磨損的鞋底板或損壞的踏板本體僅能使用 Garmin的零件更換。請洽詢 Garmin 經銷商 或參見Garmin台灣網站。 符合性聲明 Garmin 謹此聲明本產品符合指令 1999/5/ EC 必要的要求及其他相關條款。如需檢視 完整的符合性聲明,請參見 Garmin 網站並 找出您的 Garmin 產品:www.garmin.com/ compliance。 根據NCC低功率電波輻射性電機管理辦 法 規定: 第十二條 經型式認證合格之低功率射頻電機,非經許 可,公司、商號或使用者均不得擅自變更頻 率、加大功率或變更原設計之特性及功能。...
- Page 25 有限保固 Vector™ 保固從購買日起保證二年在 Garmin ® 材料或製造工藝上無任何瑕疵。 在此期間 Garmin 將依其選擇對正常使用下發 生故障的元件進行檢修或予以更換。對於此類 檢修或更換若客戶可負責運費部分,則客戶 將可享用免費檢修零件或工資。本保固不適 用:(i) 表面損壞,如刮痕、凹痕及凹陷。(ii) 電池等消耗品,但若為材料或製造工藝瑕疵 造成產品損壞者除外。(iii) 因意外、濫用、 誤用、水、淹水、火災或其他天災或外來因 素造成的損壞。(iv) 由非 Garmin 授權保養人 員檢修後造成之損壞。(v) 未經 Garmin 書面 同意,逕自修改或改變產品造成之損壞。(vi) 使用非 Garmin 提供之電源線及 / 或資料傳 輸線連接產品所造成之損壞。此外,對違反 任何國家法律而取得及 / 或使用之產品或服 務,Garmin 保留拒絕保固申請的權利。本產 品使用原意僅在於輔助行駛,不得作為測定 精確方向、距離、地點或地形的任何目的使...
- Page 26 用。Garmin 對本產品內含地圖資料的準確性 或完整性不予任何保證。 此處所述之保固及補救條款為排他性,且取代 所有其他明示性或暗示性或法令的保固條件, 包括在某特殊目的、法令規定或其他情況下 任何商品的適售性或適用性保固衍生的任何責 任。本保固提供您特定的法律權利,但此權利 可能每州各有不同。 對於任何意外、特殊、間接或衍生性損壞 (包 括但不限於任何交通罰款或傳票之損失,可 能起源於使用、誤用、不會使用或產品瑕疵) ,Garmin 將概不負責。有些州不容有排除附 帶或衍生性損壞賠償,因此上述限制對您可 能不適用。 Garmin 保留檢修或更換 (新產品或全新大修 過的替換產品) 裝置或軟體權利,或有權利選 擇退回完整採購價款。對於任何違反保固條款 者,此為唯一且排他之補救措施。 申請保固服務時請洽詢您當地的 Garmin 授權 經銷商,或電洽 Garmin 產品支援部索取裝運 指示及 RMA 追蹤碼。請將裝置包裝妥當並附 上原始銷貨收據影本,以此作為申請保固檢修 必要之購貨證明。在外部包裝面請清楚標示 您的追蹤碼,預付運費後將裝置寄送至任何 Garmin 的保固服務站。 拍賣網站購買:透過拍賣網站購買的產品未 涵蓋在保固範圍內。拍賣網站確認不可作為 保固檢驗。若要獲得保固,需向原始零售商...
- Page 27 限保固所提供之權益,為產品相關適用法律所 提供之其他權利及補償的額外增補。...
- Page 28 如需产品警告和其他重要信息, 请 参阅手册内的 《安全和产品重要信 息》 。 !注意 如需自行车兼容性、 软件更新和影 片教学的最新信息, 请参见网站 www.garmin.com.cn/minisite/ vector/。 所需工具 • 15 mm 踏板扳手 • 3 mm六角扳手 • 4 mm六角扳手 安装 Vector组件 准备曲柄 1. 访问www.garmin.com.cn/ minisite/vector/确认Vector适 用于您的自行车 2. 拆下现有的踏板。 3. 擦拭牙纹并除去旧的润滑油。 判断自行车链条间隙 安装右脚踏板前, 必须先确认自行 车链条的间隙。 将自行车链条切换到大盘最大 齿片跟飞轮最小齿片。...
- Page 29 自行车链条应该在最外侧的位 置, 才能判断踏板感应片传输线 和链条间的合适间隙。 备注: 链条和曲柄腿之间应至少 保留 5 mm 间隙 ➊。 安装踏板感应片和踏板 备注: 左右脚的踏板感应片是相 同的。 1. 请先安装左脚的踏板。 2. 在踏板轴心上涂一层薄的润滑 油 ➊。 3. 将轴心插入曲柄 。 ➋ 4. 用手锁紧轴心。 备注: 左脚踏板以逆时针方向锁 紧, 右脚踏板以顺时针方向锁 紧。 5. 使用踏板扳手锁紧轴心。...
- Page 30 备注: Garmin 建议的扭力值为 25 ~ 30 lbf-ft (34 ~ 40 N-m)。 6. 使用肥皂水或者酒精清洁轴心 上多余的润滑油。 7. 在轴心上安装踏板感应片 ➌。 备注: 务必小心弯折传输线 ➍, 以免妨碍安装。 踏板感应片需要 平贴于曲柄上。 小秘诀: 功率和回转数的计算不 会因为踏板感应片的方向而受 到影响。 Garmin 建议将踏板感 应片放在曲柄腿的前端, 曲柄朝 向前方时, 踏板传感器应朝下。 ( 踏板感应片与曲柄腿之间呈现 接近直角90度) 8. 确保将传输线塞入轴心。 9. 螺丝...
- Page 31 3. 使用 4 mm 六角扳手, 将各个螺 丝锁入鞋底。 4. 将鞋底板调整至适合的位置。 可试骑后再做调整。 5. 将鞋底板紧锁于鞋底。 备注: Garmin 建议的扭力值为 4 ~ 6 lbf-ft (5 ~ 8 N-m)。 调整松紧度 注意 请勿过度用力锁紧踏板底部的松紧 螺丝。 左右两脚踏板应调整至相同 的松紧度。 使用 3 mm 六角扳手, 调整左右 脚踏板的松紧度。 踏板后方固定处有一个指示窗, 可显示松紧度。 将 Vector 和 Edge 1000 配...
- Page 32 1. Edge 与传感器的距离不得超过 3米。 备注: 配对时, 请与其他的 ANT+ 传感器保持 10 米以上的距离。 2. 开启 Edge。 3. 在主画面上, 点选 > 传感器 > 新增传感器 > 功率计。 4. 转动曲柄数圈。 当传感器与 Edge 配对后, 传感器 状态会显示已连接。 您可以自定义 数据字段, 以显示 Vector 的数据。 踏板感应片LED状态 您需要注意多任务绿色LED闪烁系 统问题。 备注: 如果踏板感应片电量过低, 则 会闪烁红灯。...
- Page 33 第一次使用 Vector 骑行之前, 您 必须输入曲柄长度、 设定踏板内传 感器安装的角度。 每次骑行之后 Vector 系统都会自动进行更正。 当 你更换自行车时Vector需要重新输 入曲柄长度。 此程序包含适用于 Edge 1000 的 指示, 如果您使用其他兼容装置, 请参阅使用手册或参见网站 www. garmin.com.cn/minisite/vector/。 输入曲柄长度 曲柄长度通常印在曲柄腿上。 1. 转动踏板几圈, 启动 Vector。 2. 在主画面上, 点选 > 传感器 > > 传感器信息 > 曲柄长度。 3. 输入曲柄长度, 点选 。...
- Page 34 疑难解答 获取操作手册 您可以在网页上获取最新版操作 手册。 1. 前往 www.garmin.com.cn/ minisite/vector/。 2. 查阅或下载完整的网页版操作 手册。 Vector2 存放说明 如果您要运送自行车, 或长时间 不使用 Vector, Garmin 建议将 Vector 拆下并放置在产品包装盒 内。...
- Page 35 安全和产品重要信息 警告 未能避免下列潜在危险情况, 可能导致死亡或 严重伤害。 开始或改变运动计划前, 请务必先咨询医师。 若 您使用心律调节器或植入电子装置, 使用心率 监测带前请咨询医师。 电池警告 设备使用可由用户自行替换的电池。 若未遵照 下列准则, 则设备内的锂离子电池寿命可能会 缩短或有损坏设备、 发生火灾、 化学品灼伤、 电 解液泄漏及 / 或损坏的风险。 • 请勿将Vector暴露于热源或处于高温地点, 例如将Vector摆放在无人看管的太阳直射 处。 为防止设备损坏, 可将设备从车上拆下或 将其存放在如手套箱内等以避免阳光直射。 • 请勿使用尖锐物品取出电池。 • 请勿将电池或设备焚化。 • 请勿将电池放置在儿童可取得处。 • 请勿将电池拆解、 凿孔或予以损坏。 • 请使用正确的替换电池进行更换, 若另行使 用其他电池,...
- Page 36 • 请保持踏板及锁片表面的清洁, 并除去任 何泥块。 • 请勿将组件完全浸入水中或以高压冲洗。 • 穿着锁鞋行走时请特别注意。 请勿穿着锁鞋 行走过长距离。 • 请定期检查锁片和踏板是否出现任何磨损或 损坏的迹象。 • 磨损的锁片或损坏的踏板本体仅能使用 Garmin 的零件更换。 请洽询 Garmin 当地经 销商或参见 Garmin 网站。 符合性声明 Garmin 谨此声明本产品符合指令 1999/5/ EC 必要的要求及其他相关条款。 如需查看完 整的符合性声明, 请参见 Garmin 网站并找 出您的 Garmin 产品: www.garmin.com/ compliance。 FCC 符合性...
- Page 37 品, 但若为材料或制造工艺瑕疵造成产品损坏 者除外。 (iii) 因意外、 滥用、 误用、 水、 淹水、 火灾 或其他天灾或外来因素造成的损坏。 (iv) 由非 Garmin 授权保养人员检修后造成之损坏。 (v) 未经 Garmin 书面同意, 擅自修改或改变产品 造成之损坏。 (vi) 使用非 Garmin 提供之电源线 及 / 或数据传输线连接产品所造成之损坏。 此 外, 对违反任何国家法律而取得及 / 或使用之 产品或服务, Garmin 保留拒绝保固申请的权 利。 本产品使用原意仅在于辅助行驶, 不得作为 测定精确方向、 距离、 地点或地形的任何目的使...
- Page 38 收据正本或复印件。 通过拍卖网站购买的任何 套件假如遗失组件, Garmin 不提供更换服务。 国际购买: 针对在中国大陆以外国家或地区购 买的设备, 国际代理商可能提供其他保修服务, 但视国家或地区而定。 保修 (如有的话) 将由当 地的国内代理商提供, 由代理商为您的设备提 供本地化服务。 代理商保修仅适用于原订的代 理通路区域。 在美国或加拿大购买的设备必须 寄回英国、 美国、 加拿大或台湾的 Garmin 服务 中心以进行维修。 购买地为澳洲时: Garmin 的商品保修在澳洲消 费者法管辖下无法生效。 假如商品发生重大故 障, 您有权更换或退还商品, 对于任何其他合理 可预知的损失或损坏则可获得赔偿。 假如商品 不符可接受的质量, 且故障程度不及重大故障, 您亦有权要求维修或更换商品。 我们有限保修 所提供之权益, 为产品相关适用法律所提供之...
- Page 41 享受三包服务。 产品主机享有自购买日起一年的保修,其他配件正品自 购买之日起三个月内予以免费保修。 下列情况不属于三包范围,为非保修产品,维修网点将 一律按照保外收费维修处理: ( )产品无购机发票和三包凭证,亦不能提供有效证据 证明产品在三包期限内,并超过出厂日期 个月。 ( )主机和发票或三包凭证上的内容与商品实物不符或被 涂改。 ( )产品主机和配件曾受到:非正常或错误使用,非正 常条件不当的存储,未经授权的拆卸或改动。事 故、不恰当的安装造成的损坏。 ( )非本公司授权维修机构及人员维修而导致的故障或损 坏。 ( )因使用不当、私自拆机、封条破损及人为等造成的 故障和损坏。 ( )因不可抗力如地震、水灾、战争等原因造成的损坏。 对于保外付费维修,修复后相同故障经维修中心检验属 实,享有 天保修期。 请客户在送修时留下准确的姓名和联系电话,以便维修 中心能及时通知取机。 三包凭证须在销售时当即填写完整,经销商盖章后方可生 效。 www.garmin.com.cn 详细的《售后服务条款》请登录 Garmin 查询, 公司对所述信息保留解释权。 Garmin 中国公司:上海佳明航电企业管理有限公司 400-819-1899 电话:...
- Page 43 享受三包服务。 产品主机享有自购买日起一年的保修,其他配件正品自 购买之日起三个月内予以免费保修。 下列情况不属于三包范围,为非保修产品,维修网点将 一律按照保外收费维修处理: ( )产品无购机发票和三包凭证,亦不能提供有效证据 证明产品在三包期限内,并超过出厂日期 个月。 ( )主机和发票或三包凭证上的内容与商品实物不符或被 涂改。 ( )产品主机和配件曾受到:非正常或错误使用,非正 常条件不当的存储,未经授权的拆卸或改动。事 故、不恰当的安装造成的损坏。 ( )非本公司授权维修机构及人员维修而导致的故障或损 坏。 ( )因使用不当、私自拆机、封条破损及人为等造成的 故障和损坏。 ( )因不可抗力如地震、水灾、战争等原因造成的损坏。 对于保外付费维修,修复后相同故障经维修中心检验属 实,享有 天保修期。 请客户在送修时留下准确的姓名和联系电话,以便维修 中心能及时通知取机。 三包凭证须在销售时当即填写完整,经销商盖章后方可生 效。 www.garmin.com.cn 详细的《售后服务条款》请登录 Garmin 查询, 公司对所述信息保留解释权。 Garmin 中国公司:上海佳明航电企业管理有限公司 400-819-1899 电话:...
- Page 45 ข้ อ มู ล สำ า คั ญ อื ่ น ๆ ของผลิ ต ภั ณ ฑ์ ข้ อ สั ง เกต ไปที ่ www.garmin.com/ vectorowner เพื ่ อ ดู ข ้ อ มู ล ล่ า สุ ด เกี ่ ย ว...
- Page 46 Vector การเตรี ย มขาจาน 1 ยื น ยั น ความเข้ า กั น ได้ ข องจั ก รยาน ของคุ ณ ที ่ www.garmin.com/ vectorowner 2 ถอดบั น ไดตั ว เดิ ม ออก 3 ทำ า ความสะอาดเกลี ย วและล้ า ง...
- Page 47 เกลี ย วที ่ เ วี ย นซ้ า ย (กลั บ กั น ) 5 ใช้ ป ระแจไขบั น ไดจั ก รยานเพื ่ อ ขั น แกนหมุ น ให้ แ น่ น หมายเหตุ : Garmin แนะนำ า ® ให้ ใ ช้ แ รงบิ ด (torque) ที ่ 25 ถึ ง...
- Page 48 และ cadence ไม่ ไ ด้ ร ั บ ผลกระ ทบจากทิ ศ ทางการหั น ของ pedal pod โดย Garmin แนะนำ า ให้ ว าง ตำ า แหน่ ง pedal pod บนขอบหน้ า ของชุ ด จานหน้ า เมื ่ อ ชุ ด จานหน้ า...
- Page 49 ทดลองขี ่ 5 ขั น ยึ ด คลี ท เข้ า กั บ รองเท้ า ให้ แ น่ น หมายเหตุ : Garmin แนะนำ า ให้ ใช้ แ รงบิ ด (torque) ที ่ 4 ถึ ง 6 ปอนด์ - ฟุ ต (5 ถึ ง 8 นิ ว ตั น -เมตร) การปรั...
- Page 50 คุ ณ มี อ ุ ป กรณ์ อ ื ่ น ที ่ ใ ช้ ง านร่ ว มกั น ได้ ให้ ดู ค ู ่ ม ื อ การใช้ ง านของคุ ณ หรื อ ไปที ่ www.garmin.com/vectorowner 1 ให้ อ ุ ป กรณ์ Edge อยู ่ ใ นระยะ (3 เมตร) ของเซ็...
- Page 51 หมายเหตุ : ถ้ า แบตเตอรี ่ pedal pod ต่ ำ า สถานะไฟ LED จะกระพริ บ เป็ น สี แดงแทนที ่ ส ี เ ขี ย ว ลั ก ษณะไฟ LED สถานะ กระพริ บ สี เ ขี ย ว ระบบ Vector 1 ครั...
- Page 52 Edge 1000 ถ้ า คุ ณ มี อ ุ ป กรณ์ อ ื ่ น ที ่ ใ ช้ งานร่ ว มกั น ได้ ให้ ด ู ค ู ่ ม ื อ การใช้ ง านของ คุ ณ หรื อ ไปที ่ www.garmin.com/ vectorowner การป้...
- Page 53 ถ้ า คุ ณ กำ า ลั ง ขนส่ ง จั ก รยานของคุ ณ หรื อ ไม่ ไ ด้ ใ ช้ ง าน Vector เป็ น ระยะ เวลานานต่ อ เนื ่ อ งกั น Garmin แนะนำ า ให้ ถ อด Vector ออกแล้ ว เก็ บ ไว้ ใ น...
- Page 54 ข้ อ มู ล ผลิ ต ภั ณ ฑ์ แ ละความ ปลอดภั ย ที ่ ส ำ า คั ญ คำ า เตื อ น ความล้ ม เหลวในการหลี ก เลี ่ ย งสถานการณ์ ท ี ่ อ าจ เป็ น อั น ตรายต่ อ ไปนี ้ อ าจทำ า ให้ เ กิ ด การเสี ย ชี ว ิ ต หรื อ ได้...
- Page 55 คำ า ประกาศรั บ รองความสอดคล้ อ งตาม มาตรฐานของผลิ ต ภั ณ ฑ์ Garmin ขอแจ้ ง ให้ ท ราบว่ า ผลิ ต ภั ณ ฑ์ น ี ้ ผ ่ า น มาตรฐานและเป็ น ไปตามข้ อ กำ า หนดสำ า คั ญ และข้ อ...
- Page 56 ได้ เ อง การซ่ อ มจะทำ า ได้ โ ดยศู น ย์ บ ริ ก ารของ Garmin ที ่ ได้ ร ั บ การแต่ ง ตั ้ ง เท่ า นั ้ น การซ่ อ มหรื อ ดั ด แปลง...
- Page 57 จากการบริ ก ารโดยผู ้ ใ ห้ บ ริ ก ารที ่ ไ ม่ ไ ด้ ร ั บ การแต่ ง ตั ้ ง จาก Garmin (v) ความเสี ย หายต่ อ ผลิ ต ภั ณ ฑ์ ท ี ่ ถ ู ก...
- Page 58 ถ้ า ต้ อ งการขอรั บ บริ ก ารรั บ ประกั น ให้ ต ิ ด ต่ อ ตั ว แทน จำ า หน่ า ย Garmin ที ่ ไ ด้ ร ั บ การแต่ ง ตั ้ ง ในพื ้ น ที ่ ข อง...
- Page 59 หรื อ แคนาดาจะต้ อ งถู ก ส่ ง กลั บ ไปที ่ ศ ู น ย์ บ ริ ก าร ของ Garmin ในสหราชอาณาจั ก ร สหรั ฐ อเมริ ก า แคนาดา หรื อ ไต้ ห วั น เพื ่ อ รั บ การบริ ก าร...
- Page 60 포함된 공구 • 15 mm 토크렌치에서 사용하기 위한 crowfoot 어댑터 • 2.5 mm 육각렌치 필요한 공구 • 15 mm 페달렌치 • 자전거 그리스 • 3 mm 육각렌치 • 4 mm 육각렌치 벡터 부속품 설치하기 설치 전에 할 일 1. www.garmin.com/ vectorowner에서 자전거의 호환성을 확인합니다. 2. 페달 스핀들에 적혀있는 센서 ID 를 확인합니다.
- Page 61 3. 기존의 페달을 제거합니다. 4. 나사선을 깨끗하게 하고 오래된 그리스를 제거합니다. 체인 간격을 확인 오른쪽 페달을 설치하기 전에 자전거의 체인 간격을 확인합니다. 자전거의 가장 큰 체인링과 가장 작은 스프라켓 기어에 체인을 겁니다. 자전거의 체인과 페달 팟 케이블 연결부 사이에 적절한 간격이 있어야...
- Page 62 3. 스핀들을 크랭크암에 ➋ 삽입합니다. 4. 스핀들을 손으로 조입니다. (참고:왼쪽 페달 스핀들은 역방향의 나사선입니다) 5. 페달렌치를 사용해서 스핀들을 조입니다. (참고:가민에서는 34~40 N-m의 토크를 권장합니다) 6. 스핀들에서 나온 그리스는 깨끗한 천에 비눗물이나 알코올을 이용해서 닦아냅니다. 7. 스핀들에 페달 팟을 ➌ 설치합니다 (참고:케이블은...
- Page 63 10. 크랭크암을 회전시켜 간격을 확인합니다. 페달팟 은 자전거의 어떤 부위와도 닿지 않아야 합니다. 11. 2 번부터 10번까지의 과정을 오른쪽 페달과 팟을 이용해서 반복합니다. 참고: 페달 팟의 케이블과 체인이 닿는다면 한 개 또는 두 개의 와셔를 스핀들과 크랭크 암 사이에 설치합니다. 두 개가 넘는 와셔를...
- Page 64 무선센서를 ® 연결하는 것 입니다. 여기에서는 Edge 1000에서의 연결 절차를 소개하고 있으며, 다른 호환 기기를 사용하는 경우에는 기기 사용자 매뉴얼을 참조하거나 www.garmin. com/vectorowner를 방문하세요. 1. Edge 기기를 센서의 3m 이내의 거리로 가져오세요. 참고: 페이링중에는 다른 ANT+ 센서들로부터 10미터 떨어져 있어야 합니다.
- Page 65 3. 처음 화면에서 > 센서들 > 센서 추가 > 파워미터 를 선택하세요. 4. 크랭크암을 몇 차례 회전시킵니다. 5. 센서를 선택합니다. 센서와 Edge가 페어링 되면 센서가 연결되었다는 메시지가 보이고 센서 상태는 연결됨으로 표시됩니다. 이후 벡터 데이터를 보기 위한 데이터 필드를 설정하세요. 페달...
- Page 66 10초마다 불이 4 페달 팟이 다른 번 깜빡임. 페달 팟을 찾고 있습니다. 참고:Vector S 의 업그레이드에 대한 안내는 사용자 매뉴얼을 참고하세요. 10초마다 불이 5 설치각도가 번 깜빡임. 세팅되지 않았거나 확인되지 않았습니다. 10초마다 불이 6 하드웨어 번 깜빡임. 설치 오류가 발생했습니다. 10초마다...
- Page 67 참조하거나 www.garmin.com/ vectorowner를 방문합니다. 크랭크암 길이 입력 크랭크암 길이는 크랭크암의 끝부분에 출력되어 있습니다. 1. 페달을 몇 차례 회전시켜 벡터를 활성화 시킵니다. 2. 처음 화면에서 > 센서들 > > 센서 상세 > 크랭크 암 길이를 선택합니다. 3. 크랭크암 길이를 입력하고 를...
- Page 68 2. 완전한 사용자 설명서를 원하는 형식으로 다운 받습니다. 벡터 보관 만약 오랜 시간동안 자전거에서 벡터를 사용하지 않는 경우 벡터를 제거한 후 제품 상자에 보관 하는 것을 권장합니다.
- Page 69 중요 안전 및 제품 정보 주의사항 다음의 잠재 위험 상황을 예방 및 대비하지 않을 경우, 심각한 신체적 손상 및 인명 피해까지 야기할 수 있습니다. 모든 운동을 시작하거나 변경할 때에는 전문의와 상담을 권장합니다. 심박조율기나 기타 신체 내에 전기 장치를 장착한 경우, 심박모니터를...
- Page 70 • 정기적으로 클리트와 페달을 점검하여 마모 또는 손상 등이 없는지 확인하십시오. • 마모된 클리트 또는 손상된 페달 교체 시에는 Garmin사 정품을 사용하십시오. 딜러 또는 Garmin 웹 사이트에 문의 하시기 바랍니다. 규제 준수 본 제품은 준칙 1999/5/EC의 필수 요구사항을 충족하며, 기타 관련된 규정에 부합하는...
- Page 71 의뢰하십시오. 인가되지 않은 보수 및 변경은 기기에 영구적 손상을 일으킬 수 있으며, 파트 15 규정에 따라 귀하의 제품 보증 권리는 무효화됩니다. 제품 환경 프로그램 Garmin사의 제품 재활용 프로그램 및 WEEE, RoHS, REACH 및 기타 규제 프로그램에 대한 정보를 확인하려면, HYPERLINK “http://www. garmin.com/aboutGarmin/environment”www. garmin.com/aboutGarmin/environment를...
- Page 72 침수, 화재 또는 기타 자연재해 및 외부 원인 등에 의한 고장 시, (iv) Garmin의 허가를 받지 않은 자에 의한 수리활동에 따른 손상, (v) Garmin의 서면 동의 또는 허가 없이 수정 및 변경된 제품의 손상 시, (vi) Garmin이 제공하지 않은 기타 전원 및 데이터 케이블에...
- Page 73 서비스를 받으실 수 있습니다. 유통사들의 보증서는 단지 해당 유통사가 담당하는 국가 또는 지역에서만 유효합니다. 미국 또는 캐나다 내에서 구매한 기기의 경우, 보증 서비스를 받으려면, 영국, 미국, 캐나다 또는 대만에 소재한 Garmin 서비스 센터 중 한 곳에 해당 기기를 배송해야 합니다.
- Page 74 , the Garmin logo, ANT+ , and Edge ® ® ® trademarks of Garmin Ltd. or its subsidiaries, registered in the USA and other countries. Vector is a trademark of ™ Garmin Ltd. or its subsidiaries. These trademarks may not be used without the express permission of Garmin.
Need help?
Do you have a question about the Vector 2 and is the answer not in the manual?
Questions and answers