
Related Manuals for Aerogen Aerogen USB Controller


Summary of Contents for Aerogen Aerogen USB Controller
- Page 1 System Instruction Manual for use with Aerogen Solo ® and Aerogen ® Hospital Use page 1 Home Use page 38 www.aerogen.com...
- Page 3 Aerogen USB Controller ® System Instruction Manual for use with Aerogen Solo ® and Aerogen ® HOSPITAL USE Aerogen USB Controller System Instruction Manual ®...
-
Page 4: Table Of Contents
Introduction Indications for Use Set Up System Warnings Controls & Indicators Accessories Functional Test Aerogen Solo Aerosol Flow Rate Calculation Cleaning of the Aerogen USB Controller System Troubleshooting Warranty Life Of Products Specifications Aerogen Solo Performance Aerogen Pro Performance Power... -
Page 5: Introduction
• A portable medical device that is intended to aerosolize physician- prescribed medications for inhalation. • The Aerogen USB Controller should only be operated from mains ® using the Aerogen USB Controller AC/DC Adapter. • An alternative to the existing Aerogen Pro and Aerogen Pro-X ®... - Page 6 The Aerogen USB Controller can be used with Aerogen nebulizers as follows: Table 1. Intended Use Summary Aerogen Solo Aerogen Pro Intended Use Summary Nebulizer Nebulizer Hospital - Ventilated patients Hospital -Spontaneously Breathing Patients 30 Minute Mode Operation 6 Hour Mode Operation Aerogen ®...
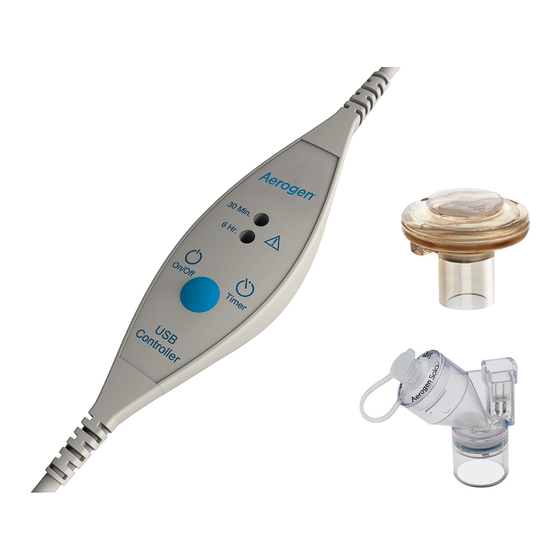
- Page 7 1. Aerogen USB Controller (Multiple patient use) 2. Aerogen Solo Nebulizer (Single patient use) Aerogen Pro Nebulizer (Multiple patient use) 3. Aerogen Solo T-Piece & Silicone Plug (Single patient use) Aerogen Pro T-Piece & Silicone Plug (Multiple patient use) 4. Cable Management Clips (Multiple patient use) 5.
-
Page 8: Set Up
Set Up Read and study all instructions before using the Aerogen USB Controller. Perform a functional test of the Aerogen nebulizer prior to use as described in the Functional Test section of this manual (see page 23). Connect the Aerogen Solo or Aerogen Pro nebulizer by firmly pushing into the T-piece. - Page 9 Alternative Set Up: The Aerogen Solo can be placed on the dry side of the humidifier. Connect the Aerogen USB Controller to the Aerogen USB Controller AC/DC Adapter. Open the plug on the nebulizer and use a pre-filled ampoule or syringe to add medication to the nebulizer.
- Page 10 >3 seconds. 30 Min. 30 Min. 6 Hr. 6 Hr. On/Off Timer On/Off Timer Note: Verify the correct mode of operation is selected. Controller Controller Verify that aerosol is visible. Note: Clips are provided to assist with cable management. Aerogen ®...
-
Page 11: System Warnings
System Warnings Read and study all instructions before using the Aerogen USB Controller System. Only trained persons should operate the Aerogen USB Controller System, Aerogen Solo, Aerogen Pro and associated accessories. If this product is being used to treat a life threatening condition, a backup device is necessary. - Page 12 Do not place the Aerogen USB Controller in an incubator during use. To avoid exhaled medication affecting the ventilator, follow ventilator manufacturer’s recommendations for use of a bacterial filter in the expiratory limb of a breathing circuit.
- Page 13 Portable and mobile radio frequency (“RF”) communication devices can disrupt medical electrical equipment. The Aerogen Solo is a single patient use device not to be used on more than one patient to prevent cross infection. Keep all cables tidy to avoid tripping or strangulation hazards.
- Page 14 • Do not use abrasive or sharp tools to clean the nebulizer. • Prior to use, autoclave the Aerogen Pro and accessories according to specified directions and temperature given in the Cleaning, Disinfection and Sterilization section of this Instruction Manual only. Any deviation from directions given in this Instruction Manual may cause damage to the nebulizer and render it inoperable.
-
Page 15: Controls & Indicators
6 Hour Mode Indicator light On/Off Timer On/Off Control Controller Figure 3. Aerogen USB Controller Controls & Indicators Table 2. Aerogen USB Controller Controls & Indicators Control / Indicator Function • Green = 30 Minute nebulization cycle on. • Amber = Nebulizer disconnect. -
Page 16: Accessories
Dry Side of the Humidifier The Aerogen Solo can be placed on the dry side of the humidifier as shown. The Aerogen Solo can be used with a nasal interface in this configuration. The Aerogen Pro is not recommended for use on the dry side of the humidifier. - Page 17 Between the Wye and Endotracheal Tube The Aerogen Solo can be placed between the wye and endotracheal tube as shown. The Aerogen Solo can be used with a Heat and Moisture Exchange Device (HME) which may contain a filter. Between the HME and Endotracheal Tube...
- Page 18 Note: To ensure correct nebulization, maintain nebulizer vertical orientation. Use With A Nasal Interface The Aerogen Solo can be used on/off ventilator with a nasal interface when configured with a humidifier. Aerogen ®...
- Page 19 2 LPM should be used. Note: The mouthpiece should not be used for children under 5 years of age. The Aerogen Ultra is a single patient use device with a validated defined life of: •...
- Page 20 The Aerogen Ultra can be used in conjunction with the Aerogen Solo Continuous Nebulization Tube Set (see page 20). Optimal aerosol delivery is achieved with valved mouthpiece or the I-Guard Aerosol Mask (as supplied), with low/no oxygen flow. ™ Inspect for device integrity and correct valve placement prior to use.
- Page 21 • Performance of the Aerogen Ultra may vary depending upon the type of drug and Aerogen Ultra configuration used. • Do not exceed recommended oxygen flow for system. • Ensure oxygen connection port or tubing is not occluded. • Do not use Aerogen Ultra without a mouthpiece or face mask.
- Page 22 Tubing (Syringe End) Figure 5. Continuous Nebulization Tube Set 1. Ensure the Aerogen Solo nebulizer is firmly fitted into the Aerogen Solo T-piece in the breathing circuit. 2. Remove the syringe cap from the medication-filled syringe. 3. Attach the syringe end of the tubing onto the syringe.
- Page 23 7. Insert the syringe filled with medication into the syringe infusion pump (pump not shown in Figure 5). 8. Turn on the 6 Hour Mode option on the Aerogen USB Controller and turn on the infusion pump (refer to pump manual or manufacturer for guidance).
- Page 24 • Ensure that the tethered silicone plug is attached to the Aerogen Solo when connecting tube set. • Ensure that the tubing is safely orientated to prevent a trip hazard. • Rising level of medication in the reservoir may occur if the Aerogen Solo nebulizer is turned off while the feed system is still on or the nebulizer is not in its recommended orientation.
-
Page 25: Functional Test
Functional Test Perform a functional test prior to first use, or after each sterilization (Aerogen Pro only) to verify correct operation. This test is to be carried out prior to inserting the nebulizer into a circuit or accessory. 1. Visually inspect each part of the system for cracks or damage and replace if any defects are visible. -
Page 26: Aerogen Solo Aerosol Flow Rate Calculation
Aerogen Solo. Flow rates may vary between individual Aerogen Solo nebulizers. The minimum flow rate for all Aerogen Solo nebulizers is 0.2 mL per minute. In order to calculate the flow rate of an individual Aerogen Solo nebulizer; follow these steps: 1. -
Page 27: Cleaning Of The Aerogen Usb Controller System
2. Check for exposed wiring, damaged connectors, or other defects and replace if any are visible. 3. Visually inspect for damage and replace the Aerogen USB Controller if any damage is observed. Note: Do not spray liquid directly onto the Aerogen USB Controller. - Page 28 Automated Washing Cycle The Aerogen Pro nebulizer has been qualified for the following automated washing cycles. Note: The Aerogen Pro nebulizer should be cleaned in a separate cycle, as opposed to being included with other devices. Automated Cycle One Detergent: Liquid alkaline cleaner (diluted as per manufacturers instruction).
- Page 29 Sterilization of the Aerogen Pro Sterilization of Aerogen Pro Nebulizer, T-Pieces & Adapters 1. Disconnect the nebulizer from the Aerogen USB Controller, and then remove the nebulizer and Adapters from the ventilator circuit, mask or mouthpiece.
- Page 30 6. Rinse at 90 °C (194 °F) for 1 minute. 7. Drain the machine for 40 seconds. 8. Dry at 90 °C (194 °F) for 15 minutes. Note: The Aerogen Pro nebulizer should be cleaned in a separate cycle, as opposed to being included with other devices. Aerogen...
- Page 31 100S Sterilization System for specific instructions regarding its correct operation. Prior to next use: 1. Check for cracks or damage and replace if any defects are visible. 2. Perform a functional test as described in this manual. Aerogen USB Controller System Instruction Manual ®...
-
Page 32: Troubleshooting
Troubleshooting If these suggestions do not correct the problem, discontinue use of any device and contact your local Aerogen sales representative. Table 4. Aerogen USB Controller System Troubleshooting If this happens: It could mean: Try this: No medication in nebulizer. -
Page 33: Warranty
The Aerogen Solo nebulizer has been qualified for: • Intermittent use for a maximum of 28 days (4 treatments per day.) • For continuous use the life of the Aerogen Solo nebulizer and the Continuous Nebulization Tube Set have been validated for use for a maximum of 7 days. -
Page 34: Specifications
Aerogen USB 91g (3.2 oz) Controller Weight Table 8. Environmental Specifications of the Aerogen USB Controller System Operating Maintains specified performance at circuit pressures up to 90 cm O and temperatures from 5 °C (41 °F) up to 40 °C (104 °F). -
Page 35: Aerogen Solo Performance
The temperature of the medication will not rise more than 10ºC (18ºF) above ambient during normal use. Table 10 shows the results of aerosol performance testing for the Aerogen Solo using an 8 stage cascade impactor running at a continuous flow rate of 28.3 LPM. - Page 36 1.85 - 4.19 2.36 - 4.51 (% of fill) Table 11 shows the Inhaled Dose (%) for the Aerogen Solo Nebulizer and Aerogen Ultra with supplemental gas flow, measured on a breathing simulator. Table 11. Inhaled Dose (%) for the Aerogen Solo and Aerogen Ultra...
-
Page 37: Aerogen Pro Performance
® Aerogen Pro nebulizer, as the fundamental scientific technology in both ® nebulizers is the same. Table 12. Performance Specifications of the Aerogen Pro Flow Rate >0.2 mL/min (Average: ≈ 0.4 mL/min) As measured with the Andersen Cascade Impactor: •... -
Page 38: Power
Power Source: The Aerogen USB Controller operates from an AC/DC Adapter (Input 100 to 240VAC, 50 – 60 Hz/200-100mA, Output 5VDC, 1.5A) Note: The Aerogen USB Controller is approved for use with Aerogen USB Controller AC/DC Adapter AG-UC1040-US (Manufacturer Reference:... -
Page 39: Symbols Glossary
Symbols Glossary Table 13. Aerogen USB Controller System Symbols Symbol Meaning Symbol Meaning Serial number designation, where Timer selection (to YY is the year of select the 30 minute YYXXXXX manufacture and or 6 hour nebulization XXXXX is the serial... - Page 40 Aerogen USB Controller ® System Instruction Manual for use with Aerogen Solo ® and Aerogen ® HOME USE Aerogen ®...
- Page 41 Contents Introduction Indications for Use Set Up System Warnings Controls & Indicators Accessories Functional Test Cleaning of the Aerogen USB Controller System Troubleshooting Warranty Life Of Products Specifications Aerogen Solo Performance Aerogen Pro Performance Power Symbols Glossary Appendix 1: EMC Tables...
-
Page 42: Introduction
Aerogen Solo Nebulizer is for single patient use. Both nebulizers are for ® pediatric (29 days or older) and adult patients. Note: The Aerogen Pro is not intended as a multiple patient use device in Home Use. Aerogen ®... - Page 43 The Aerogen USB Controller can be used with Aerogen nebulizers as follows: Table 1. Intended Use Summary Aerogen Solo Aerogen Pro Intended Use Summary Nebulizer Nebulizer Homecare - Ventilated patients 30 Minute Mode Operation 6 Hour Mode Operation Aerogen USB Controller System Instruction Manual...
- Page 44 1. Aerogen USB Controller (Multiple patient use) 2. Aerogen Solo Nebulizer (Single patient use) Aerogen Pro Nebulizer (Single patient use) 3. Aerogen Solo T-Piece & Silicone Plug (Single patient use) Aerogen Pro T-Piece & Silicone Plug (Single patient use) 4. Cable Management Clips (Multiple patient use) 5.
-
Page 45: Set Up
Read and study all instructions before using the Aerogen USB Controller. Perform a functional test of the Aerogen nebulizer prior to use as described in the Functional Test section of this manual (see page 52). Connect the Aerogen Solo or Aerogen Pro nebulizer by firmly pushing into the T-piece. - Page 46 Alternative Set Up: The Aerogen Solo can be placed on the dry side of the humidifier. Connect the Aerogen USB Controller to the Aerogen USB Controller AC/DC Adapter. Open the plug on the nebulizer and use a pre-filled ampoule or syringe to add medication to the nebulizer.
- Page 47 6 Hr. 6 Hr. On/Off Timer On/Off Timer Note: Verify the correct mode of operation is selected. Controller Controller Verify that aerosol is visible. Note: Clips are provided to assist with cable management. Aerogen USB Controller System Instruction Manual ®...
-
Page 48: System Warnings
Do not use a filter or heat-moisture exchanger (HME) between the nebulizer and patient airway. The Aerogen nebulizers, T-pieces and accessories are not sterile. The components and accessories of the Aerogen USB Controller System are not made with natural rubber latex. Only use physician-prescribed solutions that are approved for use with a general purpose nebulizer. - Page 49 Follow local laws and recycling plans regarding disposal or recycling of components and packaging. Do not use the Aerogen USB Controller adjacent to or stacked with other equipment. If adjacent or stacked use is necessary, the device should be observed to verify normal operation in this configuration.
- Page 50 Do not obstruct the removal of the Aerogen USB Controller AC/DC Adapter from the mains. Do not store the Aerogen USB Controller System in a location where it is exposed to direct sunlight, extreme heat or cold, dust or moisture. Store out of reach of children.
- Page 51 Figure 2. Aerogen Palladium Vibrating Mesh Technology (Aerogen Vibronic ® Use of the Aerogen Solo and T-piece during the administration of volatile anesthetics may result in adverse effects on the constituent plastics. Do not use with volatile anesthetics unless known to be compatible. Aerogen...
-
Page 52: Controls & Indicators
6 Hour Mode Indicator light On/Off Timer On/Off Control Controller Figure 3. Aerogen USB Controller Controls & Indicators Table 2. Aerogen USB Controller Controls & Indicators Control / Indicator Function • Green = 30 Minute nebulization cycle on. • Amber = Nebulizer disconnect. -
Page 53: Accessories
Dry Side of the Humidifier The Aerogen Solo can be placed on the dry side of the humidifier as shown. The Aerogen Solo can be used with a nasal interface in this configuration. The Aerogen Pro is not recommended for use on the dry side of the humidifier. -
Page 54: Functional Test
5. Disconnect the nebulizer from the controller. Verify that the amber Error Indicator lights. Reconnect the nebulizer to the controller. 6. If using the Aerogen Solo press the On/Off power button again to turn the system off. Press and hold the button for at least 3 seconds. Verify that the 6 Hour Mode indicator light is green and that aerosol is visible. -
Page 55: Cleaning Of The Aerogen Usb Controller System
2. Check for exposed wiring, damaged connectors, or other defects and replace if any are visible. 3. Visually inspect for damage and replace the Aerogen USB Controller if any damage is observed. Note: Do not spray liquid directly onto the Aerogen USB Controller. - Page 56 Warning: Do not use abrasive or sharp tools to clean the nebulizer unit. Boiling the Aerogen Pro & Accessories 1. Rinse the Aerogen Pro nebulizer components under running hot tap water after every use. 2. Shake off excess water, and allow parts to fully air dry on a clean, dry towel, out of the reach of children.
- Page 57 5. Carefully remove the Aerogen Pro from the boiling water and shake off the excess water. Allow parts to fully air dry on a clean, dry towel, out of the reach of children. 6. Make certain that all parts are completely dry before you store or use them.
-
Page 58: Troubleshooting
Troubleshooting If these suggestions do not correct the problem, discontinue use of any device and contact your local Aerogen sales representative. Table 4. Aerogen USB Controller System Troubleshooting If this happens: It could mean: Try this: No medication in nebulizer. -
Page 59: Warranty
The Aerogen Solo nebulizer has been qualified for: • Intermittent use for a maximum of 28 days (4 treatments per day.) • For continuous use the life of the Aerogen Solo nebulizer and the Continuous Nebulization Tube Set have been validated for use for a maximum of 7 days. -
Page 60: Specifications
Aerogen USB 91g (3.2 oz) Controller Weight Table 8. Environmental Specifications of the Aerogen USB Controller System Operating Maintains specified performance at circuit pressures up to 90 cm O and temperatures from 5 °C (41 °F) up to 40 °C (104 °F). -
Page 61: Aerogen Solo Performance
The temperature of the medication will not rise more than 10ºC (18ºF) above ambient during normal use. Table 10 shows the results of aerosol performance testing for the Aerogen Solo using an 8 stage cascade impactor running at a continuous flow rate of 28.3 LPM. -
Page 62: Aerogen Pro Performance
Table 10. Aerogen Solo Aerosol Performance Testing (Continued) Albuterol Sulphate Ipratropium Budesonide (1mg/ml) (0.25mg/ml) (0.5mg/ml) Coarse particle Dose (>4.7 μm) 27.00 - 31.11 23.62 - 28.21 32.31 - 36.12 (% of fill) Fine particle Dose (<4.7 μm) 66.33 - 72.07 68.58 - 73.84... - Page 63 Representative particle size distribution for Albuterol as per EN 13544-1 is shown below for the Aerogen Pro. 100% Particle Size (µm) Aerogen USB Controller System Instruction Manual ®...
-
Page 64: Power
Power Source: The Aerogen USB Controller operates from an AC/DC Adapter (Input 100 to 240VAC, 50 – 60 Hz/200-100mA, Output 5VDC, 1.5A) Note: The Aerogen USB Controller is approved for use with Aerogen USB Controller AC/DC Adapter AG-UC1040-US (Manufacturer Reference:... -
Page 65: Symbols Glossary
Symbols Glossary Table 12. Aerogen USB Controller System Symbols Symbol Meaning Symbol Meaning Serial number designation, where Timer selection (to YY is the year of select the 30 minute YYXXXXX manufacture and or 6 hour nebulization XXXXX is the serial... -
Page 66: Appendix 1: Emc Tables
Guidance and manufacturer’s declaration – electromagnetic emissions The Aerogen USB Controller System is intended for use in the electromagnetic environment specified below. The customer or the user of the Aerogen USB Controller System should assure that it is used in such an environment. - Page 67 Recommended separation distances between portable and mobile RF communication equipment and the Aerogen USB Controller System that is not life supporting The Aerogen USB Controller System is intended for use in the electromagnetic environment in which radiated RF disturbances are controlled. The customer or the user...
- Page 68 Aerogen USB Controller System that is not life supporting The Aerogen USB Controller System is intended for use in the electromagnetic environment specified below. The customer or the user of the Aerogen USB Controller System should assure that it is used in such an environment.
- Page 69 RF transmitters, an electromagnetic site survey should be considered. If the measured field strength in the location in which the Aerogen USB Controller System is used exceeds the applicable RF compliance level above, the Aerogen USB Controller System should be observed to verify normal operation.
- Page 70 This page has been intentionally left blank Aerogen ®...
- Page 72 (886) 423-7643 info@aerogen.com www.aerogen.com twitter.com/aerogen Manufacturer Aerogen Ltd. © 2017 Aerogen Ltd. Part No. AG-UC1050-US Galway Business Park, P/N 30-914 Rev D Dangan, Galway, Ireland.
Need help?
Do you have a question about the Aerogen USB Controller and is the answer not in the manual?
Questions and answers