Table of Contents
Advertisement
Quick Links
LightBloc FlexShade
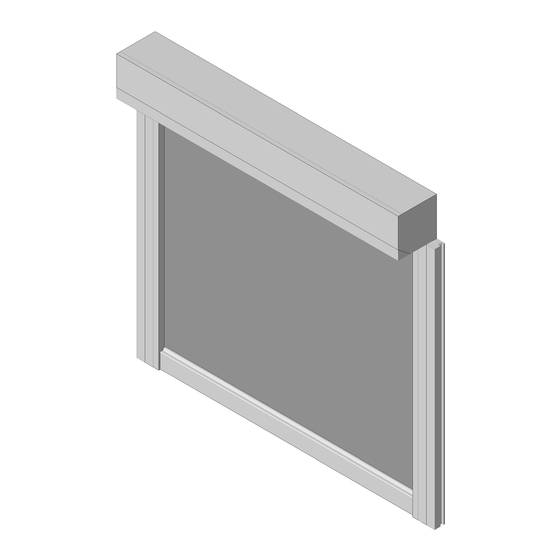
Overview - LightBloc FlexShade Components
Gudgeon assembly
Retainer clip
Idler endcap
fastens to ceiling,
face or jamb
Endcap
Covers
Channel
Liner
Fabric
Retainer
Side channel - Includes ¾" x 1"
adjustable mounting angles
(Mounting angles provided for
"Inside" or "Jamb"mount installations.
For "Face Mount" applications,
Draper provides
/
" access holes in side
3
8
channels with plastic plug covers.)
Read and understand all warnings
Contents
LightBloc FlexShade Components .................................................1
Warnings and Safety Information ..................................................2
Field Adjustments, Cleaning and Maintenance ............................2
Section 1
Preparation for Installation .............................................................3
Section 2
Side Channels ..................................................................................4
Section 3
Check Shade Fabric ........................................................................4
Section 4
®
Top/Back Cover
(STANDARD)
Shade
fabric
Stays
Slat bar
Sill channel -
see details
Fabric grommet
CAUTION
(Page 2 of this document)
......................5
Motor
Endcap
Motor
Channel
locator
Fabric guide
Roller
Face/bottom
cover
(STANDARD)
Side channel
Crank
Handle
SILL CHANNEL
Inside Mount
Face Mount
1
3
/
" H x ¾" D
2¾" H x ¾" D
8
before beginning installation.
Section 5
Check Shade Operation
(for Units with Clutch or Spring Roller Operation)
Section 6
Section 7
Section 8
Section 9
Dimensions - LightBloc FlexShade ................................................8
INSTRUCTIONS
INSTALLATION & OPERATION
TOOLS
REQUIRED
Clutch
Endcap
Endcap
Cover
PENCIL
POWER DRILL
CRANK ASSEMBLY
LEVEL
Crank Endcap
& Assembly
TAPE MEASURE
MALLET
HARDWARE
.......................................................................6
.......................................................................6
.......................................................................7
If you have any difficulties installing or servicing your
LightBloc FlexShade, call your dealer or Draper, Inc.
Draper, Inc. | 411 S. Pearl St. Spiceland, IN 47385
draperinc.com | 765.987.7999 | 800.238.7999
|
FORM: LBFS_Inst_18
© 2018 All Rights Reserved
(by others)
......................5
Advertisement
Table of Contents

Subscribe to Our Youtube Channel
Related Manuals for Draper LightBloc FlexShade


Summary of Contents for Draper LightBloc FlexShade
-
Page 1: Table Of Contents
Dimensions - LightBloc FlexShade ..........8 If you have any difficulties installing or servicing your LightBloc FlexShade, call your dealer or Draper, Inc. Draper, Inc. | 411 S. Pearl St. Spiceland, IN 47385 draperinc.com | 765.987.7999 | 800.238.7999 FORM: LBFS_Inst_18 © 2018 All Rights Reserved... -
Page 2: Please Read Warnings And Safety Information
Window covering products manufactured by Draper, when properly installed, should require no operational maintenance or lubrication. Most of Draper’s standard fabrics may be cleaned at the window by vacuuming with a soft brush attachment. They also may be cleaned by using a sponge or soft cloth and mild solution of warm soapy water. -
Page 3: Preparation For Installation
LightBloc FlexShade ® page 3 of 8 Section 1 - Preparation for Installation Caution: Before mounting shades, verify measurements on package label with shade. CRANK ASSEMBLY Please Note: Installer is responsible for selecting mounting hardware appropriate for site conditions. 1. FOR ALL: Open cartons lengthwise. Remove all pieces from carton. If shade has a detachable crank handle, remove universal (Fig. -
Page 4: Side Channels
LightBloc FlexShade ® page 4 of 8 Section 2 - Side Channels Caution: For motorized units, make sure POWER IS OFF before making any Figure 6 electrical connections. Use extreme caution when working with electric motors. 1. FOR ALL: Install side channels... -
Page 5: Bead Chain Limits And Safety Device Installation
Set upper and lower travel limits by installing stop balls to bead chain Attach Stop Balls Section 4.2 - P-Clip Cord Tension Device Please Note: Draper Bead Chain Clutch Operated shades that do not comply with WMCA/ANSI Standard Crimp A100.1-2012 come with a cord tension device pre-attached to bead chain (Fig. -
Page 6: Electrical Connections (For Motorized Units)
Please Note: All operating switches should be “off” before power is connected. Please Note: For low voltage wiring requirements, Draper recommends consulting with a professional low voltage electrical contractor. It is very important that shielded and stranded CAT 5 cable be used to prevent any electrical interference. -
Page 7: Limit Switch Adjustments (For Motorized Units)
ROOM SIDE LightBloc FlexShade ® page 7 of 8 Front (for Motorized Units) Section 8 - Limit Switch Adjustments Back Section 8.1 - Standard and Quiet Motors (All procedures shown are for Standard Roll. Invert orientation for Reverse Roll) Caution:... -
Page 8: Dimensions - Lightbloc Flexshade
LightBloc FlexShade ® page 8 of 8 Section 9 - Dimensions - LightBloc FlexShade Top/Back Cover 3⁷₁₆" Face/Bottom Cover (87.32mm) 1 ₄" Unit width = Cloth width + 2 ₈" (60.33mm) (44.45mm) ⁷₈" (22.23mm) ⁷₈" (22.23mm) Endcap Assembly 2 ₄"...
Need help?
Do you have a question about the LightBloc FlexShade and is the answer not in the manual?
Questions and answers