
Subscribe to Our Youtube Channel
Related Manuals for Rivers Edge Landmark LM600


Summary of Contents for Rivers Edge Landmark LM600
- Page 1 Operator's Manual LM600 Landmark ™ Permanent Blind GAS/OIL RATIO 50:1 P/N: 23033 REV1: 02/23/16 Get parts online at © 2016 RETI www.HuntRiversEdge.com All Rights Reserved...
-
Page 2: Table Of Contents
Operator's Manual Landmark Permanent Blind ™ INTRODUCTION Landmark™ Permanent Blinds are engineered with you the hunter in mind. We appreciate your purchase of one of our world class products. Follow these few simple instructions and your blind will provide you many years of trouble-free pleasure. -
Page 3: Frame Assembly Instructions
Operator's Manual Landmark Permanent Blind ™ FRAME ASSEMBLY INSTRUCTIONS Tools needed – two 10mm wrenches IMPORTANT ASSEMBLY TIP: Do not tighten any nut and bolt combinations completely until all parts are assembled together! Finger tighten plus one turn of a wrench only! This will temporarily hold the lock nut on the bolt while helping alignment of all parts! After all parts are assembled together, all nut &... - Page 4 Operator's Manual Landmark Permanent Blind ™ FIGURE 2 5. Slide the four C1 poles into the HUB1 corners so that the snap buttons secure pieces together. SEE FIGURE 2. 6. Attach the four HUB2 corners to C1 poles so that the snap buttons secure pieces together. PAY ATTENTION TO ORIENTATION OF THE HUB2 CORNERS! SEE FIGURE 2.
- Page 5 Operator's Manual Landmark Permanent Blind ™ FIGURE 3 7. Slide each of the three D1 poles into an E1 pole so that the snap button secures both pieces together. SEE FIGURE 3. 8. Slide the three assembled D1 and E1 poles into the HUB2 corners. These do not attach with snap buttons and will be secured together with hardware in a later step.
- Page 6 Operator's Manual Landmark Permanent Blind ™ FIGURE 4 9. Attach each of the eight F1 poles to the bottom and middle tiers of the blind frame using two M6 x 35mm bolts (20) and M6 nuts (22). Make sure upper bolts are securing the D1 and E1 poles along with the F1 poles. SEE FIGURE 4. NOTE: PAY ATTENTION TO THE ORIENTATION OF THE BOLTS! THE HEAD OF THE BOLT MUST BE ON THE OUTSIDE OF THE FRAME.
- Page 7 Operator's Manual Landmark Permanent Blind ™ Through Hole Closer to HUB3 than HUB2 Through Hole Closer to HUB3 than HUB2 FIGURE 5 10. Slide two G1 poles into HUB2 corners on the door side of the blind so that the snap buttons secure pieces together. It is critical that the G1 poles are oriented such that snap buttons are facing each other and each through hole is located closer to the HUB3 corners than the HUB2 corners.
- Page 8 Operator's Manual Landmark Permanent Blind ™ Through Hole Closer to HUB3 than HUB2 Through Hole Closer to HUB3 than HUB2 FIGURE 6 12. Slide remaining two G1 poles into the other HUB2 corners so that snap button secures pieces together. It is critical that the G1 poles are oriented such that snap buttons are facing each other and each through hole is located closer to the HUB3 corners than the HUB2 corners.
- Page 9 Operator's Manual Landmark Permanent Blind ™ FIGURE 7 14. Slide the two H1 poles into the two I1 poles so that snap buttons secure pieces together. SEE FIGURE 7. 15. Slide assembled H1 and I1 poles into HUB3 corners so that snap button secures pieces together. PAY ATTENTION TO ORIENTATION OF TABS ON H1 AND I1 POLES SO THAT THEY POINT UPWARD.
- Page 10 Operator's Manual Landmark Permanent Blind ™ FIGURE 8 16. Slide remaining two A1 poles into remaining two B1 poles so that snap buttons secure both pieces together. SEE FIGURE 8. 17. Slide assembled A1 and B1 poles into HUB3 corner so that snap buttons secure pieces together. You should now have the top tier frame of the blind assembled.
- Page 11 Operator's Manual Landmark Permanent Blind ™ FIGURE 9 18. Attach the four J1 poles by one end to the horizontal through holes on the four assembled H1 and I1 poles using four M6 x 35mm bolts (20) and M6 nuts (22). Hand tighten only at this time. SEE FIGURE 9. 19.
- Page 12 Operator's Manual Landmark Permanent Blind ™ FIGURE 10 20. Attach each set of J1 and K1 poles to the four G1 poles with four M6 x 35mm bolts (20) and M6 nuts (22). Make sure the J1 poles are between the K1 and G1 poles. Tighten all loose hardware at this time. DO NOT OVERTIGHTEN TO PREVENT CRUSHING TUBING! SEE FIGURE 10.
- Page 13 Operator's Manual Landmark Permanent Blind ™ FIGURE 11 21. Slide the four L1 poles into the four M1 poles and set aside. SEE FIGURE 11. 22. Slide the three N1 poles into the three O1 poles so that snap buttons secure pieces together and set aside. 23.
- Page 14 Operator's Manual Landmark Permanent Blind ™ FIGURE 12 24. Attach remaining two assembled N1 and O1 poles to the ends of the L1 and M1 poles using eight M6 x 35mm bolts (20) and M6 nuts (22). SEE FIGURE 12. NOTE: PAY ATTENTION TO THE ORIENTATION OF THE BOLTS! THE HEAD OF THE BOLT MUST BE ON THE TOP OF THE ROOF FRAME.
- Page 15 Operator's Manual Landmark Permanent Blind ™ FIGURE 13 25. Attach assembled roof to blind structure using eight M6 x 35mm bolts (20) and M6 nuts (22). PAY ATTENTION TO ORIENTATION OF THE ROOF! THE ROOF ATTACHES ON THE INSIDE OF THE HUB3 CORNER TABS. SEE FIGURE 13. NOTE: TIGHTEN ANY LOOSE HARDWARE AT THIS TIME.
-
Page 16: Skin Assembly Instructions
Operator's Manual Landmark Permanent Blind ™ SKIN ASSEMBLY INSTRUCTIONS 1. Lay out all sewn components and familiarize yourself with them. Pay special attention to the back wall panel and the two side wall panels as they look similar at first glance but are different. The back wall panel has a strip of Velcro sewn across the entire width of panel at the top. - Page 17 Operator's Manual Landmark Permanent Blind ™ 2. Insert the six R1 poles (window tube supports) into the window sewn sleeves found on the one back and two side wall panels. You will use two tubes per panel. SEE INSIDE BACK PANEL AND INSIDE SIDE PANEL FIGURES. 3.
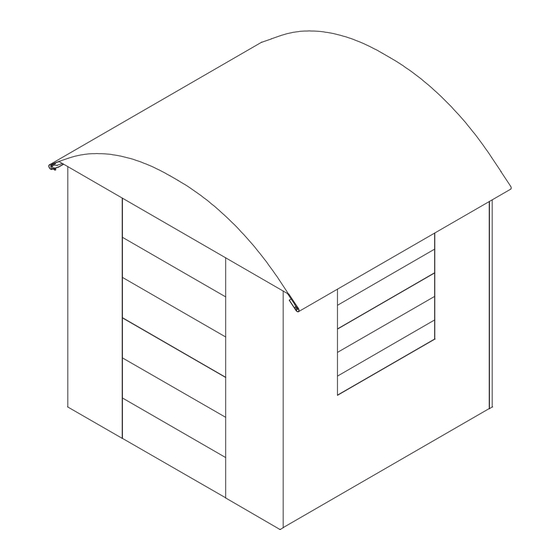
- Page 18 Operator's Manual Landmark Permanent Blind ™ 10. Wrap the edge corner flaps of the roof panel around the eave corners of the frame assembly and secure with Velcro. SEE FIGURE 18 A-B. 11. Pull the roof panel tight by wrapping D-ring straps around eave frame.
-
Page 19: Warranty
Operator's Manual Landmark Permanent Blind ™ ONE YEAR LIMITED WARRANTY RETI., warrants this product under a one-year limited warranty to be free from defects in materials or workmanship or both for a period not exceeding twelve consecutive months from the date of original purchase by the first retail consumer or commercial end user. “Consumer use” means personal recreational use by a retail consumer. -
Page 20: Parts Explosion/Parts List
Operator's Manual Landmark Permanent Blind ™ PARTS BREAKDOWN KEY # PART # DESCRIPTION QTY. KEY # PART # DESCRIPTION QTY. 22864 BASE HUB "HUB1" 22878 ROOF MOUNT FEMALE "I1" 22930 HORIZONTAL SUPPORT FEMALE "B1" 22879 UPPER CROSS BRACE "J1" 22932 HORIZONTAL SUPPORT MALE "A1"... - Page 21 Operator's Manual Landmark Permanent Blind ™ PARTS BREAKDOWN KEY # PART # DESCRIPTION QTY. KEY # PART # DESCRIPTION QTY. 23876 WINDOW RAIL TUBE "S1" 22893 SEWN BACK PANEL 22891 SEWN ROOF PANEL 22899 SEWN RIGHT FRONT PANEL 22892 SEWN SIDE PANEL 22894 SEWN LEFT FRONT PANEL 23861...
-
Page 22: Notes
Operator's Manual Landmark Permanent Blind ™ NOTES Check for parts online at www.HuntRiversEdge.com or call 800-450-EDGE (3343) M-F 8-5... - Page 23 Operator's Manual Landmark Permanent Blind ™ NOTES Check for parts online at www.HuntRiversEdge.com or call 800-450-EDGE (3343) M-F 8-5...
- Page 24 Landmark™ by RETI 1160 Eighth Avenue, PO Box 755 Cumberland, WI 54829 800-450-3343 | Fax 715-822-2124 Email: info@huntriversedge.com *All weights, specifications and features are approximate and are subject to change without notice. Due to continuous product improvements, product images may not be exact. Warning labels in some product images may have been removed for photography purposes only.
Need help?
Do you have a question about the Landmark LM600 and is the answer not in the manual?
Questions and answers