Table of Contents
Advertisement
Quick Links
WE ARE HUNTERS
PRODUCT MEETS
INDUSTRY STANDARDS
RECOGNIZED BY
PARTICIPATING MEMBER
Get parts online at
www.HuntRiversEdge.com
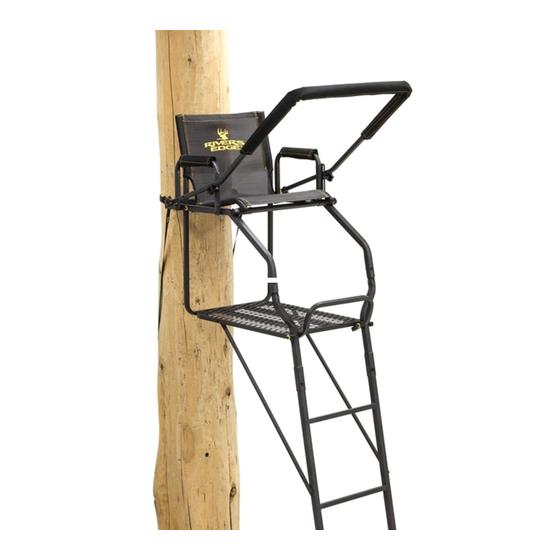
Operator's Manual
RETREAT
1-MAN
Ladder Stand
MODEL RE656
Maximum Height
17' 11" to shooting rail
Maximum Field Rating
300 lbs
Tree Diameter Range
12" to 20"
Wear Your Harness!
© 2018 RETI
P/N: 29090
All Rights Reserved
REV1: 2/27/18
Advertisement
Table of Contents

Subscribe to Our Youtube Channel
Related Manuals for Rivers Edge RE656


Summary of Contents for Rivers Edge RE656
- Page 1 Operator's Manual RETREAT WE ARE HUNTERS 1-MAN Ladder Stand MODEL RE656 Maximum Height 17' 11” to shooting rail Maximum Field Rating 300 lbs Tree Diameter Range 12" to 20" Wear Your Harness! PRODUCT MEETS INDUSTRY STANDARDS RECOGNIZED BY Get parts online at ©...
-
Page 2: Table Of Contents
INTRODUCTION Rivers Edge® Treestands are engineered with you the hunter in mind. We appreciate your purchase of one of our world class treestands. Follow these few simple instructions and your stand will provide you many years of trouble-free pleasure. Instructions should be kept in a safe place and reviewed at least annually. -
Page 3: Warnings
Operator's Manual RETREAT 1-MAN Ladder Stand READ AND UNDERSTAND THE FOLLOWING WARNINGS BEFORE ASSEMBLY STOP MODEL RE656 WARNING MAXIMUM USE HEIGHT - 17' 11” TO SHOOTING RAIL Never jump or bounce on a treestand to seat it to the tree. -
Page 4: Inspection And Maintenance
Operator's Manual RETREAT 1-MAN Ladder Stand WARNING INSPECTION AND MAINTENANCE Always lean forward as you climb and attach your harness to the tree before securing the platform to the tree and BEFORE EACH USE PERFORM THE FOLLOWING: stepping onto the platform. •... -
Page 5: Hardware Identification Chart
Bolts shown are for size reference. HARDWARE IDENTIFICATION CHART Extra hardware may be included in the parts bag. Quick Tip: Cut page out to use as a reference tool while following assembly instructions 1/4-20 X 1-1/4 IN Bolt - Qty 2 1/4-20 X 1-1/2 IN Bolt - Qty 7 M6 Yellow Washer M6 Yellow Spacer... -
Page 7: Assembly Instructions
Operator's Manual RETREAT 1-MAN Ladder Stand ASSEMBLY INSTRUCTIONS IMPORTANT ASSEMBLY TIP: All assembly must be done in this order at ground Do not tighten any nut and bolt combinations completely level before uprighting. until all parts are assembled together! Finger tighten plus one turn of a wrench only! This will temporarily hold the Do not remove labels/warnings from product, they are lock- nut on the bolt while helping alignment of all parts! - Page 8 Operator's Manual RETREAT 1-MAN Ladder Stand 5. Assemble the foot platform (2) to the rear seat supports (14 & 19) using two 1/4-20 x 2 -1/4 IN bolts (34) and two 1/4-20 nuts (36) as shown in FIGURE 3. 6. Connect the front of the foot platform (2) to the flared platform rails (8) and the footrest (6) with two 1/4-20 x 3-1/4 IN bolts (35), six yellow washers (23) and two 1/4-20 nuts (36) as shown in FIGURES 3 AND 3A.
- Page 9 Operator's Manual RETREAT 1-MAN Ladder Stand 11. Take seat assembly (13) and slide over the top rear seat supports: left (19) and right (14) as shown by arrow in FIGURE 5. 12. Connect the seat assembly (13) to the seat side rails (9) using two 1/4-20 X 2-3/4 IN bolts (37), four yellow washers (23), two yellow spacers (27) and two 1/4-20 nuts (36).
- Page 10 Operator's Manual RETREAT 1-MAN Ladder Stand 15. Connect the shooting rail assembly from step 14 to the earlier installed M6 X 60 MM carriage bolts (30) from step 4 along with two yellow spacers (27) and two M6 X 10 MM knobs (25). SEE FIGURES 7 AND 7A.
- Page 11 Operator's Manual RETREAT 1-MAN Ladder Stand 18. Ladder sections are assembled on the ground in the following order: bottom ladder section (5), middle ladder section with stabilizer slot (4) and the top ladder section (3) with the treestand top assembly. Connect all sections together using four lockpins (24). SEE FIGURE 9.
- Page 12 Operator's Manual RETREAT 1-MAN Ladder Stand 20. Attach the two provided 9 IN foam pads (7) to the armrests (11 & 12) by wrapping around tubing and attaching hook and loop together. 21. Attach the 66 IN foam pad (17) to the shooting rail assembly by wrapping the sleeve around the tubing and attaching the hook and loop together.
-
Page 13: Warnings
Operator's Manual RETREAT 1-MAN Ladder Stand READ AND UNDERSTAND THE FOLLOWING WARNINGS BEFORE SETUP AND USE STOP WARNING WARNING Double check assembly steps to be certain you have Always maintain three (3) points of contact when correctly assembled this product. climbing a ladder treestand. -
Page 14: Setup And Use Instructions
Operator's Manual RETREAT 1-MAN Ladder Stand SET UP AND USE INSTRUCTIONS FIGURE 12 WARNING Never use a treestand on a dead, leaning, diseased or loose barked tree, or a utility pole. Always avoid electrical power lines. Bring ratchet strap(s) up with you in a pocket - Do Not carry in your hands! During installation and removal of ladder treestands, you must always and properly use the included Full Body... - Page 15 Operator's Manual RETREAT 1-MAN Ladder Stand 5. a. Loop the D-loop end of the two 16' criss cross straps (41) FIGURE 16A FIGURE 16B through the loop end to form a cinch knot around the ladder rail tube. Secure beneath a step rung, at the stabilizer bar height location.
-
Page 16: Finished Ladder
Operator's Manual RETREAT 1-MAN Ladder Stand FINISHED LADDER RATCHET STRAP ASSEMBLED PLATFORM SECTION CRISS CROSS STRAPS TOP LADDER SECTION STABILIZER BAR CAM STRAP MIDDLE LADDER SECTION STABILIZER BAR BOTTOM LADDER LOCKPINS SECTION Check for parts online at www.HuntRiversEdge.com or call 800-450-EDGE (3343) M-F 8-5... -
Page 17: Illustrated Parts Breakdown
Operator's Manual RETREAT 1-MAN Ladder Stand ILLUSTRATED PARTS BREAKDOWN 23 36 Check for parts online at www.HuntRiversEdge.com or call 800-450-EDGE (3343) M-F 8-5... - Page 18 Operator's Manual RETREAT 1-MAN Ladder Stand PARTS LIST ITEM # PART # DESCRIPTION QTY. ITEM # PART # DESCRIPTION QTY. 27397 STABILIZER BAR 39 IN 26959 BOLT M6 X 1 X 70 MM 28672 FOOT PLATFORM 28839 KNOB M6 X 29 MM 28708 TOP LADDER SECTION 29729...
- Page 19 Operator's Manual RETREAT 1-MAN Ladder Stand OTHER GREAT PRODUCTS BY RIVERS EDGE TREESTANDS Portable ground blinds take a beating from the sun, wind, rain and snow. Colors fade, materials rot, poles break and fabric tears. The Landmark Perma- nent Blind was designed and constructed to resist the elements year after year.
- Page 20 WE ARE HUNTERS Rivers Edge® Treestands, Inc. Phone: 800-450-EDGE (3343) 1160 Eighth Avenue, PO Box 755 Fax: 715-822-2124 Cumberland, WI 54829 www.huntriversedge.com *All weights, specifications and features are approximate and are subject to change without notice. Due to continuous product improvements, product images may not be exact. Warning labels in some product...
Need help?
Do you have a question about the RE656 and is the answer not in the manual?
Questions and answers