Table of Contents
Advertisement
Quick Links
Download this manual
See also:
Owner's Manual
MODEL G0843P
POLAR BEAR SERIES
TM
12" DOUBLE DISC SANDER
OWNER'S MANUAL
(For models manufactured since 11/17)
COPYRIGHT © MARCH, 2018 BY GRIZZLY INDUSTRIAL, INC.
WARNING: NO PORTION OF THIS MANUAL MAY BE REPRODUCED IN ANY SHAPE
OR FORM WITHOUT THE WRITTEN APPROVAL OF GRIZZLY INDUSTRIAL, INC.
#ES19293 PRINTED IN CHINA
V1.03.18
Advertisement
Table of Contents

Related Manuals for Grizzly POLAR BEAR Series


Summary of Contents for Grizzly POLAR BEAR Series
- Page 1 (For models manufactured since 11/17) COPYRIGHT © MARCH, 2018 BY GRIZZLY INDUSTRIAL, INC. WARNING: NO PORTION OF THIS MANUAL MAY BE REPRODUCED IN ANY SHAPE OR FORM WITHOUT THE WRITTEN APPROVAL OF GRIZZLY INDUSTRIAL, INC. #ES19293 PRINTED IN CHINA V1.03.18...
- Page 2 This manual provides critical safety instructions on the proper setup, operation, maintenance, and service of this machine/tool. Save this document, refer to it often, and use it to instruct other operators. Failure to read, understand and follow the instructions in this manual may result in fire or serious personal injury—including amputation, electrocution, or death.
-
Page 3: Table Of Contents
Table of Contents INTRODUCTION ..........2 SECTION 5: ACCESSORIES ......18 Contact Info............ 2 SECTION 6: MAINTENANCE ......20 Manual Accuracy ........... 2 Schedule ............20 Identification ........... 3 Cleaning & Protecting ........20 Machine Data Sheet ........4 SECTION 7: SERVICE ........21 SECTION 1: SAFETY ........ -
Page 4: Introduction
ID label. This will help us help you faster. tions, specifications, drawings, and photographs in this manual. Sometimes we make mistakes, but Grizzly Technical Support our policy of continuous improvement also means 1815 W. Battlefield that sometimes the machine you receive is Springfield, MO 65807 slightly different than shown in the manual. -
Page 5: Identification
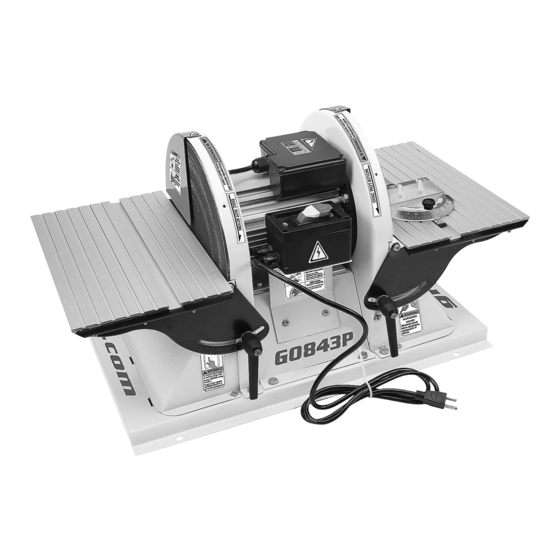
Identification Become familiar with the names and locations of the controls and features shown below to better understand the instructions in this manual. Paddle Switch w/ Right Disabling Key Sanding Right Sanding Disc Disc Guard Left Right Table Table Left Sanding Miter Front... -
Page 6: Machine Data Sheet
Machine Data Sheet MACHINE DATA SHEET Customer Service #: (570) 546-9663 · To Order Call: (800) 523-4777 · Fax #: (800) 438-5901 MODEL G0843P 12" DOUBLE DISC SANDER ‐ POLAR BEAR SERIES Product Dimensions: Weight................................79 lbs. Width (side-to-side) x Depth (front-to-back) x Height..............29-1/2 x 16 x 16 in. Footprint (Length x Width).......................... - Page 7 Construction Materials Base................................Steel Table..............................Aluminum Frame................................. Steel Disc..............................Aluminum Miter Gauge............................Aluminum Paint Type/Finish............................ Enamel Other Related Info Miter Gauge Slot Width..........................5/8 in. Miter Gauge Slot Height........................... 1/4 in. Number of Dust Ports............................2 Dust Port Size............................2-1/2 in. Other Specifications: Country of Origin ..............................
-
Page 8: Section 1: Safety
SECTION 1: SAFETY For Your Own Safety, Read Instruction Manual Before Operating This Machine The purpose of safety symbols is to attract your attention to possible hazardous conditions. This manual uses a series of symbols and signal words intended to convey the level of impor- tance of the safety messages. - Page 9 WEARING PROPER APPAREL. Do not wear FORCING MACHINERY. Do not force machine. clothing, apparel or jewelry that can become It will do the job safer and better at the rate for entangled in moving parts. Always tie back or which it was designed. cover long hair.
-
Page 10: Additional Safety For Disc Sanders
Additional Safety for Disc Sanders Serious injury or death can occur from pinching fingers or hands between rotating sanding disc and table, or getting clothes or hair getting entangled in sanding disc. Workpieces thrown by sander can strike nearby operators with great force. Long-term respiratory damage can occur from using sander without a respirator and adequate dust collection system. -
Page 11: Section 2: Power Supply
SECTION 2: POWER SUPPLY Availability Before installing the machine, consider the avail- ability and proximity of the required power supply Serious injury could occur if you connect circuit. If an existing circuit does not meet the machine to power before completing setup requirements for this machine, a new circuit must process. - Page 12 Grounding & Plug Requirements Improper connection of the equipment-grounding wire can result in a risk of electric shock. The This machine MUST be grounded. In the event wire with green insulation (with or without yellow of certain malfunctions or breakdowns, grounding stripes) is the equipment-grounding wire.
-
Page 13: Section 3: Setup
IMPORTANT: Save all packaging materials until you are completely satisfied with the machine and have resolved any issues between Grizzly or the shipping agent. You MUST have the original pack- aging to file a freight claim. It is also extremely helpful if you need to return your machine later. -
Page 14: Inventory
Inventory Site Considerations Workbench Load The following is a list of items shipped with your machine. Before beginning setup, lay these items Refer to the Machine Data Sheet for the weight out and inventory them. and footprint specifications of your machine. Some workbenches may require additional rein- If any non-proprietary parts are missing (e.g. -
Page 15: Bench Mounting
Bench Mounting Dust Collection Number of Mounting Holes ......4 Diameter of Mounting Hardware Needed .. ⁄ " This machine creates a lot of wood chips/ The base of this machine has mounting holes dust during operation. Breathing airborne that allow it to be fastened to a workbench or dust on a regular basis can result in perma- other mounting surface to prevent it from moving nent respiratory illness. -
Page 16: Test Run
Test Run Remove switch disabling key, as shown in Figure 8. Once assembly is complete, test run the machine to ensure it is properly connected to power and safety components are functioning correctly. If you find an unusual problem during the test run, immediately stop the machine, disconnect it from power, and fix the problem BEFORE operating the machine again. -
Page 17: Section 4: Operations
Read books/magazines or get formal training before beginning any proj- ects. Regardless of the content in this sec- tion, Grizzly Industrial will not be held liable for accidents caused by lack of training. -15- Model G0843P (Mfd. Since 11/17) -
Page 18: Replacing Sanding Discs
Replacing Sanding Position exposed adhesive on upper half of disc that extends above table. Once it is posi- Discs tioned evenly across disc, press adhesive onto surface. Rotate disc so lower half is above table. Peel The Model G0843P accepts 12" diameter PSA off other half of protective paper, and press (pressure-sensitive adhesive) sanding discs, remaining sandpaper against disc so adhe-... -
Page 19: Sanding Operations
Sanding Operations The advantage of a double disc sander is it allows you to work with different grit sizes for both coarse and fine sanding. Move the workpiece slowly back and forth along downward moving side of sanding disc, and avoid using excessive pressure to prevent burning the workpiece and overloading the sanding discs. -
Page 20: Section 5: Accessories
We've hand picked a selection of dust collection To reduce this risk, only install accessories components commonly needed to connect the recommended for this machine by Grizzly. Model G0843P to basic machinery. NOTICE T23412... - Page 21 Also compatible with safety glasses! H3635 Figure 20. T20446 Ear Plugs. H3631 Figure 18. Half-mask respirator with disposable cartridge filters. www.grizzly.com 1-800-523-4777 order online at or call -19- Model G0843P (Mfd. Since 11/17)
-
Page 22: Section 6: Maintenance
SECTION 6: MAINTENANCE Cleaning & Protecting To reduce risk of shock or accidental startup, always disconnect machine from power before adjustments, Cleaning the Model G0843P is relatively easy. maintenance, or service. Vacuum excess wood chips and sawdust, and wipe off the remaining dust with a dry cloth. If any resin has built up, use a resin dissolving cleaner Schedule to remove it. -
Page 23: Section 7: Service
SECTION 7: SERVICE Review the troubleshooting and procedures in this section if a problem develops with your machine. If you need replacement parts or additional help with a procedure, call our Technical Support. Note: Please gather the serial number and manufacture date of your machine before calling. Troubleshooting Motor &... - Page 24 Sander Operation Symptom Possible Cause Possible Solution Miter bar binds in 1. Miter slot dirty or gummed up. 1. Carefully clean miter slot with mineral spirits or miter slot. resin-dissolving cleaner. Workpiece angle 1. Miter slot not parallel with face of sanding 1.
-
Page 25: Table Gap & Parallelism
Table Gap & Spin disc by hand to check if sandpaper touches table. Parallelism IMPORTANT: DO NOT turn the disc sander ON until you have verified that it does not touch the table at any point in its rotation! If The miter slots must be parallel with the face sandpaper touches tables at any point, re- of the sanding discs to ensure accurate results. -
Page 26: Calibrating Miter Gauge
Calibrating Miter Calibrating Table Tilt Gauge To ensure accurate sanding results, the table tilt needs to be properly calibrated. When the table A properly calibrated miter gauge is needed to is set perpendicular to the sanding disc, the scale ensure accurate sanding results. When the miter setting should read 0˚. -
Page 27: Section 8: Wiring
Technical Support at (570) 546-9663. The photos and diagrams included in this section are best viewed in color. You can view these pages in color at www.grizzly.com. -25- Model G0843P (Mfd. Since 11/17) -
Page 28: Wiring Diagram
Wiring Diagram ON/OFF Paddle Switch (Viewed from Behind) KEDU HY18 250V 10A Motor Motor Junction Box PA9F PA9F 450V 450V Neutral Ground Ground 110 VAC 5-15 Plug Electrical Components Figure 25. G0843P switch connections. Figure 26. G0843P start capacitor connections. READ ELECTRICAL SAFETY -26- Model G0843P (Mfd. -
Page 29: Section 9: Parts
SECTION 9: PARTS We do our best to stock replacement parts when possible, but we cannot guarantee that all parts shown are available for purchase. Call (800) 523-4777 or visit www.grizzly.com/parts to check for availability. Main 19 18 47 52 BUY PARTS ONLINE AT GRIZZLY.COM! -
Page 30: Main Parts List
HEX BOLT M8-1.25 X 12 P0843P054 TAP SCREW M4 X 12 P0843P021 FLAT WASHER 8MM P0843P055 FLAT WASHER 4MM P0843P022 HEX BOLT M8-1.25 X 20 BUY PARTS ONLINE AT GRIZZLY.COM! -28- Model G0843P (Mfd. Since 11/17) Scan QR code to visit our Parts Store. -
Page 31: Labels & Cosmetics
Safety labels help reduce the risk of serious injury caused by machine hazards. If any label comes off or becomes unreadable, the owner of this machine MUST replace it in the original location before resuming operations. For replacements, contact (800) 523-4777 or www.grizzly.com. BUY PARTS ONLINE AT GRIZZLY.COM! -29- Model G0843P (Mfd. - Page 33 Would you recommend Grizzly Industrial to a friend? _____ Yes _____No Would you allow us to use your name as a reference for Grizzly customers in your area? Note: We never use names more than 3 times. _____ Yes _____No 10.
- Page 34 FOLD ALONG DOTTED LINE Place Stamp Here GRIZZLY INDUSTRIAL, INC. P.O. BOX 2069 BELLINGHAM, WA 98227-2069 FOLD ALONG DOTTED LINE Send a Grizzly Catalog to a friend: Name_______________________________ Street_______________________________ City______________State______Zip______ TAPE ALONG EDGES--PLEASE DO NOT STAPLE...
-
Page 35: Warranty & Returns
WARRANTY & RETURNS Grizzly Industrial, Inc. warrants every product it sells for a period of 1 year to the original purchaser from the date of purchase. This warranty does not apply to defects due directly or indirectly to misuse, abuse, negligence, accidents, repairs or alterations or lack of maintenance.
Need help?
Do you have a question about the POLAR BEAR Series and is the answer not in the manual?
Questions and answers