
Related Manuals for Graco DuetConnect LX


Summary of Contents for Graco DuetConnect LX
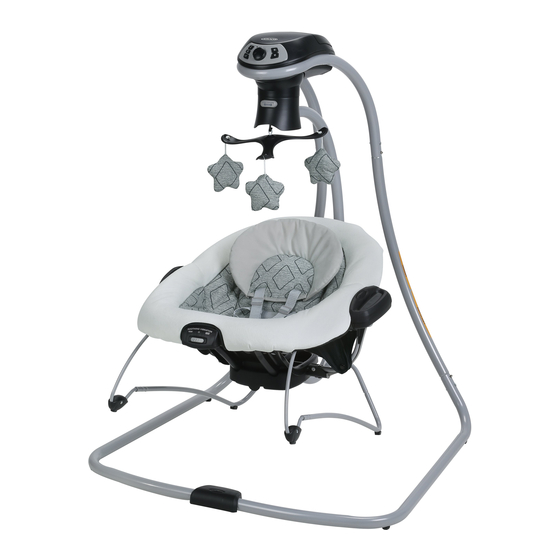
- Page 1 DuetConnect ™ with Multi-Direction Swing and Portable Bouncer ©2016 Graco PD349617C 9/16...
- Page 2 1 WARNING • ADVERTENCIA 4-11 Pages • Páginas 2 Features •Características 12-13 Pages • Páginas Parts list • Lista de las piezas Features • Características 3 Assembly • Ensamblaje 14-26 Pages • Páginas Assembling Legs • Ensamblaje de las patas Seat Assembly •...
- Page 3 4 Use • Uso 27-38 Pages • Páginas To Adjust Seat Positions• Cómo ajustar la posición del asiento To Remove Bouncer • Cómo sacar el saltador To Secure Child • Cómo sujetar al niño 4-D Installing Batteries (not included) • Instalación de las pilas (no se incluyen) To Use Wall Plug •...
- Page 4 Prevent serious injury or death: Failure to follow these warnings and the assembly instructions could result in serious injury or death. STRANGULATION HAZARD: • PLEASE SAVE OWNER’S • DO NOT suspend strings MANUAL FOR FUTURE USE. over the product or attach •...
- Page 5 • BOUNCER/CARRIER MODE: SUFFOCATION HAZARD: READ ALL INSTRUCTIONS Babies have suffocated: BEFORE ASSEMBLY AND • When product was placed on USE OF THIS PRODUCT. a soft surface and tipped over. NEVER place product on beds, PLEASE SAVE OWNER’S sofas, cushions or other soft MANUAL FOR FUTURE USE.
- Page 6 FOR SAFE BATTERY USE: Keep the batteries out of children’s reach. Any battery may leak battery acid if mixed with a different battery type, if inserted incorrectly (put in backwards) or if all batteries are not replaced or recharged at the same time. Do not mix old and new batteries.
- Page 7 Changes or modifications to this unit not expressly approved by the party responsible for compliance could void the user authority to operate the equipment. NOTE: This equipment has been tested and found to comply with the limits for a Class B digital device,pursuant to Part 15 of the FCC Rules.
- Page 8 ADVERTENCIA No observar estas advertencias y las instrucciones de armado podría resultar en lesiones serias o la muerte. • POR FAVOR, GUARDE EL PELIGRO DE ESTRANGULACIÓN: MANUAL DEL USARIO PARA • NO suspenda cordones sobre el USO FUTURO. producto ni ponga cordones en los juguetes.
- Page 9 ADVERTENCIA • MODO MECEDORA/ PELIGRO DE ASFIXIA: TRANSPORTADOR: Bebés se han asfixiado: LEA TODAS LAS • Cuando el producto fue puesto INSTRUCCIONES ANTES DE en una superficie blanda y se ARMAR Y USAR ESTE tumbó. Nunca ponga el PRODUCTO. producto sobre una cama, sofá, POR FAVOR, GUARDE EL almohadones u otras MANUAL DEL USUARIO PARA...
- Page 10 ADVERTENCIA PARA UN USO SEGURO DE LAS PILAS: Mantenga las pilas lejos del alcance de los niños. Cualquier pila puede perder ácido si se mezcla con un tipo de pila diferente, si se la coloca de manera incorrecta (puesta al revés) o si todas las pilas no se cambian o recargan al mismo tiempo.
- Page 11 ADVERTENCIA Los cambios o modificaciones no expresamente aprobados por la parte responsable del cumplimiento podrían anular la autoridad del usuario para usar el equipo. NOTA: Este equipo ha sido probado y se ha determinado que cumple con los límites de un dispositivo digital Clase B, según la Parte 15 de las normas de la FCC.
- Page 12 2-A Parts list • Lista de las piezas Verifique que tiene todas las piezas de Check that you have all the este modelo ANTES de armar su parts for this model BEFORE producto. Si falta alguna pieza, llame a assembling your product. If any Servicio al Cliente.
- Page 13 Features on Certain Models • Características de ciertos modelos DO NOT use any other NO use ningún otro accesorio con este producto. accessories with this product. Head support • Apoyacabeza Only use this head support on this Styles vary swing. Never use this head support Los estilos variar on any other product.
- Page 14 Assembling Legs • Ensamble las patas 1. Place legs on floor with rubber pads facing down. Assemble legs as shown. Attachment tube should be curved up. 1. Ponga las patas sobre el piso con las almohadillas de goma mirando hacia abajo. Ensamble las patas como se indica.
- Page 15 Assembly Seat • Ensamblaje del asiento 1. Wrap seat pad over tube on seat. 1. Envuelva la almohadilla del asiento sobre el tubo del asiento. 2. Insert leg tube into holes in leg bracket. 2. Ponga el tubo de la pata en los agujeros del soporte de la pata.
- Page 16 3. Attach seat pieces together as shown. 3. Sujete las piezas del asiento como se indica. 4. Fasten screw on each side of seat as shown. 4. Sujete un tornillo en cada costado del asiento como se indica.
- Page 17 5. Wrap seat pad around vibration unit and bottom of seat frame. 5. Envuelva la almohadilla del asiento alrededor de la unidad de vibración y el fondo del armazón del asiento. 6. Attach elastic straps to hooks on both sides of seat. 6.
- Page 18 8. Insert seat tube into brackets on Snap rear of seat with snaps facing Trabas toward vibration unit. 8. Inserte el tubo del asiento en los montantes de la parte trasera del asiento con los broches mirando hacia la unidad de vibración. 9.
- Page 19 10. Insert handle release straps into Handle release straps seat tube brackets as shown. Correas de liberación de la 10. Ponga las correas de liberación manija de la manija en los soportes del tubo del asiento como se indica.
- Page 20 Attaching Seat Pad • Instalación de la almohadilla del asiento 1. Attach flaps on bottom of seat pad to snaps on seat tube as shown. 1. Sujete las aletas de abajo de la almohadilla del asiento a las trabas del tubo del asiento como se indica.
- Page 21 Assembling Swing Frame • Ensamblaje del armazón del columpio 1. Place carton on ground. Lay unit down as shown. Plug wires together as shown and insert wires inside tube. 1. Ponga la caja en el piso. Ponga la unidad en el piso como se indica. Enchufe los alambres como se indica y póngalos en el interior del tubo.
- Page 22 3. Insert vertical tubes into base tubes as shown. 3. Inserte los tubos verticales en los tubos de la base como se indica. SNAP! ¡CRAC! SNAP! ¡CRAC!
- Page 23 4. Grab base tubes and push down while inserting tubes together. 4. Agarre los tubos de la base y empújelos hacia abajo al insertar los tubos juntos. 5. Place the cover on tubes as shown. 5. Ponga la funda en los tubos como se indica.
- Page 24 Installing hanger tube • Instalación de los tubos del colgante 1. Insert hanger tube into the center housing. CHECK that hanger tube is secure in housing by pulling firmly on it. 1. Ponga el tubo del colgante en el armazón del centro. VERIFIQUE que el tubo del colgante esté...
- Page 25 Attaching Bouncer • Instalación del saltador 1. Hold bouncer by handles and attach bouncer to mount in center of hanger tube. Always attach both sides of the bouncer to the hanger tube. Do not use the bouncer with the seat installed backwards or sideways.
- Page 26 Assembling Mobile • Cómo armar el móvil Styles vary Los estilos varían 1. Attach loop in center of mobile to hook inside hub. 1. Sujete el bucle en el centro del móvil para engancharlo dentro del cubo. 2. Attach toys as shown. 2.
- Page 27 To Adjust Seat Positions • Cómo ajustar la posición del asiento To adjust seat position, push button in on motor housing and rotate into one of three positions. Para ajustar la posición del asiento, oprima el botón en el armazón del motor y gírelo a una de las tres posiciones.
- Page 28 To Remove Bouncer • Cómo sacar el saltador 1. To use as bouncer, pull up on release trigger near handles on both sides of seat. Then pick up seat to remove from swing. 1. Para usarlo como saltador, tire hacia arriba del activador de la liberación cerca de las manijas de ambos lados del asiento.
- Page 29 To Secure Child • Cómo sujetar al niño WARNING Falling Hazard: Always use the seat belt. ADVERTENCIA Peligro de caídas: Use siempre el cinturón de seguridad. 1. To open, press button on buckle to release the waist straps. 1. Para abrirlo, oprima el botón de la hebilla para liberar las correas de la cintura.
- Page 30 4. When changing harness strap slots, MAKE SURE harness straps are going through same slots in seat pad. 4. Cuando cambia las ranuras de las correas del arnés, ASEGÚRESE de que las correas del arnés pasen por las mismas ranuras de la almohadilla del asiento.
- Page 31 Installing Batteries (not included) • Instalación de las pilas (no se incluyen) WARNING To avoid injury: Remove child from swing before changing batteries. ADVERTENCIA Para evitar lesiones: Saque al niño del columpio antes de cambiar las pilas. 1. With baby out of swing, open the battery compartment lid by inserting a screwdriver into the coin slot.
- Page 32 To Use Wall Plug • Cómo usar un tomacorriente de la pared WARNING Product does not recharge batteries. When AC adapter is in use, batteries will automatically shut off. DO NOT place product near water and moisture. Do not use the product near possible wet areas, such as a bathtub, shower, wash basin, sink, laundry tub, swimming pool, wet basement, etc.
- Page 34 Starting Swing (6 Speed) • Activación del columpio (6 velocidades) WARNING avoid serious injury from falling or sliding out. Always use seat belt. After fastening buckles, adjust belts to get a snug fit around your infant. TO TURN SWING ON: Rotate the speed dial clockwise, and lightly push the swing to get it started.
- Page 35 Battery Low Alert Speed Selection 1-6 Alerta de pila descargada Selección de la velocidad 1-6 Music Volume up Música Subir el volumen Music Música Volume down apagada Bajar el volumen Soothing sounds Sonidos suaves (Music) Selects music. All ten songs will play in turn and then start again with the first song.
- Page 36 (Volume Up) Raises sound/music volume. (Subir el volumen) Sube el volumen del sonido o la música. (Volume Down) Lowers sound/music volume. (Bajar el volumen) Baja el volumen del sonido o la música. (Music off) Turns off all sound/music. (Apagar la música) Apaga todos los sonidos o la música. Low Battery Alert- When you select a swing speed (other than OFF) it will check the battery voltage if they are in- stalled.
- Page 37 To Use Vibration • Cómo usar la vibración 1. Remove battery lid, found under seat, with a key and insert 1-D (LR20-1.5V) battery in module. Replace lid. 1. Saque la tapa de las pilas que se encuentra debajo del asiento con una llave e inserte 1 pila D (LR20-1,5V) en el módulo.
- Page 38 Problem Solving • Solución de problemas SWING WON’T OPERATE: 1. No batteries in swing. 2. Batteries dead. 3. Speed setting too low. 4. Batteries in backwards — check “+” and “-”. 5. Corrosion on battery terminals. Rotate batteries in place against terminals, or clean with sandpaper or steel wool if corrosion is severe.
- Page 39 • FROM TIME TO TIME CHECK YOUR SWING for loose screws, worn parts, torn material or stitching. Replace or repair the parts as needed. Use only Graco replacement parts. • TO CLEAN SEAT COVER, Refer to your care tag on your seat pad for washing instructions.
- Page 40 We currently do not accept product registrations from those living outside the United States of America. Para registrar su producto Graco desde dentro de los EE.UU., visítenos en línea en www.gracobaby.com/productregistration o envíe la tarjeta de registro provista con su producto.
Need help?
Do you have a question about the DuetConnect LX and is the answer not in the manual?
Questions and answers