
Related Manuals for Trend Micro TippingPoint series


Summary of Contents for Trend Micro TippingPoint series
- Page 1 Threat Protection System Hardware Specification and Installation Guide Version 5.0.0 5900-4108 October 2017...
- Page 2 Trend Micro Incorporated makes no warranty of any kind with regard to this material, including, but not limited to, the implied warranties of merchantability and fitness for a particular purpose. Trend Micro Incorporated shall not be liable for errors contained herein or for incidental or consequential damages in connection with the furnishing, performance, or use of this material.
-
Page 3: Table Of Contents
Contents About this guide............................1 Target audience............................1 Related documentation...........................1 Conventions............................1 Product support............................2 Overview..............................3 TPS TX Series devices.......................... 3 TPS 2200T device..........................5 TPS 440T device............................6 TPS TX Series product overview......................8 Device overview............................8 Chassis – front panel...........................8 Chassis – rear panel........................... 9 Chassis –... - Page 4 ESD requirements..........................14 I/O module options..........................14 Module LEDs............................16 I/O module replacement........................17 Supported transceivers and cables for TippingPoint I/O modules............ 18 Technical specifications........................18 TPS 2200T product overview.......................20 Device overview............................20 Chassis – front panel.........................20 Chassis – rear panel......................... 21 Chassis – features..........................22 Power button...........................
- Page 5 System status indicator........................30 Alert indicator...........................30 Fans and power supplies........................30 External storage card........................30 Ports..............................30 Model requirements..........................32 Power requirements........................... 32 Cabling requirements......................... 32 Technical specifications........................32 Install your TPS device........................34 Install the chassis..........................34 Determine total rack space........................34 Attach the device to the rack......................
- Page 6 RJ-45 (COM) console...........................41 RJ-45 Ethernet connectors........................42 Power supplies............................43 AC power supply – TPS 2200T and TX Series................... 43 Connect the AC power supply......................44 DC power supply – TPS TX Series..................... 44 Connect the DC power supply......................44 Fans................................ 46 Replace the fan –...
-
Page 7: About This Guide
About this guide Welcome to the installation and specification guidelines for your Threat Protection System (TPS) device. This section covers the following topics: • Target audience on page 1 • Related documentation on page 1 • Conventions on page 1 •... -
Page 8: Product Support
Convention Element • GUI elements that are clicked or selected, such as menu and list items, buttons, and check boxes. Example: Click OK to accept. Italics font Text emphasis, important terms, variables, and publication titles Monospace font • File and directory names •... -
Page 9: Overview
Overview The TippingPoint Threat Protection System (TPS) is a high-performance, enterprise-class solution that protects your network by scanning, detecting, and responding to network traffic according to the filters, action sets, and global settings maintained on each device by a client. The TPS offers higher throughput and improved technology that is optimized for high resiliency, high availability, and network segment protection from both external and internal attacks. - Page 10 Table 1. TPS 8200TX and 8400TX – hardware features Feature TX Series devices Ports Two fixed QSFP+ special purpose (SP) ports One RJ-45 console port One 1 GbE copper management port Slots • Model 8200TX – two I/O slots • Model 8400TX –...
-
Page 11: Tps 2200T Device
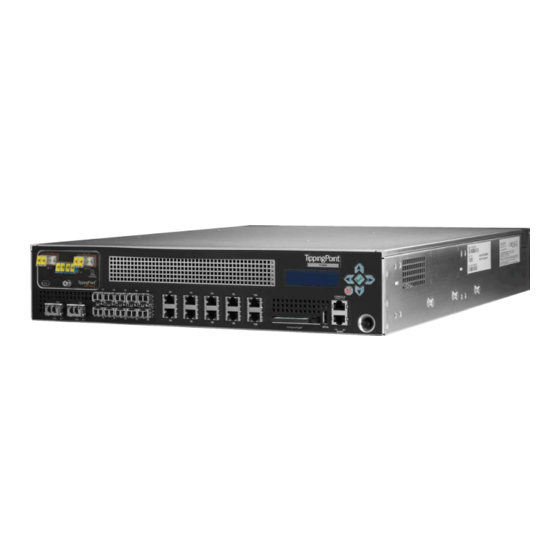
TPS 2200T device Figure 2. TPS 2200T device – front panel The TPS 2200T device provides the following hardware features. Table 2. TPS 2200T – hardware features Feature 2200T device Ports One RJ-45 console port One 1 GbE copper management port Copper ports 1 GbE SFP ports 10 GbE SFP+ ports... -
Page 12: Tps 440T Device
Feature 2200T device External storage One 8 GB CFast System fans 3 fans (not replaceable) High Availability (HA) Zero Power High Availability (ZPHA)* Built-in ZPHA for copper segments External ZPHA port for SFP and SFP+ segments *For information on installing and operating a ZPHA module, refer to TippingPoint ZPHA Installation Guide – Modular and Non-Modular available on the TMC at https://tmc.tippingpoint.com/. - Page 13 Table 3. TPS 440T – hardware features Feature 440T device Ports One RJ-45 console port One 1 GbE copper management port Copper ports 1 GbE SFP ports None 10 GbE SFP+ ports None Power supply One 350W (built-in) power supply System memory 16 GB External storage...
-
Page 14: Tps Tx Series Product Overview
TPS TX Series product overview This information describes the components, chassis, requirements, and installation specifics of the TPS 8200TX and 8400TX devices. The following topics are discussed: Device overview • on page 8 • Model requirements on page 25 • I/O module installation on page 13 •... -
Page 15: Chassis - Rear Panel
Figure 4. TPS 8200TX and 8400TX devices – front panel 1. I/O modules 2. SP ports 3. External storage 1.8-inch SSD (32 GB) 4. Stack Master LED 5. Stack LED 6. Bypass LED 7. System status LED 8. GbE management port 9. -
Page 16: Chassis - Features
Figure 5. TPS TX Series devices – rear panel 1. Fan modules - fans are numbered from left to right (Fan 1 is on the left; Fan 7 is on the right) 2. Power supply modules (Power supply 1 is on the left; Power supply 2 is on the right) 3. -
Page 17: Fans And Power Supplies
Fans and power supplies The TPS TX Series devices include two power supplies and seven cooling fans. These components are hot- swappable. For more information about these components, see Power supplies on page 43 and Fans page 46. External SSD The TPS TX Series device includes an external SSD module that is installed with your product. -
Page 18: Chassis Leds
4. Link LED The management port LEDs indicate link and activity state, as described in the following table. Table 4. TPS 8200TX and 8400TX – port LED states LED Type Color Description Link Green Link is active at 1000 Mbps. Link is inactive, or is active at 10 Mbps or 100 Mbps. -
Page 19: Model Requirements
◦ Red: Indicates that the system is experiencing a health alert, such as a fan failure. This state resets to solid green when you view the system log. • Management port status ◦ Link LED: Solid green indicates that the port is linked and ready for data. ◦... -
Page 20: Before You Begin
• Before you begin on page 14 • ESD requirements on page 14 I/O module options • on page 14 • Module LEDs on page 16 • I/O module replacement on page 17 • Supported transceivers and cables for TippingPoint I/O modules on page 18 Before you begin •... - Page 21 Bypass I/O modules are zero-power high-availability (ZPHA) modules that permit network traffic and services while bypassing the device entirely when the device loses power. All four standard I/O modules and all five bypass I/O modules are hot-swappable on devices running TippingPoint Operating System (TOS) v3.6.0 or higher.
-
Page 22: Module Leds
Standard I/O Modules Bypass I/O Modules Ports: 4 Multi-Mode (SR)/Single-Mode (LR) Fiber (LC type) Ports: 8 Fiber SFP+ ports Port speed: 1/10 Gbps Port speed: 10 Gbps Part number: TPNN0073/TPNN0074 Part number: TPNN0060 1-Segment 40 GbE QSFP+ Ports: 2 Fiber QSFP+ ports Port speed: 40 Gbps Part number: TPNN0069 Important: Handle all I/O modules with care. -
Page 23: I/O Module Replacement
Feature Color Description Activity Blinking Amber Data traffic passing. Optical transceiver port Link Green Link is active. Activity Amber Data traffic passing. Module health Status Green The module is configured, in service, and in good health. The module has been inserted Blinking Amber and powered up, but is not yet recognized by the software. -
Page 24: Supported Transceivers And Cables For Tippingpoint I/O Modules
When the device is managed by the SMS, a delay of up to 1 minute can occur before the SMS recognizes the changed I/O module. Note: When you insert a bypass I/O module, the bypass I/O module always starts up in bypass mode. A bypass I/O module remains in bypass mode until you remove it from bypass mode through the CLI, LSM, or SMS. - Page 25 Table 8. TPS 8200TX and 8400TX – technical specifications Specification Description Dimensions • 8200TX (1U form factor) – 1.73 in x 18.54 in x 24.84 in (44 mm x 428 mm x (unpackaged) 631mm) • 8400TX (2U form factor) – 3.46in x 18.54 in x 24.84 in (88mm x 428 mm x 631 mm Weight •...
-
Page 26: Tps 2200T Product Overview
TPS 2200T product overview This information describes the components, chassis, requirements, and installation specifics of the TippingPoint 2200T device. The following topics are discussed: Device overview • on page 20 • Model requirements on page 25 • Pluggable transceivers on page 25 •... -
Page 27: Chassis - Rear Panel
Figure 7. TPS 2200T device – front panel 1. 10GbE SFP+ ports 2. 1GbE SFP ports 3. 1GbE copper ports 4. External CFast card 5. Dedicated HA port 6. ZPHA port 7. Console/Management port 8. Power button 9. Alert indicator 10. -
Page 28: Chassis - Features
Figure 8. TPS 2200T – device rear panel 1. Fans (3) 2. Power supplies (2) Chassis – features The TPS 2200T chassis features include the following elements: • Power button on page 22 • System status indicator on page 23 Alert indicator •... -
Page 29: System Status Indicator
System status indicator The System Status indicator is located on the right side of the front panel and indicates the current operating status of the appliance. • Flashing Green — Appliance is booting and is not yet ready to inspect traffic. •... - Page 30 Figure 9. TPS 2200T device – management and console ports 1. 1 RJ-45 serial console port 2. 1 GbE copper management port 3. Activity LED 4. Link LED The management port LEDs indicate link and activity state, as described in the following table. Table 9.
-
Page 31: Model Requirements
In addition, the 2200T is equipped with eight 1G SFP ports and 4 10G SFP+ ports. ZPHA bypass support for SFP/SFP+ is provided through an external ZPHA device. Model requirements The following topics describe specific requirements for the 2200T device. •... -
Page 32: Technical Specifications
Table 10. Fiber input details Fiber Input Signal Left side Transmit Right side Receive Technical specifications The TPS 2200T device has the following specifications. Table 11. TPS 2200T – technical specifications Specification Description Dimensions 2U form factor – 3.46 in (H) x 16.77 in (W) x 18.80 in (D) (8.80 cm x 42.60 cm x (unpackaged) 47.80 cm) Weight... - Page 33 Specification Description • Eight 1 GbE copper ports • Eight 1 GbE SFP fiber ports • Four 10 GbE SFP+ fiber ports • One HA port • One ZPHA port • One CFast slot Threat Protection System Hardware Specification and Installation Guide...
-
Page 34: Tps 440T Product Overview
TPS 440T product overview This information describes the components, chassis, requirements, and installation specifics of the TPS 440T device. The following topics are discussed: Device overview • on page 28 • Model requirements on page 32 • Technical specifications on page 32 For information about installing the device, see Install your TPS device on page 34. -
Page 35: Chassis - Rear Panel
5. Alert indicator 6. System status indicator 7. Power indicator Chassis – rear panel The following illustration shows a rear-panel view of a 440T device. Figure 11. TPS 440T device – rear back panel 1. Fans (3) 2. AC power supply 3. -
Page 36: System Status Indicator
• No light — Device is powered off. • Green — Device is powered on. System status indicator The System Status indicator is located on the right side of the front panel and indicates the current operating status of the device. •... - Page 37 Figure 12. TPS 440T device – management and console ports 1. 1 RJ-45 serial console port 2. 1 GbE copper management port 3. Activity LED 4. Link LED The management port LEDs indicate link and activity state, as described in the following table. Table 12.
-
Page 38: Model Requirements
Model requirements The following topics describe the power and cabling requirements for the TPS 440T device. • Power requirements on page 32 • Cabling requirements on page 32 Power requirements The TPS 440T device requires Alternating Current (AC) that meets the following requirements: •... - Page 39 Specification Description Service Provider Temperature: 32 to 104° F (0 to 40° C) — Operating operating Temperature: -4 to 158° F (-20 to 70° C) — Storage requirements Altitude: No degradation up to 10,000 feet (3048 m) Humidity: 5% to 95% (non-condensing) External interfaces •...
-
Page 40: Install Your Tps Device
Install your TPS device After you have completed preparation procedures and unpacked the TPS device, you are ready to install and configure the components. Have the TPS CLI Reference available for configuration information reference. After installation of the hardware components, complete the initial setup wizard as part of the installation and configuration procedures. -
Page 41: Attach The Device To The Rack
The device fits in a 19-inch-wide rack (or a 23-inch-wide rack, with appropriate conversion parts available from rack accessory vendors). For more information about the dimensions of the device, refer to the technical specifications and requirements for your model. Attach the device to the rack Unpack the accessory kit and the slide rail assemby kit that shipped with your security appliance and review the installation documentation. -
Page 42: Add The I/O Modules - Tps Tx Series
Add the I/O modules – TPS TX Series TPS TX Series devices come with blank modules inserted into I/O module slots. The TPS 8200TX provides two I/O slots and the TPS 8400TX provides four I/O slots. Warning! Do not leave slots empty for an extended period of time. Insertion of a blank module or I/O module ensures that the device is correctly cooled. -
Page 43: Connect The Console Port
Connect the console port Describes how to connect the console port. 1. Connect the RJ-45 null modem cable to the console port on the front of the unit. 2. Connect the other end of your cable (standard USB connector) to your computer. Use the following terminal settings for the console port: ◦... -
Page 44: Run The Setup Wizard
Run the setup wizard From the console terminal, complete the initial configuration by using the setup wizard. The wizard performs system checks and then prompts you to complete the initial setup. After you run the setup, you can further configure your system using subsequent setup commands through the device CLI. -
Page 45: Attach Network Connections
Security device Unlicensed inspection throughput 8200TX 1 Gpbs 2200T 200 Mbps 440T 100 Mbps Attach network connections Describes how to make network connections. All ports on the TPS device are dynamic and do not require fixed cable assignments. When making your network cable connections, keep track of which ports you select for which purpose. - Page 46 Note: From the CLI, you can repeat the setup wizard by using the setup command. When you use the CLI, configure the terminal emulation package to transmit a Ctrl-H character when the Backspace key is pressed. • The SMS. The TippingPoint SMS provides a scalable, policy-based operational model, and enables straightforward management of large-scale IPS and TPS deployments.
-
Page 47: Connector And Cable Pinout Specifications
Connector and cable pinout specifications This information provides connector and pinout information for TPS devices and contains the following topics: RJ-45 (COM) console • on page 41 • RJ-45 Ethernet connectors on page 42 RJ-45 (COM) console Describes the RJ-45 (COM) console specifications. The following figure displays the RJ-45 connector and the following table shows the RJ-45 console connector pinouts. -
Page 48: Rj-45 Ethernet Connectors
Pin number Signal name Clear to Send (CTS) RJ-45 Ethernet connectors Provides pinout information for when your RJ-45 device is operating in 10Mbps/100Mbps mode. Table 16. RJ-45 pinout information Pin number Signal name Transmit positive (Tx+) Transmit negative (Tx-) Receive positive (Rx+) Ground (GND) Ground (GND) Receive negative (Rx-) -
Page 49: Power Supplies
Power supplies This topic provides information for using the power supply modules. The following subjects are discussed. AC power supply – TPS 2200T and TX Series • on page 43 • DC power supply – TPS TX Series on page 44 Warning! This product might have more than one power supply source. -
Page 50: Connect The Ac Power Supply
The Status LED is green when the module is powered and running normally. Connect the AC power supply Describes how to connect the power supply to your device. When the AC power supply has been securely placed in the device, use the following procedure to connect power to the AC power supply: 1. - Page 51 When the DC power supply has been securely placed in the device, use the following procedure to connect power to the DC power supply. 1. Locate the ground screw on the back of the chassis. Refer to the following figure for the location. Figure 16.
-
Page 52: Fans
Fans The 440T device includes five cooling fans (two of them are internal). The fans are not redundant or hot- swappable. If a failure to a fan module occurs, you must replace the entire device. The 2200T device includes three cooling fans. The fans for the 2200T device are redundant but not hot- swappable. - Page 53 The fan modules are hot-swappable and can be replaced when the device is operating. After you have identified the faulty fan assembly, follow this procedure to replace the fan: 1. Press the release tab on the right side of the fan module and pull the module from its slot. 2.
-
Page 54: Power Cord Retention Bracket
Power cord retention bracket The power cord retention bracket lets you manage the placement of power cords for minimal obtrusiveness. The following subjects are discussed: • Overview on page 48 • Install the retention bracket on page 48 • Use the power cord retention bracket on page 49 •... -
Page 55: Use The Power Cord Retention Bracket
Figure 19. TPS 2200T device – back panel with retention bracket To install the retention bracket: 1. Orient the bracket against the back surface of the chassis. 2. Slide the bracket over the two shoulder rivets on the back of the chassis. The spring-loaded plunger in the center of the bracket slides into place. -
Page 56: External User Disk
External user disk This information describes the external user disk (CFast or SSD) and provides the following topics: External SSD • on page 50 • External CFast storage card on page 50 • External user disk commands on page 51 External SSD The TPS TX Series devices come with a pre-formatted external SSD. -
Page 57: External User Disk Commands
Important: After you insert a new card into the CFast slot, be sure to mount the user disk. Failure to mount the user disk prevents the device from automatically mounting the disk when the device is rebooted. External user disk commands Lists the commands used to manage the external user disk (CFast or SSD) in the CLI. - Page 58 Command Description user-disk encryption Disables encryption of the external user disk if the system master disable key has been set. Changing the encryption status reformats the card and erases all data on the drive. Note: Master key and encryption controls can also be configured using System >...
Need help?
Do you have a question about the TippingPoint series and is the answer not in the manual?
Questions and answers