Advertisement
Soil Moisture Monitor with Time Display
Contents
1. Introduction ............................................................................................... 2
2. Get Started ................................................................................................ 2
2.1 Parts List ........................................................................................ 2
2.2 Soil Moisture Sensor Set Up ........................................................ 2
2.3 Display Console Set Up ................................................................ 3
2.3.1 Display Console Layout ............................................................. 5
3. Console Operation ................................................................................... 6
3.1 Time setting mode ........................................................................ 6
3.2 Custom mode ................................................................................ 6
4. Function ................................................................................................... 10
5. Appendix .................................................................................................. 10
6. Specifications ......................................................................................... 11
7. FCC Statement....................................................................................... 11
8. Warranty Information ............................................................................. 13
Model: WH0291
1
Instruction Manual
Advertisement
Table of Contents

Related Manuals for ECOWITT WH0291


Summary of Contents for ECOWITT WH0291
-
Page 1: Table Of Contents
Instruction Manual Soil Moisture Monitor with Time Display Model: WH0291 Contents 1. Introduction ....................2 2. Get Started ....................2 2.1 Parts List ..................2 2.2 Soil Moisture Sensor Set Up ............2 2.3 Display Console Set Up ..............3 2.3.1 Display Console Layout ............. -
Page 2: Introduction
Instruction Manual 1. Introduction Thanks for your purchasing of the WH0291 Soil Moisture Monitor with Time Display. To ensure the best product performance, please read this manual and retain it for future reference. 2. Get Started Note: Power up sequence can be performed in the order shown in this section: insert battery in the Soil Moisture Monitor(Receiver) first, then Soil Moisture Sensor(transmitter). -
Page 3: Display Console Set Up
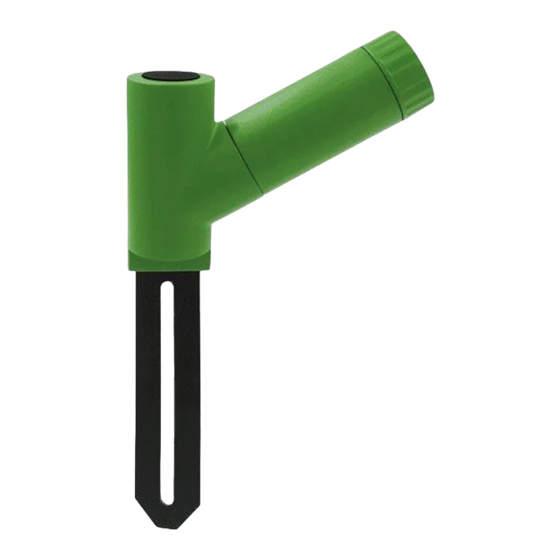
Instruction Manual Figure 1 LED Indicator (RF transmission) Battery Cap Soil Moisture Sensor 2. Insert one AA battery. 3. After inserting the battery, the remote sensor LED indicator will light for 4 seconds, and then flash once per 70 second thereafter. Each time it flashes, the sensor is transmitting data. - Page 4 Instruction Manual Figure 2 1. Integrated Hanging Hole 2. Tabletop Stand 3. ADD+ Button 4. Set Button 5. Battery Compartment 6. Battery Compartment Cover All of the LCD segments will light up for a few seconds to verify all segments are operating properly. Full Display...
-
Page 5: Display Console Layout
Instruction Manual Replace the battery door and fold out the desk stand and place the console in the upright position. The console will instantly display the default time (12:00). The soil moisture value will update on the display within a few minutes. While in the search mode, the reception search icon flash. -
Page 6: Console Operation
Instruction Manual 3. Console Operation Note: The console has two program modes: Time setting mode and Custom mode. If no operation for 20s, display will return to normal mode. 3.1 Time setting mode Long press SET button to enter the time setting mode: a. - Page 7 Instruction Manual Adjusting principle: 0%AD is used to adjust for dry condition reading inconsistency. When the displayed moisture readings are too high at dry soil condition, you could lower the slope rate by increasing the 0%AD value. 100%AD is used to adapt for wet condition reading inconsistency. When the displayed moisture readings are too low at extremely wet soil condition, you could decrease the 100%AD value to fix it.
- Page 8 Instruction Manual Your potted plant hasn't been watered for very long time and soil is extremely dry. When at this dry condition, displayed moisture readings are much higher than 10%(e.g.40%). Solution: Enable the custom mode and enter 0%AD setting mode. Hold the ADD+ button till the moisture readings lowers to 10%(±).
- Page 9 Instruction Manual c. Short press SET to enter 100%AD setting mode. short press ADD+ to adjust the 100%AD value from 0%AD+10 ~ 1000. d. Short press SET to return to the normal mode. There is no “-“ button available on this item. If you need to enter a value that is less than the value display, you need to keep press the “+”...
-
Page 10: Function
Instruction Manual the custom mode and start over the custom calibration procedure. 4. Function 12/24hr digital time display Current soil moisture. Every 70 second the unit will receive soil moisture sensor. Wireless Signal Strength Indicator During the synchronization, it will reduce one signal segment if it have not received the signal once from the transmitter. -
Page 11: Specifications
Instruction Manual 6. Specifications • Moisture Range:0~100%; Resolution: 1% • 0%AD setting range:70~200; Initial value:70 • 100%AD setting range:0%AD+10~1000; Initial value:500 • Frequency: 433 MHz • Update Rate: 70 seconds • Power Consumption: MIN 1Year battery life. Base station (display console) : 1 x AA battery(not included) Remote sensor : 1 x AA battery(not included) 7. - Page 12 Instruction Manual However, there is no guarantee that interference will not occur in a particular installation. If this equipment does cause harmful interference to radio or television reception, which can be determined by turning the equipment off and on, the user is encouraged to try to correct the interference by one or more of the following measures: •...
-
Page 13: Warranty Information
Instruction Manual 8. Warranty Information We disclaim any responsibility for any technical error or printing error, or their consequences. All trademarks and patents are recognized. We provide a 1-year limited warranty on this product against manufacturing defects in materials and workmanship. This limited warranty begins on the original date of purchase, is valid only on products purchased and only to the original purchaser of this product.
Need help?
Do you have a question about the WH0291 and is the answer not in the manual?
Questions and answers