Table of Contents
Advertisement
Advertisement
Table of Contents

Related Manuals for Acer Smart Touch Kit


Summary of Contents for Acer Smart Touch Kit
- Page 1 Smart Touch Kit USER MANUAL...
-
Page 2: Table Of Contents
Contents Introduction and Features............3 Hardware Installation..............5 System Debugging..............8 Calibration Software..............13 Gesture recognition Introduction........21 Application Software............... 22 Troubleshooting................28 Important information............. 29 ..............30 Sales Feedback Form... - Page 3 Introduction Smart Touch Kit is the first product in the world that supports finger touch and is easy to carry around. It can make any projector or LCD screen controllable by touch of the fingers. Compared with the traditional Whiteboard, the key features of Smart Touch Kit are: easy portability and finger touch control;...
-
Page 4: Specifications
Specifications Smart Touch Kit Calibration Automatic (5s) / Manual (25/36 points) In Education Software: Write with single fingers, Erase with the palm, Two fingers for movements, Two fingers away for zooming in and out, Stay for 2s with the palm for opening spotlight, Double slap with the palm for going back to Gesture Recognition the desktop. -
Page 5: Hardware Installation
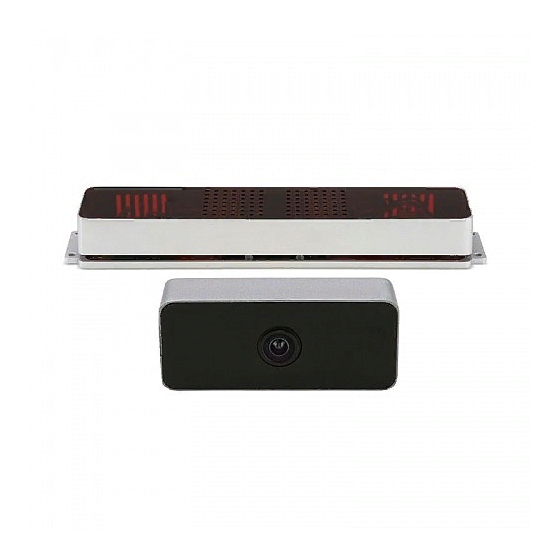
Hardware Installation Connection Topological graph: Emitter (3.3V,2A) Sensor Size:3.5cm*17cm*2.4cm Attach to the projector Installation requirements 1. The display surface for installation should be flat. For a better touch performance, the flatter the surface is, the easier the adjustment will be. 2. - Page 6 4 screws (as shown in Pic). Emitter Note: if it’s a Dual-Screen Smart Touch Kit, one emitter should be installed 3cm above the top of projection screen on the left side of whiteboard, the other emitter should be installed 3cm above the top of projection screen on the right side of whiteboard(red mark refers to the central point) (as shown in pic).
- Page 7 (as shown in pic). camera Note: If it is a Dual-Screen Smart Touch Kit, please install two cameras on two projectors respectively. 2nd installation method (Bracket 2): Fix the sensor to projector by using matched black supporting bracket, as following:...
-
Page 8: System Debugging
Connect the sensor with computer by using the USB cable. Emitter is connected to the power adapter. Note: 1.Bracket 1 and bracket 2 are optional. Please kindly refer to actual packaging accessories. 2.if it is a Dual-Screen Smart Touch Kit, two sensors are connected to one computer by a USB cable respectively. System Debugging Software installation Step 1 :Our software support win7, win8, and win10 OS. - Page 9 Step 2:Choose the installation path to continue it. Step 3:Be patient to wait the installation for several minutes.
- Page 10 Step 4:After installation, the shortcut icon will be added to desktop. After the installation of education software, the shortcut icon as picture will be added to desktop: Software Uninstall Uninstall software: Open the computer control panel, and click the “software and function” to choose and uninstall it by right click.
- Page 11 The image in the square is camera’s view, it is should be trapezoid Note: If it is a Dual-Screen Smart Touch Kit, Left camera should show the image of left projection screen, and right camera should show the right projection screen.
- Page 12 Pic 6 Then tighten the screws on the top, until white light appears as shown in Pic 7 Pic 7 Note: If it is a Dual-Screen Smart Touch Kit, adjust emitters by the same way.
-
Page 13: Calibration Software
Calibration Software Introduction Start IWB calibration software, click “operation” menu Run: Run the calibration program to start the sensor icon. Stop: Close the sensor icon, then no more touch functions. Parameter Setting: Software parameters Setting Auto Mask Clutter: Auto shield the interference point from out side environment. After the auto mask clutter, the auto calibration can only be continued. - Page 14 Parameter setting Image Sensor Settings (1) Normal Use Setting Set the Proportion of the spot (20%-80%): refers to the sensitivity of mouse reaction to lightspot sizes, the larger the value is, the worse the sensitivity becomes. The Brightness coefficient (0-255): refers to the sensitivity of sensor to light in normal mode. The larger the value is, the better the sensitivity becomes, but when the sensitivity increase, the anti-light interference decrease.
- Page 15 Double Screen: two Smart Touch Kits work with two projectors to become a big touch screen. Finish installation and connection, then the program will be in double screen mode automatically. Parameter Settings:Gesture settings Windows Gesture Settings Start All Windows Gesture: refers to the switcher of Windows Gesture. Palm in multiples of spot (3~7): refers to the sensitivity of palm gesture.
- Page 16 More Windows Gestures General Process: In General Process, you can see all the gestures recognition based on palm and finger. The user can start and close any gesture recognition based on their requirements. Exceptional Process: In Exceptional Process, you can add exceptions. Click "Add exception" to select the process to be added to Exceptional List.
- Page 17 Auto Mask Clutter (Ctrl+Shift+A) Auto mask clutter is the first step to do before performing manual calibration. Please select “Auto Mask Clutter” from “Mask Bitmap Edit” or press “Ctrl+Shift+A”. The program will specify the active area automatically. Manual Calibration After auto mask clutter, click manual calibration,and Then you will see ,Use finger or IR pen tip to do calibration by touching crosshair.
- Page 18 Auto Calibration Click auto calibration, the projection image will change to auto calibration interface. After 5 seconds, the auto calibration finished, the screen image will return to projection image. When you open the software, the image is as below and hint auto calibration succeeded. Lightspot Sampling After the auto calibration and manual calibration, click lightspot sampling, and the projection image will change to lightspot sampling interface.Use finger or IR pen to touch the red box...
- Page 19 Installation and debugging Click “installation and debugging” menu (1)Tuning Webcam Image Mode: The projection image which catched by camera will be showing in software interface. Adjust the projection image into the red frame according to the camera debugging requirement. (2)Tuning Laser Transmitter Image Mode: In this mode, emitter emits a set of invisible laser film 4mm above the whiteboard, and the beam should be parallel with the whiteboard.
- Page 20 (3)Normal Usage Image Mode: after the calibration, all operations can be done by the finger instead of the mouse. (4)Mouse: click mouse, then you can only do single touche in Windows. (5)Touch Pad: click touch pad, then you can do multi-touches in Windows. (6)Touch Pad Aspect Ratio: The default mode is auto selected.
-
Page 21: Gesture Recognition Introduction
Gesture recognition Introduction Mouse operations Single Click: single finger tap Double Click: single finger tap twice quickly at the same position. Right Click: single finger stays for 2 or 3 seconds at the same position for right click function. Scroll Bar: open a website, scroll the page up and down by single fingers directly. Gesture recognition in Windows Gesture recognition in education software GLBoard... -
Page 22: Application Software
Application Software Introduction of the main toolbar When you use GLBoard for the first time, double click GLBoard to start the program, the interface includes three areas, shown as the following: Work area: picture or text editing Toolbar Function of each button on the tool bar Icon Name Function... - Page 23 Write like a ball pen Brush Write like a Chinese brush pen Smart pen Convert drawings to geometric shapes. Multi-writing Support ten persons writing simultaneously mode Insert shape Several shapes can be chosen, such as triangle, square, and circle Import picture Insert pictures from your computer Import text Insert text frame, then edit the words...
- Page 24 When you click to go back to the desktop, GLBoard will appear as a floating toolbar. Icon Name Function Windows Back to the desktop Write like a ball pen New page Open a new white page New page Open a new black page Back Go back to the previous page Forward...
- Page 25 Preview Note Go back to the previous note page page Close Close GLBoard Width Set stroke width Start Menu List Menu Submenu Function Description Create a blank file. If any file has not been saved before, a save message will be shown. Open Open an existed PPT, PDF, PTS file.
- Page 26 you want to capture, and then click OK. White background Background color is white. Black background Background color is black. Picture background Background is a picture. Change background Desktop Choose the Desktop as background. background Other background Chose the background color yourself. color Insert a hyperlink that could open a linked page Insert a hyperlink...
- Page 27 Slide page navigation Show the slides in the PPT. First open a PPT file, and then use this function to show. Playback Replay. Online resource Pep.com.cn Connect to pep.com.cn Exit Exit GLBoard...
-
Page 28: Troubleshooting
Troubleshooting 1. Open the program and an error is shown as “No valid USB Key for hand touch whiteboard found”. (1) First check if the connection of USB cable is correct. (2) Please confirm if the USB cable has not been cut or spliced. (3) Please confirm if the system is equipped with a recovery card. -
Page 29: Important Information
Important information Note: If you are a user of the product, please read the related warning information and product maintenance methods as below carefully. Before you install the product, please fully understand safety information in the guide. It could prevent you from making mistakes, leading to product damage and safety issues. -
Page 30: Sales Feedback Form
Sales Feedback Form Dear user: Thank you for using our products. In order to make our products to better serve you, please help us to fill in the real details about our product completely. Your opinion about our company product will continuously help to improve product quality.
Need help?
Do you have a question about the Smart Touch Kit and is the answer not in the manual?
Questions and answers