Table of Contents
Advertisement
Quick Links
Instr. No. 2650-895
Introduction
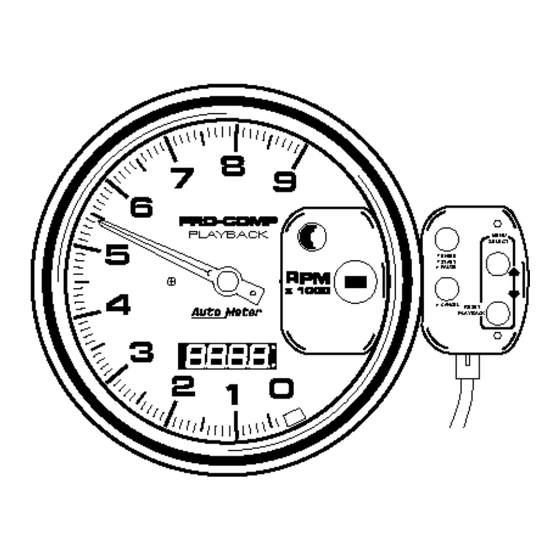
The Single Channel Pro-Comp/Phantom Playback Tach uses a menu system for
configuration. Use the arrows (
you reach the bottom or top of the menu you will automatically jump to the other
end of the menu.
To select a menu option press the ENTER button. If at any time you want to exit
the menu you are currently in, press the CANCEL button. The CANCEL button
will take you back to the TACH display and will not store the entries you have
made.
Press the ENTER key to store the settings you have entered. After pressing
ENTER, the only way to return to the original settings is to re-enter them.
When a display indicates a run (for example:
shown in this instruction. It will not be shown because any of the four runs could
be displayed and we do not know which run you have selected/displayed. In this
example, the instruction would show
INSTALLATION INSTRUCTIONS
5" SINGLE CHANNEL
P R O - C O M P / P H A N TOM TA C H
®
M O D E L 5798, 5799, 6861, 6864, 6865, 6867
) to scroll up and down the menu. When
), the number will not be
.
Advertisement
Table of Contents

Related Manuals for Auto Meter 5798


Summary of Contents for Auto Meter 5798
- Page 1 P R O - C O M P / P H A N TOM TA C H ® Instr. No. 2650-895 M O D E L 5798, 5799, 6861, 6864, 6865, 6867 Introduction The Single Channel Pro-Comp/Phantom Playback Tach uses a menu system for configuration.
-
Page 2: Table Of Contents
Contents Introduction ............1 1. -
Page 3: Wiring
1. Wiring... -
Page 4: Main Menu Options A. - Tach Mode
2. Main Menu Options - Tach Mode In Tach Mode, the Tach operates as a standard tach. It displays RPM and operates the shift light. All 4 shift points are active only when the blue wire is used. When the blue wire is not used, only the first shift point is active. -
Page 5: F. - Printer Interface Download
- Run Select (Select the run number to play, download or record 1. Press ENTER to select the Run Select Mode. The display will read 2. Press the up and down arrows to select the new run. 3. Press ENTER when the desired run is displayed. - Playback Engine Recording (shows burnout, pre-race, and race) -
Page 6: G. - Set Shift Point #1 And "Hold Set Point 1" Delay
- Set shift point #1 and "Hold Set Point 1" Delay 1. Press ENTER, the current setpoint will be displayed. 2. Adjust Shift Setpoint 1 as follows; a. Press and hold the arrow. • The displayed RPM will change. • Continue holding and the RPM display will increase in speed. -
Page 7: J. - Playback Speed Setting
- Playback Speed Setting Toggles playback speed between full speed and half s p e e d . 1. Press ENTER, the current speed will be displayed. 2. Press the up or down arrow to change the speed. 3. Press ENTER to store playback speed and return to the Main Menu. - Page 8 (12) months from date of the original purchase. Products that fail within this 12 month warranty period will be repaired or replaced at Auto Meter's option to the consumer, when it is determined by Auto Meter Products, Inc.
Need help?
Do you have a question about the 5798 and is the answer not in the manual?
Questions and answers