Table of Contents
Advertisement
Quick Links
Advertisement
Table of Contents

Related Manuals for Sper scientific 850001


Summary of Contents for Sper scientific 850001
- Page 1 Pocket Moisture Meter 850001 Instruction Manual...
-
Page 2: Table Of Contents
TABLE OF CONTENTS INTRODUCTION ..........3 FEATURES ............ 4 MATERIALS SUPPLIED ........ 4 FRONT PANEL DESCRIPTION ....5 LCD DISPLAY ..........6 SET UP ............7 CALIBRATION ..........10 MEASUREMENT PROCEDURES ....12 CARE AND MAINTENANCE ....... 18 SPECIFICATIONS ........19 WARRANTY .......... -
Page 3: Introduction
INTRODUCTION This Sper Scientific Pocket Moisture Meter (model 850001) displays the moisture content on a large backlit LCD screen. This meter combines the versatility of measuring many different materials with the peace of mind of an in-cap calibration check. The meter... -
Page 4: Features
FEATURES • Reads 7 different building materials • Minimally invasive penetration pins • Rugged housing • Hold button for maintaining readings • Maximum and minimum values • Backlight • In-cap calibration check • LCD that can withstand freezing temperatures • Reads ambient temperature in °C or °F •... -
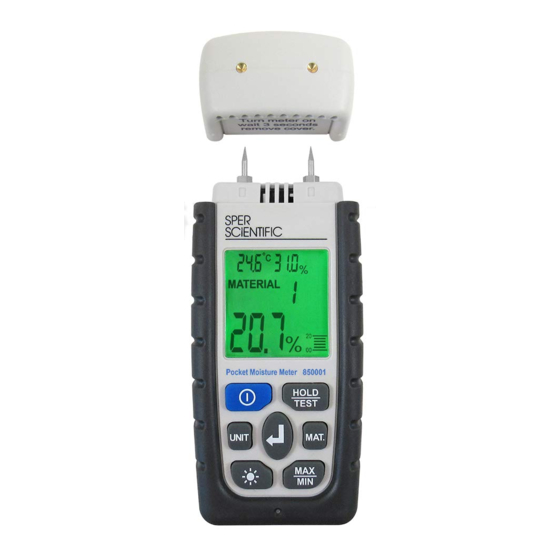
Page 5: Front Panel Description
FRONT PANEL DESCRIPTION 1. Calibration Sensors on top of cap 2. Calibrating Cap/protective cover 3. Power Button 4. Unit Selector 5. Backlight Button 6. Data Hold Button 7. Material Selector 8. Maximum/Minimum Button 9. Enter Button... -
Page 6: Lcd Display
LCD DISPLAY 1. Ambient Air Temperature 2. Temperature Units 3. Ambient Air Moisture 4. Moisture Units 5. Material Selected 6. Maximum and Minimum Values 7. Material Moisture Reading 8. Material Moisture Bar Graph 9. Data Hold Indicator 10. Low-Battery Icon... -
Page 7: Set Up
SET UP Battery Installation This meter uses two AAA batteries. To install the batteries before first use: 1. Unscrew the single screw in the center of the back of the meter. This screw secures the battery cover. 2. Remove the battery door by inverting the meter and allowing the door to slide out. - Page 8 Meter On and Off 1. Press POWER to turn the meter on. 2. Press POWER to turn the meter off. 3. The meter will automatically turn off after ten minutes of inactivity. Backlight 1. Press the backlight button to illuminate the LCD screen.
- Page 9 Select Ambient Air Units IMPORTANT: The temperature and humidity readings represent the temperature and humidity of the surrounding air and do NOT represent the temperature or humidity of the material being tested. 1. Press UNIT to toggle through temperature and humidity unit options. The meter will toggle through temperature settings first (°C or °F) followed by the humidity options of Relative Humidity, Wet Bulb, and Dew...
-
Page 10: Calibration
CALIBRATION Check the meter periodically using its included calibration cap. The meter can be checked before each use or when switching between materials. 1. Turn the meter on and ensure it is set to Material 1. 2. Remove the protective cap and turn it upside down to expose the calibration sensors. - Page 11 5. If the meter does not display the number 35%, follow these troubleshooting steps. a. Ensure there is no residual material on the pins. Drywall, wood, wet concrete, or screed can adhere to the pins. Ensure both pins are clean and dry. b.
-
Page 12: Measurement Procedures
MEASUREMENT PROCEDURES Select Material for Testing 1. Using the table below, choose the material to be tested by pressing MATERIAL. Each material is represented by a number which will appear on the LCD next to the word MATERIAL. 2. The meter is now ready for use. MATERIAL Material Minimum... - Page 13 Gypsum Drywall, Sheetrock, Cementboard, and other manufactured wallboards Anhydrite Screed and other flooring adhesives Low lime concrete, 0.5% cement, and cement mortar Lime mortar, 0.5% plaster, stucco Unpolished Red Brick...
- Page 14 Read the Moisture Content 1. Remove the protective cap and insert the pins into the material to be tested using consistent firm pressure. 2. For best results, hold the meter by the dark rubber handgrip. If your hand is too close to the top of the meter, you could obtain incorrect ambient air readings or risk damage to your hand from the pins.
- Page 15 Data Hold The Minimum/Maximum functions on the meter are disabled during data hold. Also, new readings cannot be taken. 1. Press HOLD to freeze the reading on the display. “Hold” appears at the top of the LCD and the reading remains on the display until hold is disabled.
- Page 16 Maximum/Minimum Mode It is important to take readings from different areas of your material to determine the overall moisture content. This is especially true of large surfaces due to material inconsistency, location of moisture sources, depth of penetration, and environmental factors. Maximum/Minimum mode allows you to take several readings and displays the minimum and maximum values.
- Page 17 6. Press MAXIMUM/MINIMUM again to return to regular mode. You will not lose the previous MIN/MAX readings. 7. To clear the memory of previous readings, turn the meter OFF.
-
Page 18: Care And Maintenance
• Repairs or services not covered in this manual should be performed by qualified personnel only. Please contact Sper Scientific to speak with a technician. • Do not leave the meter uncapped as this could potentially damage the pins or create an unsafe situation because the pins are very sharp and can pierce skin. -
Page 19: Specifications
SPECIFICATIONS Range Resolution Accuracy Moisture 0 - 75% 0.1% ±2% FS Content Temperature -5 - 45°C 0.1° ±2°C 23 - 113°F Relative 10 - 90% 0.1% ±5% Humidity Dew Point 0 - 30°C 0.1° ±2°C 32 - 85°F Wet Bulb* -5 - 45°C 0.1°... -
Page 20: Warranty
WARRANTY Sper Scientific warrants this product against defects in materials and workmanship for a period of one (1) year from the date of purchase, and agrees to repair or replace any defective unit without charge. If your model has since been discontinued, an equivalent Sper Scientific product will be substituted if available.
Need help?
Do you have a question about the 850001 and is the answer not in the manual?
Questions and answers