Bresser NATIONAL GEOGRAPHIC Operating Instructions Manual
Telescopes
with az mount
Hide thumbs
Also See for NATIONAL GEOGRAPHIC:
- Operating instructions manual (49 pages) ,
- Instruction manual (32 pages)
Table of Contents
Advertisement
Available languages
Available languages
Quick Links
Advertisement
Table of Contents

Related Manuals for Bresser NATIONAL GEOGRAPHIC


Summary of Contents for Bresser NATIONAL GEOGRAPHIC
- Page 1 TELESKOPE mit AZ Montierung TELESCOPES with AZ Mount Bedienungsanleitung Operating instructions Mode d’emploi Handleiding Istruzioni per l’uso Instrucciones de uso Instruccions d'ús Manual de utilização Instrukcja obsługi Руководство по эксплуатации...
- Page 2 (DE) WARNUNG! Schauen Sie mit diesem optischen Gerät niemals direkt oder in die Nähe der Sonne! Achten Sie besonders darauf, wenn es von Kindern benutzt wird! Es besteht ERBLINDUNGSGEFAHR! Verpackungsmaterial (Plastiktüten, Gummibänder, etc.) von Kindern fernhalten! (EN) CAUTION: Never attempt to observe the sun with this telescope. Make sure children do not attempt to observe the sun with the telescope.
- Page 3 Downloads: • Astronomie Software/Astronomy software • Mondkarte/Moon map • Bedienungsanleitung/Instruction Manual http://www.bresser.de/download/NG_AZ (DE) Bedienungsanleitung ................6 (EN) Operating instructions ..............10 (FR) Mode d’emploi .................. 14 (NL) Handleiding ..................18 (IT) Istruzioni per l’uso ................22 (ES) Instrucciones de uso ................. 26 (CA) Instruccions d'ús ................
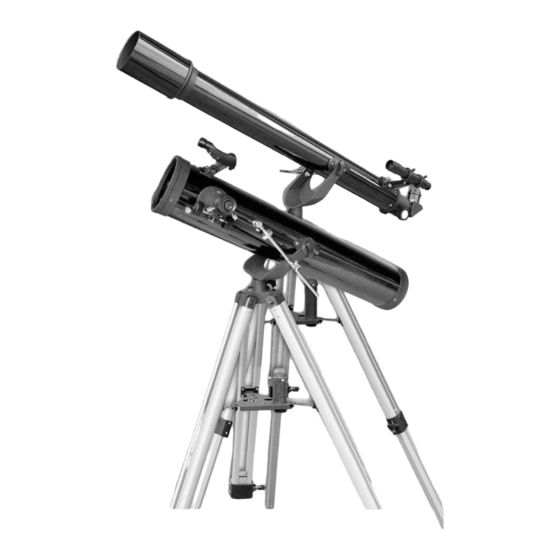
- Page 4 No. 1 No. 1b No. 1c 1& No. 1a 1& No. 1d No. 2 No. 4 No. 3a No. 3b 1& 1& Zubehör kann je nach Modell variieren. Los accesorios pueden variar según el modelo. Accessories may vary depending on the model. Els accessoris poden variar segons el model.
- Page 5 No. 5 No. 6 No. 7a No. 7b No. 9a No. 8 No. 9b No. 11 No. 10 No. 12a No. 12b No. 14a No. 14b No. 13 No. 16 No. 15a No. 17 No. 15b...
- Page 6 Allgemeine Informationen Stativkopf 1& Vertikalfeineinstellung Zu dieser Anleitung Okulare Zenit-Spiegel Lesen Sie bitte aufmerksam die Sicherheitshinweise in dieser Umkehrlinse Anleitung. Verwenden Sie dieses Produkt nur wie in der Anleitung Barlow-Linse beschrieben, um Schäden am Gerät oder Verletzungen zu vermeiden. Bewahren Sie die Bedienungsanleitung auf, damit Sie sich jederzeit Halterungen (Ablage) über alle Bedienungsfunktionen neu informieren können.
- Page 7 6. Vertikal-Feineinstellung 8. Ausrichtung des Suchers Um die Vertikal-Feineinstellung (17) zu montieren, stecken Sie zuerst 8.1 Ausrichtung Typ I + IV (Sucherfernrohre) die Justierstange durch die entsprechende Halterung (X) an der Das Sucherfernrohr muss vor dem Einsatz justiert werden. Dafür müs- Montierung (No.
- Page 8 10.2. bei Spiegelteleskopen (Reflektoren) 6.1. Okulare: Lockern Sie die Klemmschrauben am Okularstutzen (6). Nehmen Sie Durch Auswechseln der Okulare bestimmen Sie die jeweilige das mitgelieferte Okular (18) mit der größten Brennweite (20mm) Vergrößerung Ihres Teleskopes. und setzen Sie dieses direkt in den Okularstutzen ein. Ziehen Sie die Klemmschrauben (No.
-
Page 9: Hinweise Zur Reinigung
Garantiezeitverlängerung und Serviceleistungen können Sie unter Es handelt sich um den Hauptteil einer weit größeren Wolke aus www.bresser.de/garantiebedingungen einsehen. Wasserstoffgas und Staub, die sich mit über 10 Grad gut über die Hälfte des Sternbildes des Orions erstreckt. Die Ausdehnung dieser gewaltigen Wolke beträgt mehrere hundert Lichtjahre. -
Page 10: General Information
General Information Accessories may vary depending on the model. About This Instruction Manual Parts (No. 1-3) Please read the safety instructions in this manual carefully. To avoid damage to the unit and the risk of injury, only use this product as Telescope tube described in the manual. - Page 11 4. Accessories tray 7.4. Finder scope assembly (type IV): Finder scope with Quick Insert The finder scope and its mount are preassembled and included in the Model (No. 3a): Hold the accessories tray (10) against the fastening packaging. devices (22) on the tripod legs. Screw the three butterfly screws (12) Slide the finder scope mount foot entirely into the appropriate base from below through the fastening devices in the tray (No.
- Page 12 Release the clamping screw (No. 12b, X) to fasten the 20 mm eyepiece You can see some well-known stars and constellations on the map into the zenith mirror in the same way, and then retighten the clamping (No. 17) that are visible throughout the year. The arrangement of the screw to secure the eyepiece in place.
-
Page 13: Notes On Cleaning
(M42) is the brightest diffuse nebula in the sky. It is visible even with www.bresser.de/warranty_terms. the naked eye and is a worthwhile object for telescopes of all types and sizes. The nebula consists of a gigantic cloud of hydrogen gas with a diameter of hundreds of light years. -
Page 14: Informations Générales
Informations générales Vis de blocage (pied) Vis (tablette à accessoires) A propos de ce manuel Branches du pied Vis de serrage (chercheur) Veuillez lire attentivement les consignes de sécurité présentées dans Vis (tête du trépied) ce manuel. N’utilisez ce produit comme décrit dans ce manuel, afin Tête du trépied d’éviter tout risque de blessure ou de dommage sur l’appareil. - Page 15 8. Mise au point du chercheur 5. Tube 8.1. Mise au point des types I et IV (chercheurs) Tenez à présent le tube du télescope (1) - comme indiqué sur le Avant utilisation, il faut mettre le chercheur au point. C‘est-à-dire que le graphique - au milieu de la monture azimutale (9) et serrez les vis (8) chercheur et le tube du télescope doivent être orientés parallèlement.
- Page 16 6. Accessoires 10.2. Pour les télescopes à miroir (réflecteurs) Desserrez les vis de serrage qui se trouvent sur le porte-oculaire (6). Prenez l‘oculaire possédant la plus grande distance focale (20mm) L‘équipement de base de votre télescope comprend plusieurs qui vous a été fourni lors de l‘achat (18) et placez-le directement sur accessoires (No.
- Page 17 Vous pouvez consulter l’intégralité des conditions de garantie ainsi que immense est de plusieurs centaines d‘années lumière. les informations concernant la prolongation de la garantie et les pres- tations de service sur www.bresser.de/warranty_terms. Constellation LEIER / M57 (No. 25) L’ascension droite: 18 (heures : minutes) Déclinaison:...
- Page 18 Algemene informatie 1& Verticale precieze instelling Oculairen Over deze handleiding Zenitspiegel Omkeerlens Leest u aandachtig de veiligheidsinstructies in deze handleiding. Barlowlens Gebruik dit product, om schade aan het apparaat of verwondingen te Schroeven (toebehoortafel) voorkomen, alleen zoals in de handleiding is beschreven. Bewaar deze gebruikershandleiding zodat u zich op elk moment weer kunt informeren over alle bedieningsfuncties.
- Page 19 Daarna wordt de schroef (Y) voor de justeerstang losgedraaid en de Kijk door de zoekertelescoop en richt deze door het draaien aan de justeerstang aan het andere einde aangezet. De schroef (Y) wordt weer 3 of 6 regelschroeven, tot u het object in het midden van het draden- ingedraaid (No.
- Page 20 Als u vanuit een verlichte ruimte ‚s nachts naar buiten gaat, moeten uw 6.3. Omkeerlens ogen eerst aan het donker wennen. Na ca. 20 minuten kunt u dan met Om een juist opstaand beeld te zien, kunt u een omkeerlens (20) gebruiken. de astronomische observatie beginnen.
- Page 21 De volledige garantievoorwaarden en informatie over de verlen- ging van de garantieperiode en servicediensten kunt u bekijken op Sterrenbeeld LIER / M57 (No. 25) www.bresser.de/warranty_terms. Rechte klimming: (Uren : Minuten) Declinatie: +33° 02' (Graden : Minuten) Afstand: 2.412 lichtjaar van de aarde verwijderd...
-
Page 22: Informazioni Generali
Informazioni generali 1% Viti (testa del treppiede) 1^ Testa del treppiede 1& Regolazione micrometrica verticale Informazioni sul presente manuale 1* Oculari 1( Diagonale a specchio Leggere con attenzione le avvertenze di sicurezza riportate nel manua- 2) Lente di inversione le. Per evitare danni all‘apparecchio o possibili lesioni, utilizzare questo 2! Lente di Barlow prodotto soltanto come descritto manuale. - Page 23 6. Regolazione micrometrica verticale 8. Allineamento del cercatore Per montare il dispositivo di regolazione micrometrica verticale (17), 8.1 Allineamento tipo I e IV (cercatori) inserire innanzitutto l‘asta di regolazione attraverso il relativo supporto Prima dell‘uso il cercatore deve essere regolato. Ciò significa che di fissaggio (X) posto sulla montatura.
- Page 24 mente. Rimuovere il coperchio di protezione antipolvere dall’apertura 6.1. Oculari del tubo ottico. Cambiando gli oculari è possibile determinare il potere di ingrandimen- to del telescopio. Parte II – Uso Formula per il calcolo dell’ingrandimento: 1. Montatura Distanza focale telescopio ÷ Distanza focale oculare = Ingrandimento Esempi: Il telescopio è...
- Page 25 Le condizioni complete di garanzia e le informazioni sull‘estensione di della costellazione di Orione. L’estensione di questa nuvola gigantesca garanzia e i servizi di assistenza sono visibili al sito è di diverse centinaia di anni luce. www.bresser.de/warranty_terms. Costellazione LIRA / M57 (fig. 25) Ascensione retta: (ore : minuti) Declinazione: +33°...
-
Page 26: Informaciones De Carácter General
Informaciones de carácter general Vis de serrage (chercheur) Vis (tête du trépied) Sobre este manual Tête du trépied 1& Mise au point verticale Lea atentamente las indicaciones de seguridad recogidas en este Oculares manual. Emplee este producto exclusivamente de la forma descrita en Espejo cénit el manual, con el fin de evitar daños en el aparato o lesiones. - Page 27 5. Tubo Llegado este punto, el buscador del telescopio estará correctamente asegurado. Sujete el tubo del telescopio (1) tal como se muestra, en el medio de 8. Orientación del buscador la instalación azimutal (9) y gire los tornillos (8) desde ambos hacia dentro del tubo (No.
-
Page 28: Instalación
10.2. en telescopios reflectores (de espejo) 5. Búsqueda de estrellas Afloje los tornillos prisioneros del soporte para el ocular (6). Extraiga el ocular de la distancia focal máxima de 20 mm (18) incluido en el Al principio seguramente le resultará difícil orientarse en el cielo, ya volumen de suministro y coloque éste directamente en el soporte que las estrellas y constelaciones están constantemente en movi- del ocular. - Page 29 Hubble Space.
- Page 30 Informació de caràcter general Oculars Mirall zenital Sobre aquest manual Lent d’inversió Lent Barlow Llegiu atentament les indicacions de seguretat d’aquest manual. Feu Suports (safata) servir aquest producte només tal com es descriu al manual per evitar danys a l’aparell o lesions. Conserveu el manual d’ús per tal de poder Part I –...
- Page 31 Important: No colleu del tot el cargol de pressió (X) per a l’ajust fi Mireu pel telescopi cercador i ajusteu-lo girant els 3 o 6 cargols d’ajust vertical. En cas contrari, ja no es podrà ajustar l’alçada fins que vegeu l’objecte al centre del reticle. La imatge que abans heu del tub.
- Page 32 En cas que sortiu a fora de nit després d’haver estat en una habitació il·luminada, els vostres ulls s’hauran d’acostumar abans a la foscor. CONSELL! Després d’uns 20 minuts podreu començar l’observació astronòmica. Els oculars són sistemes de lents orientats cap a l’ull. Amb l’ocular es captura la imatge que es genera al No feu observacions des d’espais tancats.
- Page 33 2. Solució de problemes: NOTES sobre la neteja Problema: Ajuda: No es veu res Retireu la coberta antipols de l’obertura Netegeu les lents (oculars i/o objectius) només amb un drap suau i de l’objectiu. sense borrissol (p. e., microfibra). No apliqueu massa pressió amb el drap per evitar esgarrapar les lents.
- Page 34 Informações gerais 1& Ajuste de precisão vertical Oculares Sobre este manual Refletor zénite (apenas para telescópio com lente) Lentes inversas Leia com atenção as advertências de segurança deste manual. Utilize Lente de Barlow este produto apenas da forma descrita neste manual, a fim de evitar Suportes (prateleira de acessórios) danos no aparelho ou ferimentos.
- Page 35 6. Ajuste de precisão vertical 8. Orientación del buscador Para montar o ajuste de precisão vertical (17), encaixe, em primeiro 8.1 Alinhamento para o tipo I + IV (telescópio de procura) lugar, a barra de ajuste através do respectivo suporte (X) no elemento O telescópio de procura deve ser ajustado antes da utilização.
- Page 36 Parte II – Modo de usar 6. Acessórios 1. Elemento de projecção O seu telescópio vem, com o equipamento de base, várias peças acessórias. Conforme o modelo, pode trazer: O seu telescópio está equipado com uma “projecção azimutal“ fácil 6.1. Oculares de manusear.
- Page 37 Distância: 1.500 anos-luz das em www.bresser.de/warranty_terms. A uma distância de cerca de 1600 anos-luz está a nebulosa de Orion (M42), a nebulosa difusa mais brilhante no céu – visível a olho nú e um objecto que compensa para telescópios de todos os tamanhos,...
- Page 38 Ogólne informacje Akcesoria różnią się w zależności od modelu. Informacja dotycząca tej instrukcji Wszystkie części (No. 1-3) Należy uważnie przeczytać wskazówki dotyczące bezpieczeństwa zawarte w tej instrukcji. Produktu należy używać zgodnie z opisem Tubus teleskopu w instrukcji, pozwoli to uniknąć uszkodzeń urządzenia oraz obrażeń. Szukacz lunetkowy lub szukacz z diodą...
- Page 39 4. Zakładanie półki 7.4. Montaż szukacza (typ IV) – Szukacz lunetkowy z szybkim wsuwem Wcześniej zamontowany szukacz i uchwyt szukacza znajdują się w Modelu (No. 3a): Przytrzymaj półkę na osprzęt (10) na zamocowani- opakowaniu. ach (22) na nogach statywu. Wkręć mocno trzy śruby skrzydełkowe Proszę...
- Page 40 Na zakończenie proszę umocować w podobny sposób okular o 5. Wyszukiwanie gwiazd średnicy 20mm w zwierciadle zenitalnym poprzez odkręcenie i zaciśnięcie Początkowo orientacja na gwiaździstym niebie z pewnością sprawi Ci śruby zaciskowej (No. 12b, X). trudność, ponieważ gwiazdy oraz gwiazdozbiory znajdują się stale w ruchu i zmieniają...
-
Page 41: Wskazówki Dotyczące Czyszczenia
Wszelkie informacje dotyczące gwarancji jak również informacje na która z 10 stopniami obejmuje ponad połowę Gwiazdozbioru Oriona. temat przedłużenia czasu gwarancji i świadczeń serwisowych można Rozmiar tej gigantycznej chmury wynosi kilkaset lat świetlnych. znaleźć na stronie: www.bresser.de/warranty_terms. Gwiazdozbiór LEIER / M57 (No. 25) Rektascencja: (godziny : minuty) Deklinacja: +33°... - Page 42 Общая информация Комплектация может изменяться в зависимости от модели. О руководстве пользователя Устройство телескопа (No. 1-3) Внимательно прочтите данное руководство пользователя. Неправильное использование или обслуживание прибора может Труба телескопа привести к травмам или повреждению самого прибора. Искатель Держите данное руководство под рукой в качестве справочника Регулировочные...
- Page 43 модели (No. 3b): Първо развъртете напълно крепежния винт на Установка искателя (тип 4): Искатель - отделението за принадлежности (12). После поставете отделението быстрая установка за принадлежности (10) както е показано на фиг. (No. 7b). Накрая Искатель и его монтировка поставляются в уже собранном виде. завийте...
- Page 44 Прежде чем установить окуляр и призму, следует снять с трубы Она всегда находится в одном положении, поэтому является пылезащитную крышку. точкой отсчета на всех картах звездного неба. Ослабьте винт (No. 12а, Х) на трубе соединения окуляра и На карте можно найти хорошо известные звезды и созвездия, которые...
- Page 45 световых лет от Земли, это ярчайшая туманность, которую гарантии и о наших сервисных центрах можно получить на можно видеть в небе, - она видна даже невооруженным глазом нашем сайте www.bresser.de/warranty_terms. и является достойным объектом наблюдения в телескоп любого вида и размера.
- Page 46 No. 18 No. 19 No. 20 No. 21 No. 22 2! 1* f=20 mm f=12.5 mm f=4 mm No. 23 The Moon No. 24 Orion Nebula (M42) No. 25 Ring Nebula in Lyra con- stellation (M57) No. 26 Dumbbell Nebula in the Vulpecula (Fox) constellation (M27)
- Page 48 TELESKOPE mit AZ Montierung TELESCOPES with AZ Mount Visit our website: www.nationalgeographic.com © 2018 National Geographic Partners LLC. All rights reserved. NATIONAL GEOGRAPHIC and Yellow Border Design are trademarks of the National Geographic Society, used under license. Bresser GmbH Gutenbergstr. 2 DE-46414 Rhede www.bresser.de ·...
Need help?
Do you have a question about the NATIONAL GEOGRAPHIC and is the answer not in the manual?
Questions and answers