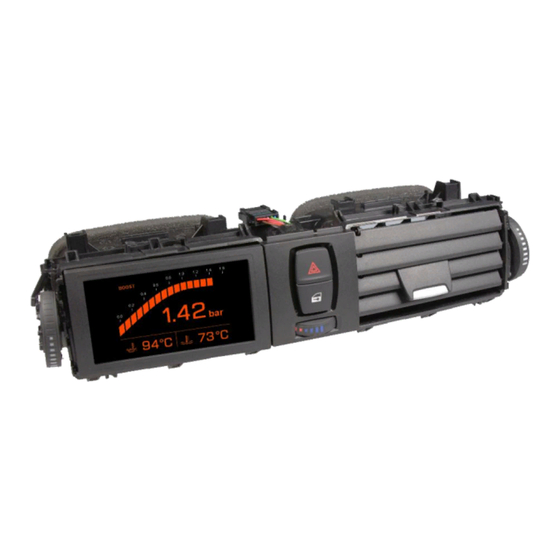
Summary of Contents for Awron F8xDGA
-
Page 1: Installation Guide
Installation Guide: F8xDGA Version: V1.0 Page: Autor: Datum: 26.03.2014 AWRON GmbH Installation Guide AWRON Display F8 DGA BMW M3, M4 • F80/F82... -
Page 2: Scope Of Delivery
Installation Guide: F8xDGA Version: V1.0 Page: Autor: Datum: 26.03.2014 AWRON GmbH Scope of delivery F8xDGA Display module Power cord set... - Page 3 Installation Guide: F8DGA Version: V1.0 Page: Autor: Datum: 26.03.2014 AWRON GmbH Toolkit Mounting wedge Assembly tool...
- Page 4 Installation Guide: F8xDGA Version: V1.0 Page: Autor: Datum: 26.03.2014 AWRON GmbH Cabel system...
- Page 5 Installation Guide: F8xDGA Version: V1.0 Page: Autor: Datum: 26.03.2014 AWRON GmbH Schematic...
- Page 6 Installation Guide: F8xDGA Version: V1.0 Page: Autor: Datum: 26.03.2014 AWRON GmbH Disassembly interior trim Remove with a plastic wedge strip the interior. Begin from the right. Pay attention to the connector on startup button and the operating unit warning lights, etc. (see picture below right) Disconnect the connectors, then you can remove air vent.
- Page 7 Installation Guide: F8xDGA Version: V1.0 Page: Autor: Datum: 26.03.2014 AWRON GmbH Disassembly panel under the glove box on passenger side Unfolding the screw Hex, wrench size 8 mm Unfolding the screw Hex, wrench size 8 mm...
- Page 8 Installation Guide: F8xDGA Version: V1.0 Page: Autor: Datum: 26.03.2014 AWRON GmbH Disassembly panel under the glove box on passenger side No tools required Remove connector No tools required...
- Page 9 Installation Guide: F8xDGA Version: V1.0 Page: Autor: Datum: 26.03.2014 AWRON GmbH Disassembly panel under the glove box on passenger side Remove connector No tools required...
- Page 10 Page: 10 Installation Guide: F8xDGA Version: V1.0 Autor: Datum: 26.03.2014 AWRON GmbH Disassembly door sill on passenger side Use a plastic wedge Unclip side trim Use a plastic wedge...
- Page 11 Installation Guide: F8xDGA Version: V1.0 Page: 11 Autor: Datum: 26.03.2014 AWRON GmbH Disassembly interior trim Threading of cables...
- Page 12 Installation Guide: F8xDGA Version: V1.0 Page: 12 Autor: Datum: 26.03.2014 AWRON GmbH Disassembly side trim on the passenger side Remove the side panel Use a plastic wedge Unscrew the cover Screwdriver TORX T25...
- Page 13 Page: 13 Installation Guide: F8xDGA Version: V1.0 Autor: Datum: 26.03.2014 AWRON GmbH Expose the connector from the FEM control unit Remove the side panel No tools required Remove connector CON3 No tools required...
- Page 14 Page: 14 Installation Guide: F8xDGA Version: V1.0 Autor: Datum: 26.03.2014 AWRON GmbH Plug CON 3 into the connector CON10 CON3 CON2...
- Page 15 Installation Guide: F8xDGA Version: V1.0 Page: 15 Autor: Datum: 26.03.2014 AWRON GmbH Plug CON 3 into the connector...
- Page 16 Page: 16 Installation Guide: F8xDGA Version: V1.0 Autor: Datum: 26.03.2014 AWRON GmbH Remove plug CON 3 Unlocking bracket at the connector solve Kein Werkzeug notwendig Remove connector Kein Werkzeug notwendig...
- Page 17 Page: 17 Installation Guide: F8xDGA Version: V1.0 Autor: Datum: 26.03.2014 AWRON GmbH Disassembly trim on the passenger side Remowe connector from the case No tools required 20 = Kl.15 (!2V) (brown/green) 24 = Kl.31 MASSE (brown/black) 19 18 Unpin 20 und 24 Pin...
- Page 18 Pin 1 = Kl.15 (12V) (green/gray) Pin 2 = Kl.31 MASSE (brown/black) Install the supplied black connector No tools required 19 18 Cable green / brown and brown / black from Pin AWRON cable harness in chamber 20 and 24 No tools required...
- Page 19 Page: 19 Installation Guide: F8xDGA Version: V1.0 Autor: Datum: 26.03.2014 AWRON GmbH Dismounting plug CON 8 Pin47 = FA_CAN_LOW Pin48 = FA_CAN_HIGH CON10 CON3...
- Page 20 Installation Guide: F8xDGA Version: V1.0 Page: 20 Autor: Datum: 26.03.2014 AWRON GmbH Dismounting plug CON 8 Pin47 = FA_CAN_LOW Pin47 = FA_CAN_LOW Pin48 = FA_CAN_HIGH Pin48 = FA_CAN_HIGH...
- Page 21 Page: 21 Installation Guide: F8xDGA Version: V1.0 Autor: Datum: 26.03.2014 AWRON GmbH Plug CON 10 connection CON10 CON3 CON2...
- Page 22 Page: 22 Installation Guide: F8xDGA Version: V1.0 Autor: Datum: 26.03.2014 AWRON GmbH Remove plug CON 10 Unlocking bracket at the connector solve No tools required Remove connector 19 18 No tools required...
- Page 23 Page: 23 Installation Guide: F8xDGA Version: V1.0 Autor: Datum: 26.03.2014 AWRON GmbH Remove plug CON 10 Remowe connector from the case No tools required 19 18 Unpin Pin 3 Flat screwdriver 2mm...
- Page 24 Page: 24 Installation Guide: F8xDGA Version: V1.0 Autor: Datum: 26.03.2014 AWRON GmbH Remove plug CON 10 Pin 1 = ETH_WUP (blue/yellow) Install the supplied blue connector No tools required 19 18 No tools required...
- Page 25 Installation Guide: F8xDGA Version: V1.0 Page: 25 Autor: Datum: 26.03.2014 AWRON GmbH Mounting display...
- Page 26 Installation Guide: F8xDGA Version: V1.0 Page: 26 Autor: Datum: 26.03.2014 AWRON GmbH Mounting display...
- Page 27 Autor: Datum: 26.03.2014 AWRON GmbH Support & FAQs For all enquiries concerning your AWRON display system, or if you Please also seen us and our have problems with installation another AWRON products on guide the AWRON support team our website www.awron.de...


Need help?
Do you have a question about the F8xDGA and is the answer not in the manual?
Questions and answers