Table of Contents
Advertisement
SOFTWARE REGISTRATION
In order for you to receive software updates at no charge as they become
available, please complete this form and fax or email it back to us. We will then send
you the files as email attachments and you can download them from your PC or Mac
into your Gradient Master (model 107), Piston Gradient Fractionator (model 152) or the
Gradient Station (model 153).
BioComp's fax number:
506-455-6157
BioComp's email address:
dhc@biocompinstruments.com
Please complete the following:
1. Product model and serial number
2. Tube holder sizes
3. Name of lab head
4. Company/University
5. Address
6. Phone / Fax
7. Email address
Advertisement
Table of Contents

Related Manuals for Biocomp GRADIENT MASTER 108

Summary of Contents for Biocomp GRADIENT MASTER 108
- Page 1 files as email attachments and you can download them from your PC or Mac into your Gradient Master (model 107), Piston Gradient Fractionator (model 152) or the Gradient Station (model 153). BioComp’s fax number: 506-455-6157 BioComp’s email address: dhc@biocompinstruments.com...
- Page 3 MODEL 108 GRADIENT MASTER™ ver 5.3 OPERATOR'S MANUAL © 2011 BioComp Instruments, Inc. 650 Churchill Row, Fredericton New Brunswick, Canada E3B 1P6 Ph: (800)561-4221; (506)454-6410; Fx: (506)455-6157; Email: dhc@biocompinstruments.com Home Page: <http://www.biocompinstruments.com>...
-
Page 4: Table Of Contents
TABLE OF CONTENTS SECTION 1. INTRODUCTION Warranty and service Maintenance Electrical surge protection Goods damaged in transit SECTION 2. SPECIFICATIONS SECTION 3. PARTS DIAGRAMS SECTION 4. ORDERING INFORMATION A. The Gradient Master Gradient Forming System B. The Western Roller Blot Development System C. - Page 5 NOTES and FREQUENTLY USED GRADIENTS...
-
Page 6: Section 1. Introduction
SECTION 1. INTRODUCTION WARRANTY AND SERVICE BioComp has a policy of complete customer satisfaction. If, during the first thirty (30) days, you are unhappy with the GRADIENT MASTER, you may return it for a full refund. BioComp warrants this instrument to be free of defects in workmanship for a period of one year from the date of receipt for all electronic and mechanical parts. -
Page 7: Section 2. Specifications
SECTION 2. SPECIFICATIONS Timer:..........0 - 9:59 min:sec, count up or down 0 - 99.9 min, " " " " 0 - 999 min, " " " " ° Tilt angle:......... 0.0 - 90.0 from vertical Speed of rotation:......0 - 60 RPM Memory:......... -
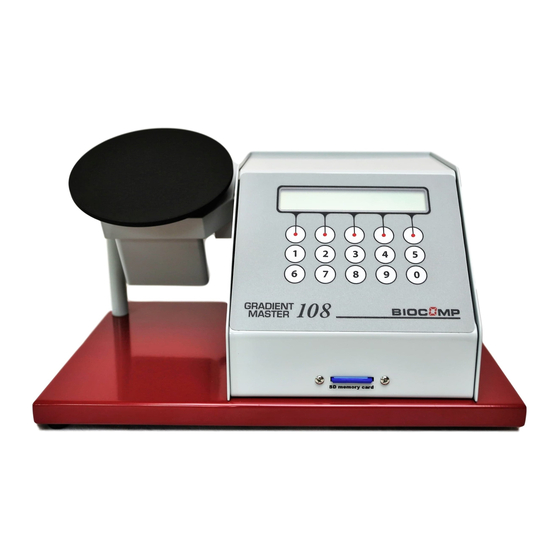
Page 8: Section 3. Parts Diagrams
SECTION 3. PARTS DIAGRAMS... -
Page 9: Section 4. Ordering Information
SECTION 4. ORDERING INFORMATION A. The Gradient Master™ gradient forming system. MagnaBase System: Catalog number Model 108 Gradient Master base unit ......... 108-1 (100-120V) 108-2 (220-240V) Includes: 4" MagnaBase rotating steel plate, 2 layering cannula, fine tip marker, 2 hex wrenches, level, SD card and SD card reader. -
Page 10: The Western Roller Blot Development System
Tube holders for Vertical and Near Vertical Rotors (8 tube capacity) Order Tube Size Beckman Dupont/Sorvall Hitachi Kontron Cat. No. mm/in 1). 25mm diameter tubes 105-925-8A 25 x 89 VTi 50 RPV50T 1 x 3 1/2 RP50VF 105-925-8B 25 x 60 TV-865B TV-865B 1 x 2 3/8... -
Page 11: Section 5. Instrument Set-Up
SECTION 5. INSTRUMENT SET-UP 1. After unpacking the instrument, be sure that all the parts listed on the shipping papers are present. You should find a bag with 3 allen wrenches, 2 cannula, a marker and a round level. There is also an SD card and SD card reader. -
Page 12: Section 6. Programming Instructions
SECTION 6. PROGRAMMING INSTRUCTIONS A. LEVELLING THE PLATE: A CRITICAL FIRST STEP There are two Levelling functions: 1. When you power up the device (see above) 2. Levelling the plate during use. Press the EXIT key until the display shows the Main Menu; GRADIENT MASTER108v5.22 GRAD SYST... -
Page 13: Preparing And Capping The Gradient Tubes
through the list. When you have found the gradient you desire, press the USE key 00-50% S1/2 5:00/60.0/25 DOWN EXIT Press the DOWN or UP keys to scroll through the steps in this gradient. Press the RUN key when you are ready to start the run. -
Page 14: Forming The Gradients
For Quick Seal vertical rotor tubes, use an 18 Ga needle-tipped syringe to top off the light solution and fill the nipple to keep air bubbles from entering the gradient during the run. 5. For open-top tubes, caps are then applied while tilting the tube slightly and aligning the cap's air escape hole with the last air to leave the tube. -
Page 15: Developing Your Own Gradient Run Parameters
Press GRAD: GRADIENT MENU LAST RCNT LIST NEW EXIT 2. If you press LAST, the very last gradient run on the device will appear: Short Sucr 02-28% wv 2St SW50 EXIT Place your tubes in the holder and press RUN. It is that simple. 3. - Page 16 2. Press the rotor you wish to develop a gradient for (only gradients you have the software key for will appear): Short Sucr 02-28% wv EDIT NEXT DONE EXIT 3. In order for the gradient to be stored in the correct location in the LIST, you will need to describe its basic properties.
- Page 17 SW41 SHORT SUCR 5-50% wv 11 Steps Time/Angle/Speed 0:05/87/30 0:15/87/0 0:05/87/30 0:15/87/0 0:05/87/30 0:15/87/0 0:05/87/30 0:15/87/0 0:05/87/30 0:15/87/0 0:19/80/20 Note that the angle stays the same for all but the last step and that the speed alternates between 30 rpm and 0 rpm for 5 repeats: thus the name START-STOP. To simplify data entry, you will only need to describe the three steps that are different.
- Page 18 Press ANGL, enter the value, press ENTR and the key becomes SPED. Press SPED, enter the value, press ENTR and it cycles back to TIME. Press NEXT to scroll between TIME-ANGL-SPED Note: The DONE key in the TIME entry window might tempt you to press DONE to access ANGLE or SPEED, but the DONE key on the main screen signifies that all Memories are entered and you are ready to enter the sequence of memories.
-
Page 19: Entering Gradient Run Parameters Acquired Elsewhere
If you find one you want to use or acquire it from any other source like a paper or from BioComp, enter in into the rotor memory using NEW(see above) and it will appear in the LIST for that rotor, and in RCNT and LAST as well. -
Page 20: Section 7. Internet Programming Instructions
6. Using weight as your guide, remove the sample volume from the top of the tube, sucking a mixture of air and water so that you stay at the air-water interface. 7. Carefully layer the sample on top of the gradient and seal the tube. III. - Page 21 4. Insert the card into your Gradient Master's SD card slot on the front panel 5. Turn the power OFF and then ON with the upper right most key pressed: hold it down until you see "OK". BioComp Flash SDLder 1.5 LOAD MDSP GMLD Press the GMLD key. The display should show: GRADIENT MASTER SD v1.5...
- Page 22 The display should show: GRADIENT MASTER SD v1.5 CODE GRAD ROTR To load new gradient run parameters, press the GRAD key. The display reads: Downloading SD HEX file. Rec loaded = 0 -> 2500 After a brief pause, the display starts counting up from 0 again: Downloading SD CODE file.
-
Page 23: Section 8. Notes And Helpful Hints
4. Sample volumes are adjustable by removing solution from the top of the tube after gradient formation or by purchasing the different caps sold by BioComp. Caps leaving 4 or 10 mm for sample at the top of the tube are now available. - Page 24 (see page 6). To get clear access to it, with the power off, rotate the motor shaft until the set screw appears in the groove in the motor base. 3. Please help others by reporting problems to BioComp so that we can improve our products. See the front page for contact information.
Need help?
Do you have a question about the GRADIENT MASTER 108 and is the answer not in the manual?
Questions and answers