
Subscribe to Our Youtube Channel
Related Manuals for General DPS16


Summary of Contents for General DPS16
- Page 1 PIPE & DUCT RECORDING VIDEO BORESCOPE INSPECTION SYSTEM USER’S MANUAL DPS16 99 Washington Street Melrose, MA 02176 Phone 781-665-1400 Toll Free 1-800-517-8431 Visit us at www.TestEquipmentDepot.com...
-
Page 2: Table Of Contents
TABLE OF CONTENTS Introduction ......... . . 3 Key Features . -
Page 3: Introduction
.jpg files, applications found on most PCs (Microsoft Windows Media Player and Microsoft Office Picture Manager) can open the files. The 4GB SD memory card included in the DPS16 case can store at least 5 hours of video, recorded at an average of 6 Mbytes/minute, in addition to hundreds of photos. -
Page 4: Key Features
Never insert any probe attached to the H16 into any structure or space known or suspected to contain live electric wiring • The DPS16 and H16 are intended for industrial applications only. Do not use a compatible probe for human or any other biological inspections. -
Page 5: What's In The Case
WHAT’S IN THE CASE The DPS16 comes in a custom hard plastic protective carrying case. Inside the case are: • The H16 console. The console integrates an LCD monitor, a connector for a high- performance camera-tipped probe from General, and front-panel controls for controlling the camera’s lights, adjusting system parameters, and recording and playing back videos and... -
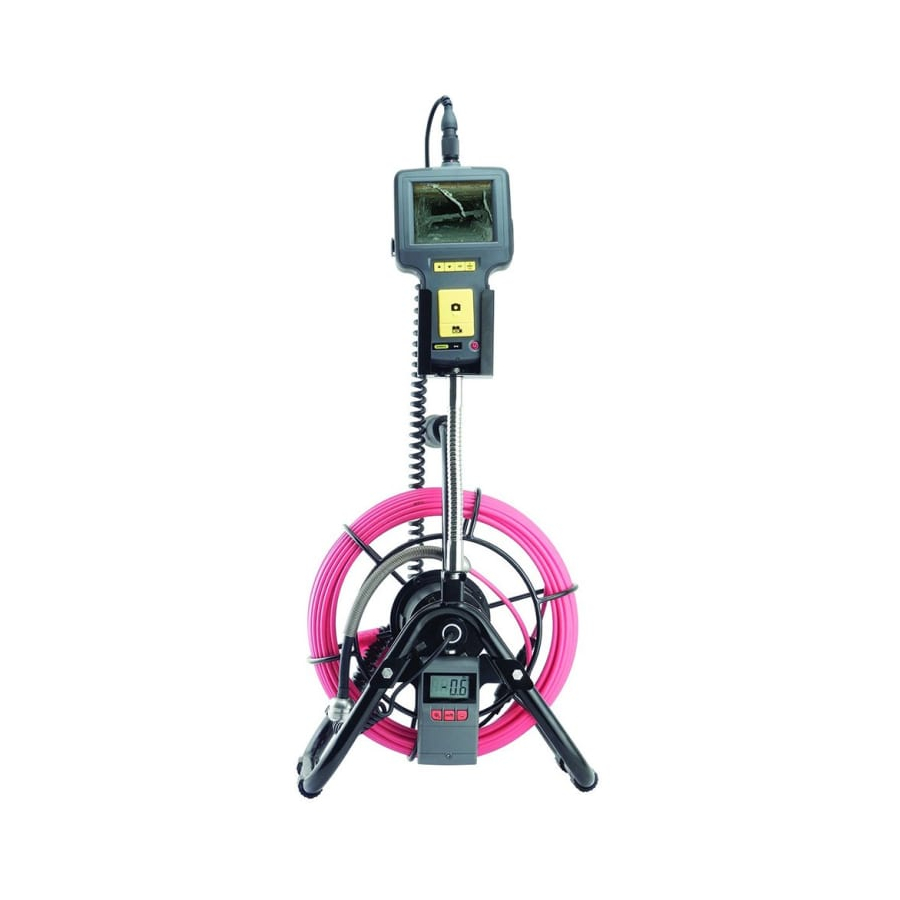
Page 6: Product Overview
PRODUCT OVERVIEW Fig. 1 below shows the names and locations of all of the controls, ports and jacks of the H16. Table 1 on the next page details how the function of each front-panel button changes with the console’s operating mode. Familiarize yourself with the labels, positions and functions of all buttons and connectors before moving on to the Setup Instructions and Operating Instructions. - Page 7 Table 1. The H16’s multi-function buttons Button Label In Preview Mode In Playback Mode In Menu Mode Switches to Selects next-oldest Moves up one line; Playback mode video or photo when setting DATE/TIME, moves back one field Switches to Selects next-newest Moves down one line;...
-
Page 8: Setup Instructions
Camera head Accessory mounting ring Rubber probe cover Fig. 3. Structures near the camera-tipped end of the probe Metal coil spring sleeve Joint ball Probe SETUP INSTRUCTIONS ATTACH PROBE TO CONSOLE Attach the P16PIP to the H16 by 1) inserting the H16 into the bracket at the top of the P16PIP and 2) plugging the P16PIP’s probe connector (see bottom of Fig. -
Page 9: Insert Sd Card
It will take several hours to fully charge the H16’s Lithium-ion battery the first time. You cannot replace the battery, which can only be replaced by General-authorized service personnel. Do not open the case in an attempt to change the battery yourself. Doing so creates a potentially fatal electrical hazard (and voids the warranty as well) with the AC adaptor plugged in. -
Page 10: Operating Instructions - H16
VIEWING LIVE VIDEO ON A TV MONITOR The DPS16 comes with a video cable for connecting the console to a TV or TV monitor that uses either the NTSC or PAL analog broadcast standard. By making the connection, you can view live... -
Page 11: Taking Pictures And Recording Videos
To implement the connection in hardware, insert the stereo mini-plug of the provided cable into the TV Out jack of the H16 (Fig. 1, Callout 9). Then insert the yellow RCA plug at the other end of the cable into the Video in jack of your TV or TV monitor. Be sure to set the TV input to external video. -
Page 12: Accessing Sd Card Content
H16 and plug it directly into a PC. If your PC does not have an SD card slot, you can purchase a USB SD card reader (Part No. SDRD1) from General. - Page 13 Menu mode has a hierarchical structure and uses prompts and MAIN MENU dialog boxes familiar to anyone who has used an Automated Teller DELETE ALL FILES Machine (ATM). The only constraint on using the menu is your own AV OUTPUT response speed.
-
Page 14: Operating Instructions - P16Pip
The TV SYSTEM line enables you to choose either NTSC or PAL formatting of the videos you export to a TV monitor. Press either the and M button to make your choice and then push the OK button to save the setting. The AUTO POWER OFF of the main menu is not visible on the screen that first appears after you press the OK button to put the H16 into Menu mode. - Page 15 Once you have played out a few feet of probe, lock the reel by fastening the Velcro closure around the reel frame, as shown at right. You can now attach the 2 in. spherical ring, the 4 in. brush set or the 6 in. brush set to the probe tip. To attach the ring, slide its slightly larger open end over the camera head (it fits only one way) until the head protrudes about 1/8 in.
-
Page 16: Using The Probe Length Counter
USING THE PROBE LENGTH COUNTER The probe length counter on the front of the P16PIP can help you gauge the position of the camera head as you feed the 72 ft. long probe into a pipe or duct. Backlight Power/Reset To power on the counter, press and hold the button for at least 3 seconds. -
Page 17: Specifications
Power Source Rechargeable 3.7V Li-ion battery Power Consumption 1.8A @ 5.5VDC Operating Temperature -4° to 140°F (-20° to 60°C) Storage Temperature -4° to 140°F (-20° to 60°C) Recharge Temperature 32° to 104°F (0° to 40°C) Console Dimensions 8.5 x 4.7x 1.4 in. (215 x 120 x 36mm) Console Weight 13.4 oz (380g) SPECIFICATIONS... -
Page 18: Operating, Maintenance & Troubleshooting Tips - H16
• Video recording requires an SD card with a fast writing speed. For maximum video quality, General recommends SD cards with a writing speed of 80X or higher. • If the console “freezes” (pushing buttons has no effect) like a computer, straighten out a paper clip and use one end to press the Reset button on the back of the console (Fig. -
Page 19: Optional Probes & Accessories
Stop when the camera head meets the Camera head stopper (see figure at right below). 12 in. OPTIONAL PROBES & ACCESSORIES The table below lists and describes all probes and accessories compatible with the DPS16. Model No. Description Camera Head... -
Page 20: Warranty Information
Acceptance of the exclusive repair and replacement remedies described herein is a condition of the contract for purchase of this product. In no event shall General be liable for any incidental, special, consequential or punitive damages, or for any cost, attorneys’ fees, expenses, or losses alleged to be a consequence of damage due to failure of, or defect in any product including, but not limited to, any claims for loss of profits.
Need help?
Do you have a question about the DPS16 and is the answer not in the manual?
Questions and answers