Advertisement
Quick Links
Advertisement

Related Manuals for ENERMAX LIQTECH TR4 II 280


Summary of Contents for ENERMAX LIQTECH TR4 II 280
- Page 1 Incredible 500W+ TDP Us er’ s Manua l IHS FULL coverage...
- Page 2 Index: Limited Warranty Warranty & Support information For Australia Specification Part List Installation ® Motherboard Sync RGB Control Box...
-
Page 3: Limited Warranty
ENERMAX Technology Corporation agrees to repair or replace the product, at its own option and at no charge, if, during the warranty period, it is returned to nearest ENERMAX Technology Corporation subsidiary/agent with all shipping charges prepaid and if inspection reveals that the product is defective. - Page 4 Web Site: h�p://www.enermax.com E-mail: enermax@enermax.com.tw This ENERMAX liquid cooler is warranted to be free from defects in material and workmanship for period stats in two(2) years. ENERMAX Technology Corpora�on agrees to repair or replace the product, at its own op�on and at no charge, if during the warranty perod, it is returned to nearest ENERMAX Technology Corpora�on subsidiary/agent with all shipping charges prepaid...
- Page 5 Specifica�on Model ELC-LTTRTO240-TBP ELC-LTTRTO280-TBP ELC-LTTRTO360-TBP Cold Plate Material Copper Bearing Ceramic Nano PI Bearing MTBF 100,000 hrs Pump Motor Speed 3000 rpm Rated Voltage Rated Current 0.4A Rated Current – RGB LED 0.2A Dimension 274 x 120 x 39 mm 313 x 140 x 28 mm 394 x 120 x 28 mm Radiator...
- Page 6 Part List (LIQTECH TR4 II 240) Fan x 2 Cooler x 1 Case Screw x 8 Fan Screw x 8 / SP3 AMD TR4 Spring Screw x 4 Thermal Grease x 1 Screw x 4 PWM Y cable x 1 Molex adapter x 1 RGB Control Box x 1 RGB Sync cable x 1...
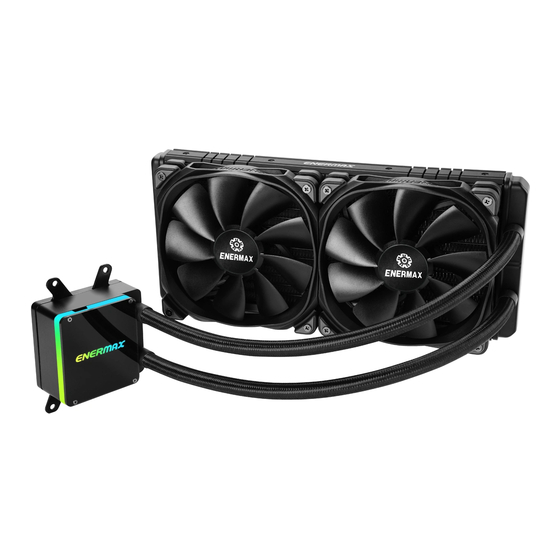
- Page 7 Part List (LIQTECH TR4 II 280) Fan x 2 Cooler x 1 Case Screw x 8 Fan Screw x 8 / SP3 AMD TR4 Screw x 4 Spring Screw x 4 Thermal Grease x 1 PWM Y cable x 1...
- Page 8 Part List (LIQTECH TR4 II 360) Fan x 3 Cooler x 1 Case Screw x 8 Fan Screw x 8 / SP3 AMD TR4 Screw x 4 Spring Screw x 4 Thermal Grease x 1 PWM 3 to 1 cable x 1 Molex adapter x 1 RGB Control Box x 1 RGB Sync cable x 1...
- Page 9 AMD Installa�on Step 1 A�ach the fan and the radiator to the chassis Schrauben Sie den Lü�er und den Radiator am Gehäuse fest. Fixez le ven�lateur et le radiateur sur le châssis Fissare la ventola e il radiatore al case Fijar el ven�lador y el radiador a la caja Zamontuj wentylator i radiator na obudowie komputerowej.
- Page 10 AMD Installa�on Step 2 Tighten the AMD TR4 / SP3 screw to the motherboard Schrauben Sie die Backplate mit den passenden AMD TR4 / SP3-Abstandshaltern am Mainboard fest. Serrez la vis du support AMD TR4 / SP3 à la carte-mère Fissare i montanti per AMD TR4 / SP3 alla scheda madre Fije los tornillos de pilar para AMD TR4 / SP3 a la placa madre Przykręć...
- Page 11 AMD Installa�on Step 3 Apply the thermal grease evenly on the CPU surface Verteilen Sie gleichmäßig eine dünne Schicht Wärmeleitpaste auf der CPU-Oberfläche. Appliquez une couche uniforme de pâte thermique sur la surface du CPU Applicare in modo uniforme la pasta termica sulla superficie della CPU Aplicar de forma uniforme la pasta térmica en la superficie de la CPU Nałóź...
- Page 12 AMD Installa�on Step 4 Remove the protect film from the cold-plate En�ernen Sie die Schutzfolie von der Kühlpla�e der Pumpe. Re�rez le film protecteur de la plaque-froide Rimuovere la pellicola di protezione dalla piastra di raffreddamento Quite la película de protección del bloque de refrigeración Zdjąć...
- Page 13 AMD Installa�on Step 5 Place the pump on the CPU and �ghten the spring screws un�l all four corners are secured Platzieren Sie die Pumpe auf der CPU und drehen Sie die Federschrauben fest bis alle vier Seiten fixiert sind. Placez la pompe sur le CPU et serrez les vis à...
- Page 14 AMD Installa�on Pump Pump Step 6 4 pin 3 pin Connect the pump power connector to the motherboard. No�ce: If you recognize that your mainboard's CPU fan or PWM sockets do not provide enough voltage to power the pump, please use the included 4-pin Molex adaptor and connect the pump directly to your PSU.
- Page 15 AMD Installa�on Step 7 PWM Y cable 4 pin Connect the fan connector to the motherboard Schließen Sie den 4-Pin-PWM-Stecker des Lü�ers am Mainboard an. Branchez le connecteur du ven�lateur à la carte-mère Collegare il conne�ore della ventola alla scheda madre Conecte el conector del ven�lador a la placa madre Podłącz wtyczkę...
- Page 16 Motherboard Sync - 14 -...
- Page 17 Motherboard Sync Addressable RGB Header * Please ensure it is properly the connector to the motherboard. If the motherboard DOES support the addressable RGB (ADD headers): connect the RGB Sync cable to the motherboard. When you install the cooler onto the motherboard, please connect the RGB Sync cable to the water block, and then connect the power connectors to RGB control box.
- Page 18 Motherboard Sync Si su placa base está equipada con conectores RGB compatibles, conecte el cable RGB Sync a la placa base Cuando se instala el disipador en la placa base, se ruega conectar el cable de sincronización RGB con el bloque de agua y de conectar los conectores de alimentación a la caja de control RGB.
-
Page 19: Motherboard Sync
Motherboard Sync GIGABYTE RGB adapter RGB Sync cable MSI RGB adapter For GIGABYTE and some MSI’s high-end motherboards, the pin assignments* of the addressable RGB headers are different from those of LIQTECH TR4 II. Therefore, when you install the cooler onto the motherboards, please connect the RGB Sync cable included in the LIQTECH TR4 II package to the adapter, and then connect one of the RGB Sync adapter to the motherboard address- able RGB header, to enrich and perfect your lighting experience. - Page 20 Motherboard Sync Alcune schede madri GIGABYTE e MSI potrebbero avere una disposizione dei pin RGB diversa da quella del LIQTECH TR4 II. Se la tua scheda madre fa parte di questo gruppo, connetti prima il cavo RGB Sync all’adattatore RGB Sync.
- Page 21 Motherboard Sync 對於 MSI 高階以及 GIGABYTE 主機板,其JRAINBOW1(MSI)/二代 RGB LED 針腳定義與LIQTECH TR4 II不同。請先將LIQTECH TR4 II裝內附的 RGB Sync 同步線與RGB Sync adapter 連接之後,再將 RGB Sync adapter 另一端接到 MSI 或GIGABYTE主機板上的 5V RGB接頭。 *5V RGB 接頭針腳定義: 1) MSI主機板,可各別定址RGB LED 5V接頭:C1/D1/+5V/G 2) GIGABYTE 數位LED接頭:V/D/G GIGABYTEと一部MSIのハイエンドマザーボードでは、アドレッサブルRGBヘ ッダーのピン割り当て*がLIQTECH TR4 IIのピン割り当てとは異っております 。本製品をマザーボードに取り付ける際は、付随のRGB Sync ケーブルをRGB Sync アダプターの凹側に接続し、RGB sync アダプターの凸側2つのうち1つ...
- Page 22 RGB Control Box For non-addressable RGB motherboard - 20 -...
- Page 23 RGB Control Box 5V D - 21 -...
- Page 24 RGB Control Box Light effect mode (GREEN) Effect up/down Mode The 4 LED colors indicate the different modes: GREEN (Light Effect), RED (Effect Speed), BLUE (Brightness), YELLOW (Auto-run). 1. Press “M” until you reach the Light Effect Mode (GREEN). 2. To change the effect, press the ▲ or ▼ button. 3.
-
Page 25: Rgb Control Box
RGB Control Box Les 4 couleurs des diodes indiquent les différents modes: VERT (Effets lumineux), ROUGE (Vitesse), BLEU (Luminosité) et JAUNE (Mode Auto). 1.Appuyez sur “M” jusqu’à ce que vous atteigniez le mode Effets lumineux (diode verte). 2.Pour faire varier l’effet, appuyez sur ▲ ou ▼. 3.10 effets lumineux sont prédéfinis : 1) Arc-en-ciel galopant (par défaut) 2) Arc-en-ciel respirant... - Page 26 RGB Control Box 2. Para cambiar el efecto, presionar el botón ▲ o ▼ . 3. 10 efectos luminosos predeterminados: 1) Racing-Rainbow (Predeterminado) 2) Breathing-Rainbow 3) Flash-Rainbow 4) Overlaying-Rainbow 5) Flow-Rainbow 6) Ejecución Automática colores (8 colores) Presionar ▲ durante 3 segundos para fijar el color corriente. Presionar de nuevo ▲...
- Page 27 RGB Control Box 5) 幻彩Flow 6) 256自動變色 (八組燈色:白、靛、紫、黃、藍、紅、綠、橙 漸變自動變色); 長按 ▲ 3秒可定色,再長按 ▲ 3秒解除定色。 7) 幻彩雷達 8) 單色疊加,紅色 9) 單色疊加,綠色 10) 單色疊加,藍色 3. 按 M 鍵 可切換到其他模式。 4. 長按3秒 ▼ 鍵,會回復預設的 幻彩全亮跑馬 (彩虹)。 本控制器上的4种LED灯色分别代表不同模式:绿灯(灯型切换模式)、红灯(灯速 调整模式)、蓝灯(明暗模式)、黄灯(自动模式) 1. 灯型模式下,指示灯亮绿灯;此时按 ▲ ▼ 键可做灯型切换 (共10种灯型可供选 择)。...
- Page 28 ©2018 ENERMAX TECHNOLOGY CORPORATION. All right reserved. Specifications are subject to change without prior notice. Some trademarks may be claimed as the property of others. Sep. 2018...
- Page 29 RGB Control Box 4. ▼を3秒間押すと、デフォルトの「Racing-Rainbow」エフェクトに戻ります 。 4가지 모드 변경시 리모컨 색상을 확인하세요: 초록 (색상), 빨강 (속도), 파랑 (밝기), 노랑 (자동실행) 1. “M”버튼을 눌러 색상변경 모드(초록)를 선택하세요. 2. ▲ 혹은 ▼ 버튼을 눌러 색상을 변경하세요. 3. 10가지 색상 효과 1) 레이싱 무지개효과(기본) 2) 브리딩...
- Page 30 RGB Control Box Effect Speed Mode (RED) Speed up/down Mode 1. Press “M” until you reach the Effect Speed Mode (RED). 2. To change the effect speed, press the ▲ or ▼ button. 1. Drücken Sie "M", bis Sie den Effektgeschwindigkeitsmodus (ROT) erreichen. 2.
- Page 31 RGB Control Box Brightness Mode (BLUE) Brightness up/down Mode 1. Press “M” until you reach the Brightness Mode (BLUE). 2. To adjust the brightness, press the ▲ or ▼ button. 3. Press “M” in any mode for 3 seconds to turn-off the light. Press “M” again to turn on the light and continue with the previous effect.
- Page 32 RGB Control Box Auto-run (YELLOW) Mode 1. Press “M” until you reach Auto-run (YELLOW). 2. In Auto-run Mode all 10 pre-set light effects run in a loop. 1. Drücken Sie "M", bis Sie den Auto-Run-Modus (GELB) erreichen. 2. Im Auto-Run-Modus laufen alle 10 voreingestellten Lichteffekte in einer Schleife. 1.
Need help?
Do you have a question about the LIQTECH TR4 II 280 and is the answer not in the manual?
Questions and answers