Advertisement
Quick Links
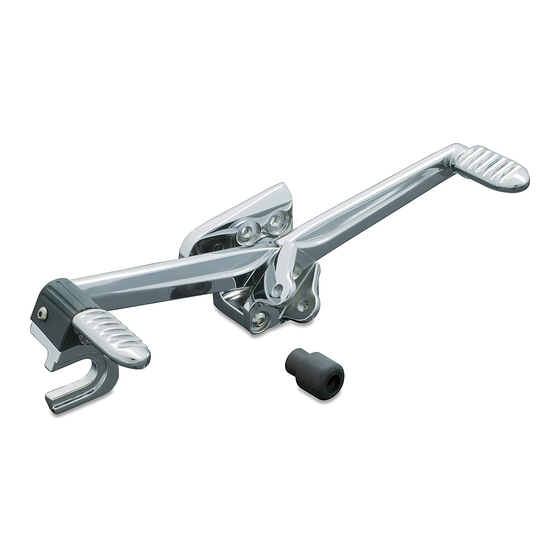
H E E L - T O E S H I F T E R
F ITS: '01- UP GL1800
PART #
INCLUDED
604039
1
904039
1
1
1
4
1
304039
1
THANK YOU FOR CHOOSING KURYAKYN!
PROCEDURE
STEP 1 Remove the rubber sleeve from the stock shift peg by inserting a long shank- small
tip screwdriver between the shift peg and the rubber. Work the screwdriver around the
peg prying outward slightly until the rubber sleeve can be slid off the peg. Applying a small
amount of liquid soap will help ease removal.
STEP 2 Using a 6mm hex socket driver, remove the two socket head screws that hold the
OEM shift side peg mount to the frame and remove the mount and peg as a unit (PIC.1).
Set the OEM hardware aside, it will be reused.
STEP 3 Install the shift fork bushings to the shift peg using the supplied #6 x 1/2" pan
head sheet metal screws. For clarity in PIC.2, we show the bushing installed with the screws
visible from the top, however, for appearance we recommend the screws be positioned on
the bottom.
STEP 4 To avoid scratching the upper surface of the
heel-toe shift lever, place a couple layers of sturdy tape
on the lever before proceeding (PIC.3). Electrical or
heavy masking tape are easiest to remove.
STEP 5 Verify the heel and toe shift pegs are securely
tightened.
-cont.-
PIC.3
4039-12GL-1005
Heel-Toe Shifter Assembly
Hardware Kit Including:
Lower Shift Fork Bushing
Upper Shift Fork Bushing
#6 x 1/2" Pan Head Sheet Metal Screw
Rubber Plug
Installation Instructions
I N S TA L L AT I O N
4 0 3 9
PIC.1
PIC.2
CUSTOMER SERVICE
877.370.3604 (toll free)
INSTALLATION QUESTIONS
techsupport@kuryakyn.com
or call 715.247.2983
LIMITED WARRANTY
Küryakyn warrants that any Küryakyn products sold
hereunder, shall be free of defects in materials and
workmanship for a period of one (1) year from the
date of purchase by the consumer excepting the
following provisions:
•
Küryakyn shall have no obligation in the event
the customer is unable to provide a receipt showing
the date the customer purchased the product(s).
•
The product must be properly installed,
maintained and operated under normal conditions.
•
Küryakyn makes no warranty, expressed or
implied, with respect to any gold plated products.
•
Küryakyn shall not be liable for any consequential
and incidental damages, including labor and
paint, resulting from failure of a Küryakyn product,
failure to deliver, delay in delivery, delivery in noncon-
forming condition, or for any breech of contract or
duty between Küryakyn and a customer.
•
Küryakyn products are often intended for use
in specific applications. Küryakyn makes no
warranty if a Küryakyn product is used in
applications other than intended.
•
Küryakyn electrical products are warranted for one
(1) year from the date of purchase by the consumer.
Components of Küryakyn products containing L.E.D.s
will be warranted for defects in materials and
workmanship for 3 years from the date of purchase.
•
Küryakyn makes no warranty of any kind in regard
to other manufacturer's products distributed by
Küryakyn. Küryakyn will pass on all warranties made
by the manufacturer and where possible, will expe-
dite the claim on behalf of the customer,
but ultimately, responsibility for disposition of the
warranty claim lies with the manufacturer.
ABOUT OUR CATALOG
You'll find all our innovations for H-D, GL and
Metric Cruisers in our annual catalogs. Order online
today–select the "CATALOGS" icon. Each Küryakyn™
product comes with a Proof-of-Purchase good for a
complimentary catalog. Details in packaging.
Be sure to ask your local dealer about other
Küryakyn products, the motorcycle parts and ac-
cessories designed for riders by riders.
©2005 Küryakyn USA
All Rights reserved.
™
Advertisement

Subscribe to Our Youtube Channel
Related Manuals for Kuryakyn 4039


Summary of Contents for Kuryakyn 4039
- Page 1 • Küryakyn shall have no obligation in the event the customer is unable to provide a receipt showing THANK YOU FOR CHOOSING KURYAKYN! the date the customer purchased the product(s). • The product must be properly installed, PROCEDURE maintained and operated under normal conditions.
- Page 2 STEP 6 Pivot the shift lever back and forth in order to insert the OEM fasteners through the mounting holes in the heel-toe shifter bracket. Put a dab of medium strength thread locker on each screw. STEP 7 Slide the “U” shaped section of the toe shift arm around the shift fork bushing, maneuver the bracket into position, and fasten the assembly to the frame.
Need help?
Do you have a question about the 4039 and is the answer not in the manual?
Questions and answers