
Related Manuals for Flexicon FF20


Summary of Contents for Flexicon FF20
- Page 1 INSTRUCTION HANDBOOK FF20 FF20 (example; exact model may vary) This instruction handbook is for the daily users of the equipment. FF20 IH EN 74-215-051 v1.02.doc Version: 1.02 Page 1 of 21...
-
Page 2: Table Of Contents
Essential training before daily use ................... 4 References ..........................4 Dismantling and disposal ......................4 General information ......................... 5 Unpacking and inspection ....................... 5 Receiving and storing the FF20....................5 Mounting of inlet and outlet trays ..................... 5 3.3.1 Side infeed ..........................5 3.3.2 Front infeed .......................... -
Page 3: Introduction
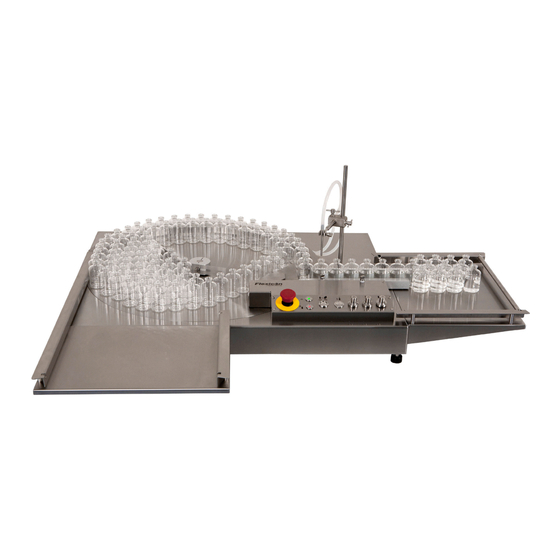
Filling is performed automatically when a bottle is present below the filling nozzle. After filling, the bottle is pushed towards the outlet tray. FF20 is delivered without an external filler. In order to perform fillings, a filler must be connected. (See further information in section 3.5) 2.2 Abbreviations in this manual... -
Page 4: Caution And Employee Safety
It is not to be used in explosion hazardous environment. • Always remember that the FF20 must be earthed through the power supply plug. 2.5 Essential training before daily use Read the section with Daily Use, thoroughly before using the machine. -
Page 5: General Information
Before unpacking or storing of the FF20 it should be checked if the crate is damaged. In case of long-term storage of the FF20 before installation, the machine must be stored in the crate, and placed in a dry room. The crate is not water resistant. - Page 6 • Mount the screws as shown in the red circles and tighten them loosely. • Adjust the the tray so it is flush with the top surface of the FF20. • Tighten the screws. 3.3.2.2 Mounting the long railing for side infeed.
- Page 7 • Mount the screws as shown in the red circles and tighten them loosely. • Adjust the the tray so it is flush with the top surface of the FF20. • Tighten the screws. 3.3.2.4 Mounting the long railing for side infeed.
-
Page 8: Mounting Of Filling Stand
Position tray as shown on page 5. • Mount the screws as shown in the red circles and tighten them loosely. • Adjust the the tray so it is flush with the top surface of the FF20. • Tighten the screws. Mounting of filling stand If the filling stand has been removed during shipping it is mounted as shown on the picture. -
Page 9: Technical Specifications
INSTRUCTION HANDBOOK FF20 3.5 Technical specifications 3.5.1 Dimensions with front infeed FF20 IH EN 74-215-051 v1.02.doc Version: 1.02 Page 9 of 21... -
Page 10: Dimensions With Side Infeed
INSTRUCTION HANDBOOK FF20 3.5.2 Dimensions with side infeed FF20 IH EN 74-215-051 v1.02.doc Version: 1.02 Page 10 of 21... -
Page 11: Services
AISI304 stainless steel Anodised aluminium 3.5.8 Optional fillers and capping machines FF20 must be connected to a peristaltic filler in order to perform indexing of bottles. Optional WMF fillers when filling are: PF6 or PF22 Peristaltic filler MC12 with PD12 or PD22 peristaltic filler 520 Di peristaltic filler FF20 IH EN 74-215-051 v1.02.doc... -
Page 12: Installation
INSTRUCTION HANDBOOK FF20 4 Installation 4.1 Connections FF20 must be placed on a stable and horizontal bedplate. The mains cable (1) is connected to a single-phase power supply with earth. The filler is connected to (2) See section 3.5.8 A UP20 can be connected to (3). -
Page 13: Control Panel
Regulates the speed of the ejector. Faster: Turn counter clockwise Ejector Speed Slower: Turn clockwise. If the speed is too high, narrow bottles may fall over in the sluice. FF20 IH EN 74-215-051 v1.02.doc Version: 1.02 Page 13 of 21... -
Page 14: Daily Use
Place a bottle in each end of the sluice (3). • • Move the (2) out until there is about 1mm of room on each side of the bottle. • Fasten the Screw (1) FF20 IH EN 74-215-051 v1.02.doc Version: 1.02 Page 14 of 21... -
Page 15: Adjusting The Inlet Sensor
Adjust the filling stand and the filling nozzle over the centre of the second bottle in the sluice. The nozzle tip should only be a few millimetres above the bottle top to minimise spill and spray. second bottle in outlet sluice FF20 IH EN 74-215-051 v1.02.doc Version: 1.02 Page 15 of 21... -
Page 16: Production Start And Stop
INSTRUCTION HANDBOOK FF20 6.3 Production START and STOP FF20 is ready for production start when: • bottles are placed on the round table/inlet tray • the sluice is set up to the exact bottle size • inlet sensor is adjusted •... -
Page 17: Malfunctioning
7 Malfunctioning 7.1 Function errors / Trouble shooting FF20 is a relatively simple machine to operate and normally errors will be due to incorrect adjustment of certain functions. In the table below, the most common faults are described and what causes it. -
Page 18: Cleaning
Remove the filling nozzle and the filling tubes 8.3 Cleaning Guidance Correct cleaning of the FF20 is carried out by washing it off with water or detergents, using a lint-free firmly wrung cloth or lint-free paper towel; subsequently the machine is wiped off with a dry cloth. -
Page 19: Maintenance & Service
The bottle disc can be aligned from underneath the FF20 via the 4 conically shaped plastic rollers. Turn of power, remove all connections to other equipment and tip the FF20 to gain access to the plastic rollers. Loosen the small bolt on the outside of the FF20 and adjust on the hexagon pole inside. -
Page 20: Alignment Of Trays
The trays can be aligned as described in the installation section, see section 3.3.2.1, 3.3.2.3 or 3.3.2.5. 9.2 Service Should service be needed, please contact W-M Flexicon or your local supplier. 9.3 Methods and frequency of inspections for safety functions Safety functions should be tested once a year: ... -
Page 21: Declaration Of Conformity
2004/108/EC On the approximation of the laws of the Member States relating to electromagnetic compatibility Signature: July 2016 Ringsted, Denmark Jørn Jeppesen, Development Manager FF20 IH EN 74-215-051 v1.02.doc Version: 1.02 Page 21 of 21...
Need help?
Do you have a question about the FF20 and is the answer not in the manual?
Questions and answers