
Related Manuals for AFL FOCIS Flex


Summary of Contents for AFL FOCIS Flex
- Page 1 Test & Inspection FOCIS Flex Fiber Optic Connector Inspection System Quick Reference Guide www.AFLglobal.com or (800) 321-5298, (603) 528-7780...
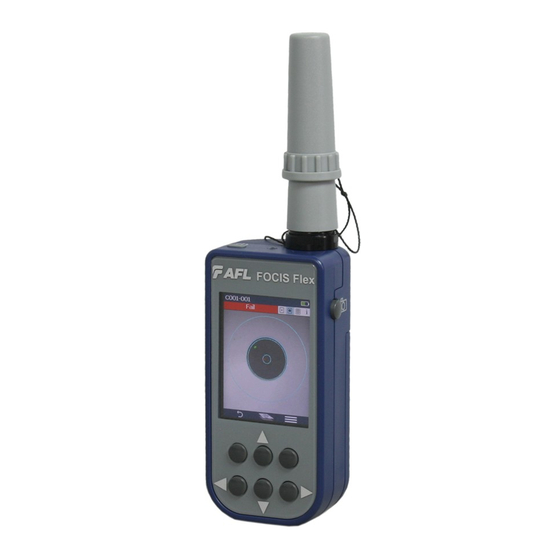
- Page 2 Controls, Display, Interfaces Controls Power key - Image Capture key - F1 soft key (typically Back function) F2 soft key (typically Select function) Navigation and Edit functional keys Display (2-inch Color LCD [320 x 240]) Screen title Battery status icon Image and information display area F1 and F2 soft key labels area Interfaces...
- Page 3 Properly Installing and Removing Adapter Tips FOCIS Flex is available with the following adapter tips UPC Connectors APC Connectors Connector Ferrule Bulkhead Ferrule Bulkhead FFLX-01-U25 FFLX-01-SC FFLX-01-A25 FFLX-01-ASC FFLX-01-U25 FFLX-01-FC FFLX-01-A25 FFLX-01-AFC FFLX-01-U125 FFLX-01-LC FFLX-01-A125 FFLX-01-ALC FFLX-01-U25 FFLX-01-ST Not applicable...
-
Page 4: Powering Up/Down
• Power-Down Press and hold the Power key until • display turns off. Configure FOCIS Flex to Auto-Off From the Main Menu > Settings, • select Display & Power Save option. Select desired power save option: • 2 min, 5 min, 10 min, Never. - Page 5 Live Image Mode FOCIS Flex powers-up in the Live Image mode. Pressing and holding the Help soft key • displays help tips about FOCIS Flex keys usage. Note: pressing the Left arrow key toggles between connector types: – Single (single fiber connector, UPC or APC) –...
- Page 6 Capture Key Operation In the Live Image mode, press the Capture key to perform the following: • – Auto Focus image (if the Auto Focus option is enabled) – Capture the displayed image and enter the Captured Image mode – Analyze image (if the Pass/Fail option is enabled) –...
-
Page 7: Pass/Fail Settings
Pass/Fail Settings Pass/Fail menu is accessed from the Live Image mode > Main Menu > Settings. Enable/disable Auto Analysis Highlight Auto Analysis • Use Select key to enable/disable Pass/Fail analysis. • Change Rule: Highlight Change Rule • Press Select or Right arrow key to display a list of the available Rules •... - Page 8 Captured Image Mode Features Description Screen Title: displays File Name (e.g. COO1-003) if saved image is shown or Captured @ hh:mm:ss if unsaved image is shown. Pass/Fail Indication: shown only if Pass/Fail option is enabled in Settings. Display Tabs: select the desired view using the Left/Right ◄ arrow keys. End-face Image: displays end-face image with Pass/Fail overlay (if enabled).
- Page 9 Captured Image - Pass/Fail Results Table Description Screen Title: displays File Name (e.g. COO1-003) if saved image is shown or Captured @ hh:mm:ss if unsaved image is shown. Pass/Fail Indication: shown only if Pass/Fail option is enabled in Settings. Display Tabs with the Pass/Fail display tab selected. Analysis Rule applied to determine Pass/Fail.
- Page 10 Saving Captured Images To save results to the current folder While in the Captured Image mode, press the Menu soft • key to display the Save/Send screen. Highlight Save and press Select soft key to save image • and results to the current folder. To edit file name While in the Save/Send screen, using Up/Down keys,...
- Page 11 Configuring Image Pairing Image Pairing functionality allows user to capture and save two images for each fiber. Available Pairing Modes and Pairing Types Pairing Mode Pairing Type None None – Image pairing disabled Cleaning Before – image before connector cleaned After –...
- Page 12 Configuring Auto-Save and Auto-Send From the Main Menu, select Settings > Capture > Auto Focus to enable or disable the auto-focus option as needed. • Highlight and Select Auto-Send. Use to disable auto-send, enable on 1st Capture key, or enable on 2nd Capture key. Highlight and Select Auto-Save.
- Page 13 – After pairing, set FlexTester Visibility to Off From the Main Menu > Settings > Capture, configure • FOCIS Flex to auto-send captured images on 1st or 2nd Capture Key. See page 12. Press the Capture key to return to Live Image mode.
- Page 14 Pair FOCIS Flex to your smart device. • – In smart device Bluetooth Settings, make your device visible. – In FOCIS Flex: from the Main Menu, select Settings > Bluetooth Settings > Pair With New Device . Press Select. – From the displayed Device List screen, select your smart device Press Select.
- Page 15 Upload Inspection Results to a PC On FOCIS Flex Turn your FOCIS Flex unit off. • Using the supplied USB cable, connect the micro-USB port on your FOCIS Flex unit • with a USB port on your PC. Verify FOCIS Flex powers up and displays: •...
- Page 16 Drag, copy, or move some or all of the results to your PC. • When finished, disconnect USB cable and turn off FOCIS Flex (since FOCIS Flex • will remain on and return to normal operation if USB cable simply disconnected.) Install and run TRM 2.0...
Need help?
Do you have a question about the FOCIS Flex and is the answer not in the manual?
Questions and answers