Advertisement
Available languages
Available languages
Quick Links
Kinderwagen - Bedienungsanleitung
Carry Cot - Assembly Instructions
Poussette - Instructions de Montage
WICHTIG:
FÜR SPÄTEREN GEBRAUCH
AUFBEWAHREN.
SORGFÄLTIG LESEN.
IMPORTANT:
RETAIN FOR FUTURE REFERENCE.
READ CAREFULLY.
IMPORTANT:
GARDER POUR UTILISATION
ULTÉRIEURE.
LIRE ATTENTIVEMENT.
BabyGO Baby Products GmbH
Am Bahndamm 1-3
33378 Rheda-Wiedenbrück
Germany
Carry Cot
Advertisement

Subscribe to Our Youtube Channel
Related Manuals for BabyGo SPRING


Summary of Contents for BabyGo SPRING
- Page 1 Carry Cot - Assembly Instructions Poussette - Instructions de Montage WICHTIG: FÜR SPÄTEREN GEBRAUCH AUFBEWAHREN. SORGFÄLTIG LESEN. IMPORTANT: RETAIN FOR FUTURE REFERENCE. READ CAREFULLY. IMPORTANT: GARDER POUR UTILISATION ULTÉRIEURE. LIRE ATTENTIVEMENT. BabyGO Baby Products GmbH Am Bahndamm 1-3 33378 Rheda-Wiedenbrück Germany...
- Page 2 Carry Cot Kinderwagen Stroller Bedienungsanleitung Carry Cot Stroller Assembly Instructions Poussette Stroller Instructions de Montage...
- Page 3 Carry Cot Kinderwagen - Stroller Bedienungsanleitung Kinderwagen - Stroller Bedienungsanleitung...
- Page 4 Carry Cot BEDIENUNGSANLEITUNG Liebe Eltern: Wir bedanken uns für den Kauf dieses Kinderwagen-Systems. Lesen Sie diese Anleitung bitte aufmerksam, bevor Sie den Kinderwagen verwenden.
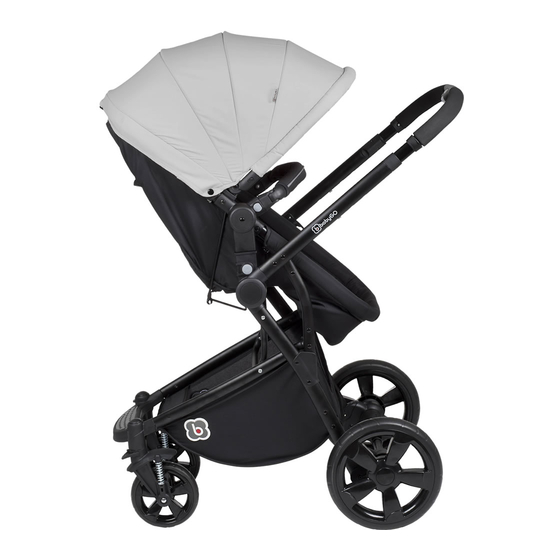
- Page 5 Carry Cot Das Chassis aufklappen und zusammenbauen: 1. Lösen Sie den Haken. 2. Klappen Sie das Chassis auf, bis es mit einem „Klick“ einrastet. 3. Bringen Sie die hintere Bremse am Chassis an.
- Page 6 Carry Cot 4. Setzen Sie die Vorderräder in die Vorderradaufnahmen ein. 5. Setzen Sie das Sitzteil auf das Chassis, bis es mit einem „Klick“ einrastet. Um den Sitz zu entfernen, heben Sie ihn an, indem Sie die linke / rechte Taste drücken.
- Page 7 Carry Cot Funktionen: 1. Abnehmen des Vorderrads: Drücken Sie den Entriegelungsknopf und das Vorderrad fällt nach unten. 2. Vorderradfeststellung: Hebel nach oben – Vorderrad ist blockiert; Hebel nach unten – Vorderrad kann sich drehen. 3. Abnehmen des Hinterrads: Drücken Sie den Entriegelungsknopf und ziehen Sie das Hinterrad ab.
- Page 8 Carry Cot 4. Bremse: Treten Sie auf das Pedal, um die Bremse zu aktivieren. Heben Sie das Pedal nach oben, um die Bremse zu lösen. 5. Sitzfunktion: Sie können den Winkel des Sitzes verstellen, indem Sie an der Lasche oben am Sitz ziehen. 6.
- Page 9 Carry Cot 7. Setzen Sie den vorderen Stoßfänger in die Stoßfängeraufnahme ein: Abnehmen des Stoßfängersers: Drücken Sie auf den Knopf und ziehen Sie den Stoßfänger ab. Setzen Sie den Stoßdämpfer ein, bis er mit einem „Klick“ einrastet. 8. Verstellen der Sonnenabdeckung: Sie können die Sonnenabdeckung verstellen, indem Sie direkt am Rohr der Abdeckung ziehen.
- Page 10 Carry Cot 9. Sicherheitsgurt: Zum Öffnen des Sicherheitsgurtes den Knopf drücken. Der Sicherheitsgurt ist komplett entfernbar. In der Liegeposition muß er immer entfernt werden. In Sitzposition muß der Sicherheitsgurt immer angebracht sein. 10. Fußablage: 1) Für die Kleinen lösen Sie die zwei gegenüberliegenden Riemen. 2) Für die Größeren verbinden Sie die zwei Riemen.
- Page 11 Carry Cot 12. Umwandlung der Wanne zur Sitzposition: -Verwenden Sie die Sitzeinheit nur, wenn sie am Chassis montiert ist. -Verwenden Sie niemals die einzelne Babyschale (ohne das Chassis), um das Kind zu tragen. Verwenden Sie für Kinder unter 6 Monaten nur den Wannen-Modus. Entfernen Sie hierfür den Sicherheitsgurt und den Handlauf.
- Page 12 Carry Cot Warnung: Lesen Sie diese Anleitung vor der Verwendung bitte aufmerksam und bewahren Sie sie für spätere Verwendung auf. Nichtbeachten dieser Anlei- tung kann die Sicherheit Ihres Kindes beeinträchtigen. • Keine weiteren Kinder, Taschen, Waren oder Accessoires mit dem Kinderwagen transportieren, wenn vom Hersteller nicht in dieser Anlei- tung empfohlen.
- Page 13 Carry Cot • Stellen Sie den Kinderwagen bitte nicht auf Parkett-, Laminat-, Linoleum- oder Teppichböden! Die Reifen können Streifen auf dem Boden verursa- chen, die sich eventuell nicht mehr entfernen lassen! • Beachten Sie bitte, dass sich die in dieser Anleitung abgebildeten Stoff- muster, Farbbilder und Zubehörteile des Kinderwagens von denen des Produkts, das Sie gekauft haben unterscheiden können.
- Page 14 Carry Cot...
-
Page 15: Assembly Instructions
Carry Cot Carry Cot - Stroller Assembly Instructions Carry Cot Assembly Instructions... - Page 16 Carry Cot AssEMbLy INsTRuCTIONs Dear Parents: Thank you for purchasing the Carry Cot System. Please read and follow all instructions before using this Carry Cot System.
- Page 17 Carry Cot Unfold the chassis and assemble: 1. Release the hook. 2. Unfold the chassis until a ‚click‘ sounded. 3. Fit the rear brake assembly onto chassis.
-
Page 18: Handle Adjustment
Carry Cot 4. Add the front wheels into the front wheel hole. 5. Put the seat unit onto the chassis until a ‚click‘ sounded. To remove the seat, lift it by pressing the left/right button respectively Handle adjustment: 1. Press the button in the centre of the handlebar, then pull it up to reach the desired position... -
Page 19: Function Operation
Carry Cot Function operation: 1. Front wheel take off: Push the release button, to drop off the front wheel. 2. Front wheel lock: switch up to lock the front wheel, down to swivel. 3. Rear wheel take off: Push the release button and pull out the rear wheel. - Page 20 Carry Cot 4. Brake: Step on the pedal to brake. Pull up the pedal to release the brake 5. Seat function: Seat angle adjustment by lifting up the flap at top of the seat. 6. The seat can be installed on the frame facing you or facing the road.
- Page 21 Carry Cot 7. Insert the front bumper into the bumper mount: Bumper remove: Push the button and pull off the bumper. Load the bumper until a “click” sounded. 8. Canopy adjustable: Adjust the canopy by pulling the canopy tube directly.
- Page 22 Carry Cot 9. Safety belt: Unlock by pushing the button. The harness is completely removable. - In mode platform, the harness MUST always be removed. - In siege mode, always use the safety harness. 10. Fußablage: 1) For the small do not connect the two strap opposite strand. 2) For the more great connect the two strands of webbing left.
-
Page 23: Folding The Chassis
Carry Cot Transformation of the carrycot to the Seat position: -Use the basket only when it is mounted on the chassis. -Never use the single carrycot (without the chassis) to carry the child. For children less than 6 months, only use the carrycot mode. Remove the harness and the handrail. - Page 24 Carry Cot Warning: Please read these instructions carefully and keep for future reference. Your child‘s safety may be affected if you do not follow these instructions. • Do not carry additional children, bags, goods or accessories in stroller except as recommended in the manufacturer‘s instructions. •...
- Page 25 Carry Cot • Before starting operation, please applies some lubricant silicone free oil Vaseline onto the hinges and joints to ensure smooth function. • Clean the seat, wipe with damp cloth and dry it in the air. • Check your stroller regularly. If any parts, like bolts, screws, fabric pieces or stitching, are found to be loose, broken or damaged, always repair or replace them.
- Page 26 Impressum: BabyGO Baby Products GmbH Tel.: 0049 5242 418 86 81 Am Bahndamm 1-3 Fax: 0049 5242 418 86 80 D-33378 Rheda-Wiedenbrück e-mail: info@babygo.eu Germany web: www.babygo.eu...
Need help?
Do you have a question about the SPRING and is the answer not in the manual?
Questions and answers