Advertisement
Quick Links
Instruction No
Instruction No
Version
Version
30737874
30737874
1.1
1.1
IMG-213551
IMG-213551
© Volvo Car Corporation
Installation instructions, accessories
Volvo Car Corporation Gothenburg, Sweden
Part. No.
Part. No.
30664677
30664677
Sirius satellite radio
Sirius satellite radio
Sirius satellite radio- 30737874 - V1.1
Page 1 / 31
5
5
5
5
Advertisement

Related Manuals for Volvo Sirius


Summary of Contents for Volvo Sirius
- Page 1 Volvo Car Corporation Gothenburg, Sweden Instruction No Instruction No Version Version Part. No. Part. No. 30737874 30737874 30664677 30664677 Sirius satellite radio Sirius satellite radio IMG-213551 IMG-213551 © Volvo Car Corporation Sirius satellite radio- 30737874 - V1.1 Page 1 / 31...
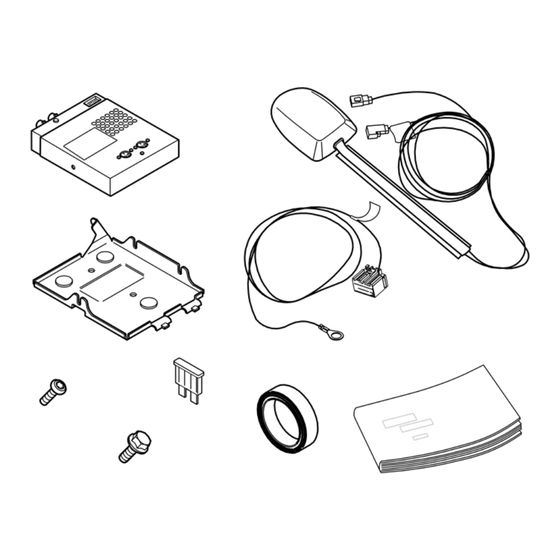
- Page 2 Installation instructions, accessories Volvo Car Corporation Gothenburg, Sweden Equipment A0000162 A0000163 A0000161 M0000232 A0000214 A0000177 M8802108 © Volvo Car Corporation Sirius satellite radio- 30737874 - V1.1 Page 2 / 31...
- Page 3 Installation instructions, accessories Volvo Car Corporation Gothenburg, Sweden IMG-212379 © Volvo Car Corporation Sirius satellite radio- 30737874 - V1.1 Page 3 / 31...
- Page 4 Installation instructions, accessories Volvo Car Corporation Gothenburg, Sweden IMG-213320 © Volvo Car Corporation Sirius satellite radio- 30737874 - V1.1 Page 4 / 31...
- Page 5 +15˚C (59˚F). Steps 3-10 and 15-18 apply to cars without RTI, CD changer, Digital Jukebox or SAT preparation in which the DIN cable must then be routed from the radio to the Sirius control module. Preparations Preparations Move the left-hand front seat to its rear position.
- Page 6 Pull the panel up until the four clips at the sides have released. M8504883 © Volvo Car Corporation Sirius satellite radio- 30737874 - V1.1 Page 6 / 31...
- Page 7 Do not damage the removed components or the surrounding panels. Unplug the connectors from the radio and dashboard environment panel, and if applicable, from the phone keypad. M8504890 Place the unit to one side. © Volvo Car Corporation Sirius satellite radio- 30737874 - V1.1 Page 7 / 31...
- Page 8 Remove the sill trim panel (2) at the left-hand front door. IMG-212378 Fold aside the carpet to provide access to the air ducts (1). D8502411 © Volvo Car Corporation Sirius satellite radio- 30737874 - V1.1 Page 8 / 31...
- Page 9 Fold the left-hand rear seat cushion (1) and backrest (2) forward. M8502805 Remove the left-hand side cushion by pulling the upper edge backwards and lifting it slightly upwards. A8500151 © Volvo Car Corporation Sirius satellite radio- 30737874 - V1.1 Page 9 / 31...
- Page 10 Volvo Car Corporation Gothenburg, Sweden Remove the sill trim panel at the left-hand rear door. M8502823 Applies to all models Remove the two floor hatches in the cargo compartment. M8502718 © Volvo Car Corporation Sirius satellite radio- 30737874 - V1.1 Page 10 / 31...
- Page 11 M8503121 Remove the left-hand folding panel in the cargo compartment. The panel will not be used again. There is a new panel in the kit. M8502710 © Volvo Car Corporation Sirius satellite radio- 30737874 - V1.1 Page 11 / 31...
- Page 12 Cable routing. Applies to cars without RTI and SAT preparation Saw off the protruding plastic flange on the left-hand floor support using a hacksaw as illustrated. M8101260 © Volvo Car Corporation Sirius satellite radio- 30737874 - V1.1 Page 12 / 31...
- Page 13 Continue to route the DIN cable under the carpet alongside the door sills to the rear seat. Fit protective caps on the lugs (1) of the cable ducts. M3702874 © Volvo Car Corporation Sirius satellite radio- 30737874 - V1.1 Page 13 / 31...
- Page 14 Wash the area around where the antenna and antenna cable shall be located using a mixture of washer fluid and water. Note! Thoroughly remove all dirt and grease. Wipe dry. IMG-212375 © Volvo Car Corporation Sirius satellite radio- 30737874 - V1.1 Page 14 / 31...
- Page 15 Remove the roof panel by pulling it down until the clips detach. M8503153 Detach the roof panel in the luggage compartment by pulling it straight down. Force is required to make the clips release. M8503005 © Volvo Car Corporation Sirius satellite radio- 30737874 - V1.1 Page 15 / 31...
- Page 16 Measure from both sides of the roof to the antenna. The measurement must be approx. 504 mm (19 27/32'). IMG-212373 © Volvo Car Corporation Sirius satellite radio- 30737874 - V1.1 Page 16 / 31...
- Page 17 Hold against the roof from the inside while the antenna is pressed in straight down with a force of 2-3 kg (4-6 lbf.) for several seconds. IMG-212380 © Volvo Car Corporation Sirius satellite radio- 30737874 - V1.1 Page 17 / 31...
- Page 18 Detach the upper edge at the window so that the panel can pass the gas strut (2). Pull inward to make the clips in the opening release (3). Lift upwards. M8503010 © Volvo Car Corporation Sirius satellite radio- 30737874 - V1.1 Page 18 / 31...
- Page 19 Clean the area to which the antenna cables shall be taped using a mixture of washer fluid and water. Note! Thoroughly remove all dirt and grease. IMG-212370 © Volvo Car Corporation Sirius satellite radio- 30737874 - V1.1 Page 19 / 31...
- Page 20 IMG-212369 Take the cloth tape from the kit. Secure the two conductors from the antenna cable neatly beside each other as illustrated. IMG-212368 © Volvo Car Corporation Sirius satellite radio- 30737874 - V1.1 Page 20 / 31...
- Page 21 The illustration shows taping using small strips of tape. Tape the cables with a long continuous strip of tape so that there is a better fit. IMG-212366 © Volvo Car Corporation Sirius satellite radio- 30737874 - V1.1 Page 21 / 31...
- Page 22 Press in the catch on the rear brown connector in the cargo compartment fuse holder. Turn up the lock arm as far as possible and pull out the connector. M3703306 © Volvo Car Corporation Sirius satellite radio- 30737874 - V1.1 Page 22 / 31...
- Page 23 Take the cable harness from the kit. Connect the blue/red (R/BL) cable with pins to position 27 in the connector. Refit the connector in the holder and reinstall the whole unit in the fuse holder. IMG-212364 © Volvo Car Corporation Sirius satellite radio- 30737874 - V1.1 Page 23 / 31...
- Page 24 Route the cable with ground connection under the cargo compartment floor and onward along existing cables to the ground terminal (1). Unscrew the ground screw and fit the Sirius control module ground lead there together with any existing ground connections.
- Page 25 IMG-212362 Installing the Sirius control module Installing the Sirius control module Take the Sirius control module and its bracket from the kit. Install the Sirius control module in the bracket with three screws (1) from the kit as illustrated. Note! Only 8 mm (5/16”) long screws may be used.
- Page 26 Installation instructions, accessories Volvo Car Corporation Gothenburg, Sweden Install the Sirius control module, first with the catches (1), and then angle it down. IMG-212360 Secure the unit with a screw from the kit through the designated hole in the bracket (1). It fits in an existing threaded hole in the car.
- Page 27 Installation instructions, accessories Volvo Car Corporation Gothenburg, Sweden Connect the antenna's two connectors (1) to the corresponding ones on the Sirius control module. They are colour coded and only fit one way. Connect the green connector for the unit's power supply (2).
- Page 28 Connect the end of the new DIN cable with small terminals to the CD changer. Route both DIN cables under the wheel housing insulation and on to the Sirius control module. Route them so that there is no risk of chafing or damage. Connect the DIN cables' connectors to the corresponding ones on the Sirius control module.
- Page 29 Route the cable in accordance with step 48 under the wheel housing insulation and on to the Sirius control module. Route it so that there is no risk of chafing or damage. Connect the end of the DIN cable with large terminals to the corresponding one on the Sirius control module.
- Page 30 Reinstall the side cushion in the rear seat. Fold back the rear seat and backrest. Turn the ignition key to position II. Reconnect the battery negative lead A8800137 © Volvo Car Corporation Sirius satellite radio- 30737874 - V1.1 Page 30 / 31...
- Page 31 Note! When installing the D-post panel it is important to reinstall it in reverse order. Fit it to the sill moulding and load anchorage. M8503011 © Volvo Car Corporation Sirius satellite radio- 30737874 - V1.1 Page 31 / 31...
Need help?
Do you have a question about the Sirius and is the answer not in the manual?
Questions and answers