
Subscribe to Our Youtube Channel
Related Manuals for Parrot DISCO FPV


Summary of Contents for Parrot DISCO FPV
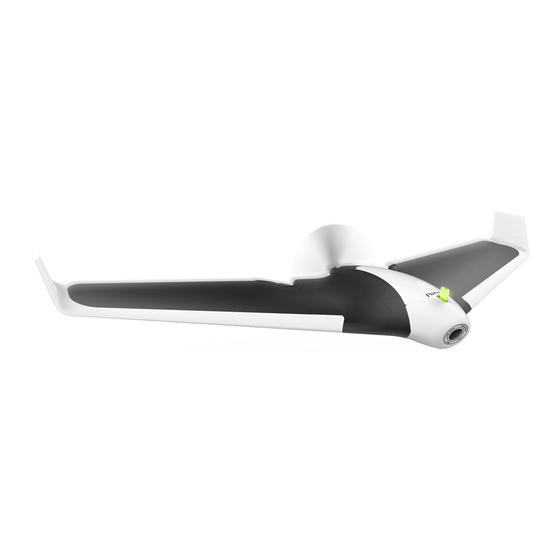
- Page 1 PRESENTATION OF THE PARROT DISCO GENERAL Flap Servomotor Propeller Flap Servomotor Cowling Fisheye camera On/Off button, warning light and pitot tube...
- Page 2 CHUCK AUTOPILOT UNIT RC remote port Battery connector Servomotor connectors Micro USB port Central engine connector...
- Page 3 PRESENTATION OF THE PARROT SKYCONTROLLER 2 Location of the smartphone and tablet holder Antenna On/Off button During flight: take a photo Settings: Confirm Take off/ Settings Land Return home During flight: start/stop video recording Settings: return...
- Page 4 Switch to direct view or immersive view Set the camera exposure USB port Change the display mode on the application Vertical orientation of the camera...
- Page 5 • Samsung Galaxy S • Nexus 5 ® Never leave Parrot Cockpitglasses in the sun when not in use. This could damage your phone. Never look directly into the sun with the Parrot Cockpitglasses if your smartphone is not inside. Permanent and irreversible eye...
-
Page 6: Before Getting Started
FreeFlight Pro application to your smartphone or tablet. CHARGING THE PARROT DISCO’S BATTERY The battery must be disconnected from the Parrot Disco. 1. Select the plug for your country and put it on the charger. 2. Connect the cable to the charger. -
Page 7: Fitting The Battery
FITTING THE BATTERY 1. Remove the Parrot Disco’s cowling. 2. Place the battery in the slot provided for this purpose. 3. Plug the battery into the Parrot Disco. 4. Close the Parrot Disco’s cowling. - Page 8 ATTACHING THE WINGS Attach the wings to either side of the Parrot Disco. Make sure the wings are properly secured in the servomotors. To remove the wings, pull on them. Do not move the servomotors with your hand to avoid damaging them.
-
Page 9: Pre-Flight Checks
Do not fly the Parrot Disco at night. Do not fly the Parrot Disco over an urban area or in certain places in the public domain (for example: train stations, airports, etc.). - Page 10 PILOTING CONFIGURATIONS There are three piloting configurations. Familiarise yourself with no. 1 and no. 2 before using no. 3. Parrot Skycontroller 2 Parrot Skycontroller 2 alone and smartphone Parrot Skycontroller 2 and Parrot Cockpitglasses...
- Page 11 2. Press the Parrot Disco’s On/Off button. > The button flashes red and green once the GPS is connected. 3. Press the Parrot Skycontroller 2’s On/Off button to turn it on. 4. Wait until the warning light is a steady green.
- Page 12 CONNECTING YOUR PARROT SKYCONTROLLER 2 TO YOUR SMARTPHONE 1. Screw the smartphone holder onto the Parrot Skycontroller 2. You can rotate the holder to fit your smartphone’s dimensions. To do this, press on it and rotate it to the right.
- Page 13 3. Open the drawer. 4. Pass your smartphone’s USB cable through the opening in the drawer. 5. Plug one end of your smartphone’s USB cable into the Parrot Skycontroller 2 and the other end into your smartphone. > The FreeFlight Pro application will launch automatically on your...
- Page 14 0.0 m/s 0.000... 0.000... 8. Close the drawer and slide it into the Parrot Cockpitglasses. 9. Adjust the strap of the Parrot Cockpitglasses on your head. Note: Use the Parrot Skycontroller 2 to edit the FreeFlight Pro application’s settings when you are wearing Parrot Cockpitglasses.
-
Page 15: Taking Off
You can take off. 4. Gently toss the Parrot Disco upward. > The Parrot Disco takes off. It goes up to 50 metres in altitude and then makes 60-metre diameter circles. Now you can fly it. Note: To stop the Parrot Disco’s engine, press the button again on your Parrot Skycontroller 2. - Page 16 PILOTING MODES AUTOPILOT This mode allows you to securely fly the Parrot Disco. During flight, the Parrot Disco maintains its speed and maintains its altitude. LEFT CONTROL RIGHT CONTROL Accelerate Go down Slow down Go up Right orbital standby mode...
-
Page 17: Manual Mode
MANUAL MODE You can use an RC remote (not included) to fly the Parrot Disco. Manual mode offers no piloting assistance for the Parrot Disco. Configure the channels of your RC remote for the Parrot Disco. To do this, refer to the manual for your RC remote. -
Page 18: Control Screen
CONTROL SCREEN Return Home Take a photo Video recording Previous screen Parameters FPV mode 00:00 mode 5848.6 45 % 95 % Parrot Disco’s Speed battery level Altitude GPS signal Parrot Skycontroller 2’s battery level Distance from your smartphone... -
Page 19: Fpv Mode
Parrot Disco without any other information. RETURN HOME To make the Parrot Disco return to its starting point, press the button on the Parrot Skycontroller 2 or on the FreeFlight Pro application. > The Parrot Disco sets its altitude to 50 meters, comes back towards its starting position and makes 60-meter diameter circles above this position. -
Page 20: Linear Landing
1. Position the Parrot Disco facing upwind. 2. Press the button on the Parrot Skycontroller 2. > The Parrot Disco descends in a straight line and then straightens and lands softly. Note: During the descent of the Parrot Disco, you can over-correct: go up, go down, turn left and turn right. - Page 21 CIRCULAR LANDING During circular landing, the Parrot Disco makes sure, by itself, that it 10 m lands facing upwind so as to limit its landing speed. 1. Make sure you have an area of at least 80 meters in diameter to 50 m land the Parrot Disco.
-
Page 22: Photos And Videos
TAKING PHOTOS On your Parrot Skycontroller 2, press the button to take a photo. The internal memory of the Parrot Disco has a capacity of 32 GB. The maximum number of stored photos depends on the format selected. For good quality photos, make sure the Parrot Disco is in photo mode. -
Page 23: Creating A Flight Plan
1. Make sure your flight plan is created and loaded. 2. Turn on your Parrot Disco. 3. Wait until the Parrot Disco’s warning light turns green. This means that the GPS is connected. 4. Connect your smartphone to the Parrot Disco and start the FreeFlight Pro application. -
Page 24: On Your Computer
If the connection is not restored after 5 minutes, the Parrot Disco performs a circular landing. TURNING OFF THE PARROT DISCO To turn off the Parrot Disco, press and hold down the On/Off button. > The red light flashes, and then the Parrot Disco turns off. RETRIEVING YOUR PHOTOS... - Page 25 4. Copy the photo and video recordings onto your computer. ON YOUR SMARTPHONE To retrieve photos and/or videos from the FreeFlight Pro application: 1. Turn on your Parrot Disco and connect it via Wi-Fi to your smart- phone. 2. On your smartphone, launch the FreeFlight Pro application and go to Menu >...
-
Page 26: Warning Light Indications
3. Copy this file to the root of your micro USB flash drive. 4. Turn on the Parrot Disco. 5. Connect the micro USB flash drive to one of the Parrot Disco’s ports. > The Parrot Disco automatically restarts and the warning light flashes yellow. -
Page 27: Spare Parts
SPARE PARTS You can buy spare parts for the Parrot Disco from our online store : www.parrot.com. For more information on the assembly of spare parts, see the video tutorials on our support page. TECHNICAL SPECIFICATIONS SENSORS • Ultrasound • Altimeter •... - Page 28 • Linux & Open Source SDK for development BATTERY CHARGER • Input: 100-240V, 50h-60Hz, 1.2A • Output: Max 12.6Vdc, 3.5A • Maximum altitude: 2000m above sea level • Operating range: 0°C-40°C PARROT DISCO • Operating range: 0°C-40°C • Max current: 15A • Rated voltage: 11.1V...
-
Page 29: General Information
Keep the Parrot Disco away from high voltage power lines, buildings or any other potentially hazardous areas. Do not use this device near liquids. Do not place the Parrot Disco on water or on a wet surface as this could cause irreparable damage. - Page 30 Do not use Parrot Cockpitglasses when you are in a vehicle in motion, such as a car, bus or train, as this may increase the side effects.
-
Page 31: Warranty
Please separate your device from other types of waste to recycle it responsibly. This will help to foster the sustainable re-use of material resources. We invite you to contact your retailer or inquire at your local town hall to find out where and how the Parrot Skycontroller 2/Parrot Disco/Parrot Cockpitglasses can be recycled. - Page 32 This transmitter must not be co-located or operating in conjunction with any other antenna or trans- mitter. TRADEMARKS Parrot Disco, Parrot Skycontroller, Parrot Cockpitglasses, Parrot C.H.U.C.K as well as their respective logos are trademarks of Parrot Drones SAS. Parrot and the Parrot logos are trademarks of Parrot S.A.
Need help?
Do you have a question about the DISCO FPV and is the answer not in the manual?
Questions and answers