Advertisement
Quick Links
Model/Equipment Type:
M-DWS01DB/M-DWM01DB/M-DWL01DB
/elecom11
ENGLISH
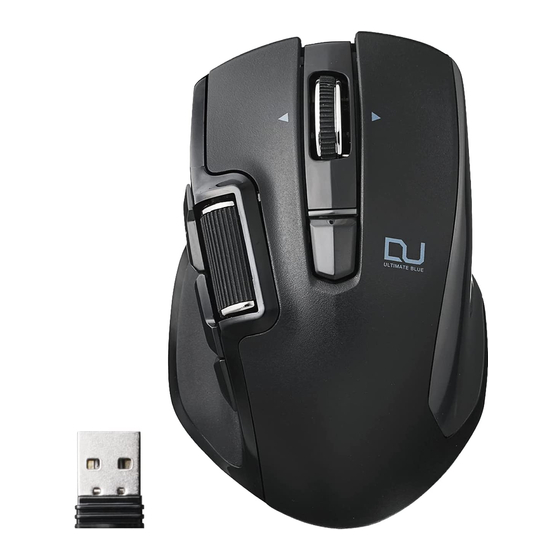
Part names
Trackball unit
Receiver unit
1 Left button
3
10
2
8
17
17
2 Right button
1
9
11
3 Tilt wheel (With accelerated
12
scrolling function)
7
By entering the accelerated scrolling
mode, you can scroll fast in one smooth
motion.
By tilting the tilt wheel, you can scroll to
the left or right.
4 4-button
Functions can be assigned to this
button.
The "Go back" function of Web
5
16
browser is assigned by default.
14
4
13
5 5-button
6
15
Functions can be assigned to this
button.
The "Go forward" function of Web
browser is assigned by default.
1
Inserting battery
M-DWM01DBBK
M-DWS01DBBK/M-DWL01DBBK
The orientation for battery may vary depending on the
model you purchased. Insert the battery in the correct
direction.
Remove the battery cover.
Insert the battery as instructed on the battery
removal sheet.
Place the battery removal sheet underneath the
battery.
Do not use batteries of different types or use a
mixture of old batteries and new batteries. Doing
so can cause battery leak leading to malfunctions.
Insert with the correct battery plus and minus
orientation.
Attach the battery cover.
2
Turning power on
Slide the power switch at the bottom to the ON position.
The LED lamp is lit red for a fixed period of time.
* When remaining battery is low, the LED blinks red for a fixed time.
Power-saving mode
When the mouse is left untouched for a fixed period of time with the
power on, it automatically shifts to power-saving mode. The mouse is
released from the power-saving mode when it is touched.
* Mouse operation may be unstable for a few seconds after returning from
the power-saving mode.
3
Connecting to PC
Start the PC.
Wait until it becomes ready to operate.
Insert the USB connector of this product into the USB
port of the PC.
You can use any USB ports.
Ensure the correct orientation and plug-in location of the
connector.
If it felt hard to insert, do not force it and check the shape and
orientation of the connector. Forcibly inserting the connector
may damage the connector, and there is a risk of injury.
Do not directly touch the terminal area of the USB connector.
The driver will be automatically installed, and you will then be able to use the mouse.
For Windows
With the special driver installed, the function assignments to all buttons except the change scrolling mode button, and
the forward/backward or the left/righ scroll buttons, or configuration for macros and the detailed DPI specific to the X/Y
axis are possible.
Install the special driver referring to "4. Installing special driver". For details on how to configure the special driver, see
"Configuration guide" on our website.
For Macintosh
You can assign functions to the buttons and forward/backward scroll with the Elecom Mouse Assistant installed.
Download and install the Elecom Mouse Assistant from our website.
http://www.elecom.co.jp/global/download/utility/mouse_ assistant/
Specifications
Count number
50 - 3000 counts (can be configured by unit of 50)
Storage temperature/
Level 1 (default value: 500 counts)
humidity
Level 2 (default value: 1000 counts)
Supported batteries
Level 3 (default value: 2000 counts)
Level 4 (default value: 3000 counts)
Interface
USB
Sensor method
Ultimate Blue sensor
Buttons
6
Operational time
Wheel
2
Radio frequency
2.4 GHz band
Radio wave method
GFSK
Radio wave range
Non-magnetic materials (such as wooden desks):
approximately 10 m
Magnetic materials (such as iron desks): approximately 3 m
* These values were obtained in ELECOM's test
environment and are not guaranteed.
Mouse dimensions
M-DWS01DB Series Approximately 63 × 97 × 41 mm
(W × D × H)
M-DWM01DB Series Approximately 71 × 109 × 40 mm
M-DWL01DB Series Approximately 81 × 126 × 45 mm
Receiver unit
Approximately 16 × 8 × 21 mm
Dimensions (W × D × H)
Operational
5°C to 40°C/up to 90%RH (without condensation)
temperature/humidity
设备型号
:
M-DWS01DB/M-DWM01DB/M-DWL01DB
/elecom11
中文・简体
各部位名称
轨迹球单元
接收机单元
1 左键
3
2 右键
10
8
17
17
2
1
3 纵横滚轮 (配备加速滚动功能)
9
11
开启加速滚动模式后, 鼠标在单次平滑
12
7
移动中可以更快速地进行滚动。
通过拨动纵横滚轮 , 您可以向左或向右
滚动。
4 4-按键
可以为此按键分配多种功能。
默认情况下, 分配为 Web 浏览器的
" 返回 " 功能。
5 5-按键
可以为此按键分配多种功能。
5
默认情况下, 分配为 Web 浏览器的
16
14
13
4
" 前进 " 功能。
6
15
插入电池
1
电池的方向可能因您购买的型号而异。按正确的方向
M-DWM01DBBK
M-DWS01DBBK/M-DWL01DBBK
插入电池。
拆下电池盖。
结合电池取出片的记载,插进电池。
将电池取出片放在电池下面。
不要使用不同类型的电池,或将新旧电池混合
使用。这样做会导致电池泄漏,引发故障。
按照正负极的方向正确的插入电池。
装回电池盖。
打开电源
2
将电源开关滑到ON的位置。
LED 灯有段时间会亮红光。
* 当剩余电池电量较低时,LED 灯有段时间会闪烁红光。
关于鼠标的省电模式
打开电源后,如鼠标在一段时间内没有使用,它将自动切换到省电模
式。再次触摸鼠标将解除节电模式。
* 从省电模式恢复后的 2-3 秒期间,鼠标操作有时不稳定。
连接到计算机
3
启动计算机。
等待,直至其可以使用。
将本产品的 USB 连接器插入计算机的 USB 端口。
您可以使用任何一个 USB 端口。
请仔细确认接头的方向和插入部位。
如果难以插入, 请勿大力推挤接头,并检查连接器的形状和
方向。强制插入连接器可能造成损坏,并有导致受伤的风
险。
请不要触摸USB连接器的端子部。
驱动程序将自动安装,自此即可使用鼠标。
Windows操作系统
安装特殊驱动程序后, 即可给按键分配功能, 但 "更改滚动模式" 按键以及前进 / 后退或向左 / 向右滚动按键除外。 也可
进行鼠标宏的配置以及为 X/Y 轴设定详细的 DPI 参数。
特殊驱动程序的安装请参阅 "4 安装特殊驱动程序 "。 有关如何配置特殊驱动程序的详细信息 , 请参阅我司官网上的
" 配置指南 "。
Macintosh操作系统
安装 Elecom 鼠标助手后, 您可以给按键和前进 / 后退滚轮分配功能。
请从我司官网下载并安装 elecom 鼠标助手。
http://www.elecom.co.jp/global/download/utility/mouse_ assistant/
基本规格
计数
50-3000 计数 ( 可以 100 为单位进行配置 )
存放温度 / 湿度
1 级 ( 默认值 : 500 计数 )
适用电池
2 级 (默认值 : 1000 计数)
3 级 (默认值 : 2000 计数)
4 级 (默认值 : 3000 计数)
支持接口
USB
估计可用时间
传感器方法
终极蓝色传感器
按钮
6
滚轮
2
电波频率
2.4GHz 频段
电波方式
GFSK 方式
电波范围
非磁性材料 (例如木书桌) : 大约 10m
磁性材料 (例如铁书桌) : 大约 3m
* 这是在本公司环境下的测试值,并非保证值。
鼠标本体外观尺寸
M-DWS01DB 系列 约 63 x 97 x 41 mm
(宽 × 深 × 高)
M-DWM01DB 系列 约 71 x 109 x 40 mm
M-DWL01DB 系列 约 81 x 126 x 45 mm
接收器外形尺寸
约 16 × 8 × 21 mm
(宽 × 深 × 高)
工作温度 / 湿度
5° C 至 40° C/ 相对湿度高达 90%(不过无结露)
Manual
8 LED light
6 6-button
The button mode is indicated by the color of light.
Functions can be assigned to
Profile 1: Red
Profile 4: Pink
this button.
The Selecting button mode
Profile 2: Green
MA mode: Light blue
function is assigned by default.
Profile 3: Blue
You can select a mode by
If you change the count number by pressing the
Change pointer speed button, the current
pressing the button.
pointer speed level is indicated by the number of
(Default value: Profile 1)
light blinks.
* The current button mode can
Level1 One blink in red
Level 4 Four blinks in red
be verified with the "8 LED
light".
Level 2 Two blinks in red
Level 3 Three blinks in red
7 Side wheel
9 Change scroll mode button
Can be rotated with a finger.
Changes the operation mode for the tilt
By default, the left/right scrolling
wheel described in "3 Tilt wheel". It is not
function same as the tilt wheel is
applied to the operation mode for the side
assigned.
wheel described in "7 Side wheel".
Normal scroll mode:
Scrolls exactly one row at the
time.
Accelerated scroll mode:
Scrolls fast in one smooth
motion.
4
Installing special driver
In Windows, you can assign functions to buttons or configure macros and the detailed DPI specific to the X/Y axis by downloading
and installing the special driver from our website.
In Windows, the configuration for this product can not be changed with the Elecom Mouse Assistant.
Downloading special driver
To use the special driver, access our product website and download the special driver.
http://www2.elecom.co.jp/peripheral/mouse/m-dwx01db/
Installing special driver
Before installing
Attach this product to your system.
If you have any of our or third party's mouse utilities installed in your system, uninstall them.
Login to the user account with an administrator rights.
Exiting all of the Windows
®
programs (application software) is recommended.
The below is a screen on Windows
10. Your screen might be different depending on OS, but procedures are the same.
®
Double-click the ELECOM DUAL series Mouse Driver (.exe) you have just downloaded.
The installer starts.
Click "Yes" when the User account control screen is shown.
Turn on the necessary checkboxes in "Select components to
install" and click "Install".
Installation starts.
Click "Close".
The Configuration screen is shown and your system attempts to recognize this product.
Installation of the special driver is completed when the Configure
special driver screen appears.
Now, this product is ready to use.
For details on how to configure the special driver, see "Configuration guide" on our website.
Please access the URL below.
http://www2.elecom.co.jp/peripheral/mouse/m-dwx01db/
-10°C to 60°C/up to 90%RH (without condensation)
Supported OS
Windows
®
10, Windows
Sierra (10.13)*
* The special driver is not available for Macintosh. The
M-DWS01DB Series/M-DWM01DB Series
button assignment can be configured with the Elecom
Two of: AAA alkaline battery, AAA manganese battery or
Mouse Assistant.
AAA type nickel-metal hydride rechargeable battery
(You may need to update to the latest version of each OS
M-DWL01DB Series
or install service packs.)
Two of: AA alkaline battery, AA manganese battery or AA
type nickel-metal hydride rechargeable battery
Estimate when using alkaline battery
Continuous operating time:
M-DWS01DB Series Approximately 130 hours
M-DWM01DB Series Approximately 154 hours
M-DWL01DB Series Approximately 346 hours
Continuous standby time:
M-DWS01DB Series Approximately 416 days
M-DWM01DB Series Approximately 468 days
M-DWL01DB Series Approximately 1041 days
Estimated usage time:
M-DWS01DB Series Approximately 260 days
M-DWM01DB Series Approximately 306 days
M-DWL01DB Series Approximately 684 days
(assuming the computer is used for eight hours a day and
5% of that time spent operating the mouse.)
使用说明书
8 LED灯光
6 6-按键
灯光颜色代表当前的按键模式。
可以为此按键分配多种功能。
配置文件 1:红色
配置文件 4:粉红色
默认情况下 , 分配为选择按键
模式功能。
配置文件 2:绿色
MA 模式:浅蓝色
您可以点击该按键, 进行模式
配置文件 3:蓝色
如果通过按 " 更改指针速度 " 按键更改计数 , 则
选择。
灯光闪烁次数即代表当前指针速度级别。
( 默认值 - 配置文件 1)
1级 红色闪烁一次
4 级 红色闪烁四次
* 当前按键模式可通过 "8 LED
灯光 " 进行判别。
2级 红色闪烁二次
3级 红色闪烁三次
7 侧轮
9 更改滚动模式按钮
可以用手指旋转。
更改 "3 纵横滚轮 " 的操作模式。
默认情况下 , 与纵横滚轮一样,
但它不适用于更改 "7 侧轮 " 的操作模式。
分配为左 / 右滚动功能。
正常滚动模式 :
每次只滚动 1 行
加速滚动模式 :
在单次平滑运动中滚动得更快
安装特殊驱动程序
4
在 Windows 操作系统中 , 您可以通过从我们的网站下载和安装特殊驱动程序 , 并给按键分配功能、 进行鼠标宏配以及为 X/Y 轴
设定具体的 DPI 参数。
在Windows操作系统中,无法使用Elecom鼠标助手对本产品的配置进行更改。
下载特殊驱动程序中
如需使用特殊驱动程序, 请访问我司产品网站并下载特殊驱动程序。
http://www2.elecom.co.jp/peripheral/mouse/m-dwx01db/
安装特殊驱动程序
安装前
将本产品附加到您的系统中
如果您的系统中安装了我们或第三方的鼠标工具, 请卸载它们。
使用管理员权限登录用户帐户。
建议退出所有的 Windows®程序 (应用程序软件)。
以下为 Windows®10 的截屏。您的屏幕可能会因操作系统而异 , 但安装过程是完全相同。
双击您刚刚下载的 ELECOM 双系列鼠标驱动程序 (.exe)。
安装程序启动。
显示 " 用户帐户控制 " 时 , 单击 " 是 "。
在 "选择要安装的组件" 中勾选必要的复选框, 然后单击 "安装" 。
安装开始。
单击 " 关闭 "。
随后,配置页面将出现,系统将尝试识别本产品。
出现 " 配置特殊驱动程序 " 页面时 , 即代表特殊驱动程序安装完毕。
现在,产品已经可以使用了。
有关如何配置特殊驱动程序的详细信息 , 请参阅我司官网上的 " 配置指南 "。
请访问下面的链接。
http://www2.elecom.co.jp/peripheral/mouse/m-dwx01db/
-10° C 至 60° C / 相对湿度高达 90%(不过无结露)
支持的操作系统
Windows® 10、Windows® 8.1、Windows® 7、macOS
High Sierra(10.13)*
M-DWS01DB 系列 /M-DWM01DB 系列
* 特殊驱动程序不适用于 Macintosh。您可以使用 Elecom
两个 :7 号碱性干电池、7 号锰干电池或 7 号镍氢可充电池
鼠标助手进行按键配置。
M-DWL01DB 系列
( 您可能需要更新到 OS 的最新版本或安装服务包)
两个 :5 号碱性干电池、5 号锰干电池或 5 号镍氢二次电池
在使用碱性电池时的估计值
连续工作时间 :
M-DWS01DB 系列 约 130 小时
M-DWM01DB 系列 约 154 小时
M-DWL01DB 系列 约 346 小时
连续待机时间 :
M-DWS01DB 系列 约 416 天
M-DWM01DB 系列 约 468 天
M-DWL01DB 系列 约 1041 天
估计可用时间 :
M-DWS01DB 系列 约 260 天
M-DWM01DB 系列 约 306 天
M-DWL01DB 系列 约 684 天
(假设 1 天使用计算机 8 小时, 其中 5% 的时间在操作鼠标。 )
모델명:
M-DWS01DB/M-DWM01DB/M-DWL01DB
한국어
Wireless Mouse
부품 이름
트랙볼 유닛
10 Optical sensor
3
11 Change pointer speed button
10
2
8
1
Changes the pointer speed
9
every time you press. The count
number for the Level 1 - 4 can
7
be changed with the special
driver.
By default, it is set to the Level 1.
12 Power switch
13 Receiver unit storage section
14 Battery cover
15 Battery storage compartment
16 Battery removal sheet
5
16
17 USB connector (male)
4
6
건전지 삽입
1
M-DWM01DBBK
M-DWS01DBBK/M-DWL01DBBK
전원 켜기
2
PC 접속
3
드라이버가 자동으로 설치되며, 마우스를 사용할 수 있습니다.
Windows의 경우
특수 드라이버를 설치하면 스크롤링 모드 변경 버튼, 앞/뒤 또는 왼쪽/오른쪽 스크롤 버튼, 매크로 구성 및 X/Y 축에 대한 상세
DPI 구성을 제외한 모든 버튼의 기능 할당이 가능합니다.
"4. 특수 드라이버 설치"를 참조하여 특수 드라이버를 설치하십시오. 특수 드라이버 구성 방법에 대한 자세한 설명은 본사
웹사이트의 "구성 가이드"를 참조하십시오.
Macintosh
Elecom Mouse Assistant를 설치하면 버튼과 앞/뒤 스크롤에 기능을 할당할 수 있습니다.
본사 웹사이트에서 Elecom Mouse Assistant를 다운로드하여 설치하십시오.
http://www.elecom.co.jp/global/download/utility/mouse_ assistant/
특수 드라이버 설치
카운트 수
50-3000 카운트 (50 단위로 구성할 수 있습니다 )
®
8.1, Windows
®
7, macOS High
레벨 1 ( 기본값 : 500 카운트 )
레벨 2 ( 기본값 : 1000 카운트 )
레벨 3 ( 기본값 : 2000 카운트 )
레벨 4 ( 기본값 : 3000 카운트 )
인터페이스
USB
센서 방식
Ultimate Blue 센서
버튼
6
휠
2
전파 주파수
2.4GHz 대역
전파 방식
GFSK 방식
전파 범위
비 자성 소재 ( 나무 책상 등 ): 약 10m
자성 소재 ( 철제 책상 등 ): 약 3m
※폐사 환경에서의 테스트 값이며 보증 값은 아닙니다 .
마우스 본체 외형 치수
M-DWS01DB 시리즈 약 63 × 97 × 41mm
( 폭 x 깊이 x 높이 )
M-DWM01DB 시리즈 약 71 × 109 × 40 mm
M-DWL01DB 시리즈 약 81 × 126 × 45 mm
리시버 유닛 외형
약 16 × 8 × 21 mm
치수 ( 폭 x 깊이 x 높이 )
동작 온도 / 습도
5° C ~ 40° C/ 최고 90%RH ( 결로 없이 )
型號/型式:
M-DWS01DB/M-DWM01DB/M-DWL01DB
无线鼠标
中文 ・繁體
各零件名稱
軌跡球
10 光学传感器
11 更改指针速度按钮
3
10
8
每次按下时都将更改指针速度。
2
1
9
可通过特殊驱动程序更改 1 级
至 4 级的计数。
7
默认情况下设置为 1 级。
12 电源键
13 接收单元存放区
14 电池盖
15 电池存放区
16 电池取出片
17 USB连接器(公)
5
16
4
6
插入電池
1
M-DWM01DBBK
M-DWS01DBBK/M-DWL01DBBK
開啟電源
2
與個人電腦連線
3
系統自動安裝驅動程式後,您便可以使用滑鼠。
針對 Windows 電腦
安裝特殊驅動程式後,您便可指派功能至所有按鈕 (除變更滾被模式按鈕外)、上一頁/下一頁或左/右滾動按鈕,或
巨集的設定和 X/Y 軸的特定詳細 DPI。
有關特殊驅動程式,請參閱電池取出膠片「 4.安裝特殊驅動程式」。 有關如何設定特殊驅動程式的詳情,請參閱
本公司網站上的《設定指南》。
針對 Macintosh 電腦
安裝Elecom 滑鼠助手後,您便可指派功能至按鈕和上一頁/下一頁滾輪。
請從本公司網站下載並安裝 Elecom 滑鼠助手。
http://www.elecom.co.jp/global/download/utility/mouse_ assistant/
規格
計數數字
50 - 3000 計數 (可以 50 為單位進行配置)
等級 1 (預設值:500 計數)
等級 2 (預設值:1000 計數)
等級 3 (預設值:2000 計數)
等級 4 (預設值:3000 計數)
介面
USB
感應器方法
終極藍光感應器
按鈕
6
滾輪
2
電波頻率
2.4 GHz 頻段
電波方式
GFSK 方式
電波範圍
非磁性材質 (如木質書桌):約 10 公尺
磁性材質 (如鐵書桌):約 3 公尺
* 這是在 ELECOM 測試環境中所取得的測試值,並非保證。
滑鼠尺寸
M-DWS01DB 系列 約 63 × 97 × 41 mm
(寬 × 深 × 高)
M-DWM01DB 系列 約 71 × 109 × 40 mm
M-DWL01DB 系列 約 81 × 126 × 45 mm
接收器尺寸
約 16 × 8 × 21 mm
(寬 × 深 × 高)
操作溫度/濕度
5°C 至 40°C/最高濕度為 90%相對濕度(但不可有冷凝)
/elecom11
취급설명서
리시버 유닛
6 6-버튼
1 좌 버튼
이 버튼에 기능을 할당할 수
2 우 버튼
있습니다.
17
17
3 틸트 휠 (가속 스크롤 기능 포함)
선택 버튼 모드 기능은
11
가속 스크롤 모드를 설정하면 부드러운
기본적으로 할당됩니다.
12
동작으로 한 번에 빠르게 스크롤할 수
버튼을 눌러 모드를 선택할 수
있습니다.
있습니다.
틸트 휠 기울이기로 왼쪽이나 오른쪽으로
(기본값: 프로필 1)
스크롤할 수 있습니다.
* 현재 버튼 모드를 "8 LED
램프"로 확인할 수 있습니다.
4 4-버튼
이 버튼에 기능을 할당할 수 있습니다.
7 사이드 휠
웹 브라우저의 "뒤로 가기" 기능이
손가락으로 돌릴 수 있습니다.
기본적으로 할당 됩니다.
기본적으로 틸트 휠과 같이 좌/우
스크롤 기능이 할당되어 있습니다.
5-버튼
5
이 버튼에 기능을 할당할 수 있습니다.
14
13
웹 브라우저의 "앞으로 가기" 기능이
기본적으로 할당 됩니다.
15
특수 드라이버 설치
4
Windows의 경우, 본사 웹사이트에서 특수 드라이버를 다운로드하고 설치하여 버튼에 기능을 할당하거나 매크로 및 X/Y 축에 대한 상세
DPI를 구성할 수 있습니다.
건전지 방향은 구입한 모델에 따라 다를 수 있습니다.
건전지를를 올바른 방향으로 삽입합니다.
Windows에서 본 제품의 구성은 Elecom Mouse Assistnat로 변경할 수 없습니다.
특수 드라이버 다운로드
건전지 커버를 분리합니다.
건전지 배출 시트의 지시에 따라 건전지를
특수 드라이버를 사용하려면 본사 제품 웹사이트에 접속하여 특수 드라이버를 다운로드하십시오.
삽입합니다.
http://www2.elecom.co.jp/peripheral/mouse/m-dwx01db/
건전지 아래 건전지 제거 시트를 놓습니다.
특수 드라이버 설치
설치하기 전에
유형이 다른 건전지를 함께 사용하거나 오래된
이 제품을 사용자 시스템에 연결하십시오.
건전지를 새 건전지와 함께 사용하지 마십시오.
그럴 경우 건전지 누출이 발생하여 오작동이 나타날
시스템에 본사 또는 서드파티 마우스 유틸리티가 설치되어 있다면 제거하십시오.
수 있습니다.
관리자 권한이 있는 사용자 계정으로 로그인하십시오.
올바른 건전지 양극과 음극 방향으로 삽입합니다.
모든 Windows® 프로그램 (응용 소프트웨어)을 종료하는 것이 좋습니다.
전지 커버를 원래대로 부착합니다.
다음은 Windows®10 화면입니다. 화면은 OS에 따라 다를 수도 있지만 절차는 동일합니다.
방금 다운로드한 ELECOM DUAL 시리즈 마우스 드라이버 (.exe)를 더블 클릭합니다.
설치 프로그램이 시작됩니다.
전원 스위치를 하단에서 ON 위치로 밀어올립니다.
LED 램프는 일정 시간 동안 빨간색으로 켜집니다.
사용자 계정 관리 화면이 표시되면 "예"를 클릭합니다.
* 건전지 잔량이 낮으면 LED가 일정 시간 동안 빨간색으로 깜박입니다.
"설치할 구성요소 선택"에서 필요한 체크박스를 선택하고 "설치"를
마우스의 절전 모드에 대해
클릭합니다.
전원이 켜진 상태에서 마우스를 일정 시간 동안 만지지 않으면 자동으로
설치를 시작합니다.
절전 모드로 설정됩니다. 마우스를 건드리면 절전 모드가 해제됩니다.
※절전 모드에서 벗어난 후 2~3초간은 마우스 조작이 불안정할 수
있습니다.
"닫기"를 클릭 합니다.
컴퓨터를 부팅합니다.
유닛이 작동 준비가 될 때까지 기다립니다.
이 제품의 USB 커넥터를 PC의 USB 포트에 삽입합니다.
모든 USB 포트를 사용할 수 있습니다.
커넥터 방향과 삽입 장소를 정확히 확인하십시오.
삽입하기 어렵다면 강제로 삽입하지 말고 커넥터의 모양과
방향을 확인하십시오. 커넥터를 강제로 삽입하면 커넥터가
구성화면이 표시되고 시스템이 제품 인식을 시도합니다.
손상될 수 있으며 상해 발생 위험이 있습니다.
USB 커넥터의 단자 부분을 직접 만지지 마십시오.
특수 드라이버 구성 화면이 표시되면 특수 드라이버 설치가 완료됩니다.
이제 제품을 사용할 준비가 되었습니다.
특수 드라이버 구성 방법에 대한 자세한 설명은 본사 웹사이트의 "구성 가이드"를 참조하십시오.
아래 URL에 접속하십시오.
http://www2.elecom.co.jp/peripheral/mouse/m-dwx01db/
보존 온도 / 습도
-10° C ~ 60° C/ 최고 90%RH ( 결로 없이 )
대응 전지
M-DWS01DB 시리즈 /M-DWM01DB 시리즈
두 가지 : AAA 알칼리 건전지 , AAA 망간 건전지 또는 AAA
니켈수소 충전지
M-DWL01DB 시리즈
두 가지 : AA 알칼리 건전지 , AA 망간 건전지 또는 AA
니켈수소 충전지
작동 시간
알카라인 건전지 사용 시 예상
연속 동작 시간 :
M-DWS01DB 시리즈 약 130 시간
M-DWM01DB 시리즈 약 154 시간
M-DWL01DB 시리즈 약 346 시간
연속 대기 시간 :
M-DWS01DB 시리즈 약 416 일
M-DWM01DB 시리즈 약 468 일
M-DWL01DB 시리즈 약 1041 일
예상 사용 시간 :
M-DWS01DB 시리즈 약 260 일
M-DWM01DB 시리즈 약 306 일
M-DWL01DB 시리즈 약 684 일
(1 일 8 시간 컴퓨터 조작 중 5% 를 마우스 조작에 할당한
경우 )
/elecom11
使用說明書
接受器
6 6-按鈕
1 左鍵
可指派功能至這個按鈕。
2 右鍵
17
17
依預設,已指派選擇按鈕模式
3 傾斜輪 (具有加速滾動功能)
功能至這個按鈕。
11
進入加速滾動模式後,您只要輕鬆一個
您可透過按下按鈕來選擇模
12
動作,就可以快速捲動。
式。
操作傾斜滾輪,您便可向左或向右滾
(預設值:設定檔 1)
動。
* 您可藉由 「8 LED 指示燈」 來
確認目前的按鈕模式。
4 4-按鈕
7 側輪
可指派功能至這個按鈕。
依預設,已指派網頁瀏覽器的 「上一
可以用手指轉動。
頁 」 功能至這個按鈕。
依預設,左 / 右滾動功能與傾斜
5 5-按鈕
輪的指派相同。
可指派功能至這個按鈕。
依預設,已指派網頁瀏覽器的 「下一
14
13
頁」 功能至這個按鈕。
15
安裝特殊驅動程式
4
在 Windows 電腦中,您可透過自本公司網站下載並安裝特殊驅動程式,指派功能至按鈕、設定巨集和 X/Y 軸特定的詳細
DPI。
電池的方向可能因您購買的產品型號而異。以正確的
方向將電池插入。
在 Windows 中,您無法使用 Elecom 滑鼠助手更改此產品的配置。
拆下電池蓋。
下載特殊驅動程式
按照電池取出膠片的記載,放入電池。
若要使用特殊的驅動程式,請造訪本公司的產品網站並下載特殊驅動程式。
將電池取出膠片放在電池下方。
http://www2.elecom.co.jp/peripheral/mouse/m-dwx01db/
安裝特殊驅動程式
請勿使用不同種類的電池,或混用新舊電池。
安裝前
這樣做會導致電池洩漏,進而造成故障。
將此產品加入到您的系統。
依照正確的正負極方向插入電池。
如果您的系統安裝有本公司或第三方的滑鼠公用程式,請先將其解除安裝。
登入至具有管理員權限的使用者帳戶。
重新蓋回電池蓋。
建議您退出所有的 Windows® 程式 (應用程式軟體)。
以下為 Windows®10 的螢幕截圖。視作業系統而定,您的畫面可能會有不同,但操作程序是相同的。
按兩下您剛下載的 ELECOM 雙系列滑鼠驅動程式 (.exe)。
安裝程式啟動。
將底部的電源開關滑至 ON 的位置。
系統顯示使用者帳戶控制畫面時,按一下 [是]。
LED 指示燈會亮紅燈一段時間。
* 剩餘電量變低時, LED 指示燈會閃紅燈一段時間。
在 「選擇要安裝的元件」 中打開必要的核取方塊,然後按一下 [ 安
關於滑鼠的省電模式
裝 ]。
當滑鼠在電源開啟時閒置一段時間不用,便會自動切換至省電模式。
一觸碰滑鼠後,滑鼠便會退出省電模式。
安裝開始。
* 從省電模式復原後的幾秒內,滑鼠操作可能變得不穩定。
按一下 [關閉]。
開啟電腦。
等待到電腦已準備好可供操作。
將本產品的 USB 接頭插入個人電腦的 USB 連接埠。
您可以使用任何 USB 連接埠。
請確認連接器方向與插入部位。
如果難以插入接頭,請勿強迫用力;請檢查連接器的形狀
系統會顯示設定畫面,並嘗試識別本產品。
和方向。強行插入接頭可能會損壞接頭,並有受傷的風
險。
請勿直接觸碰 USB 接頭的端子區域。
設定特殊驅動程式畫面出現時,即代表特殊驅動程式的安裝已完
成。
現在本產品已經準備好可以使用了。
有關如何設定特殊驅動程式的詳情,請參閱本公司網站上的 《設定指南》 。
請造訪以下網址。
http://www2.elecom.co.jp/peripheral/mouse/m-dwx01db/
儲存溫度/ 濕度
-10°C 至 60°C/最高濕度為 90%相對濕度(但不可有冷凝)
適用電池
M-DWS01DB 系列/M-DWM01DB 系列
兩個:AAA 鹼性電池、AAA 錳電池或 AAA 鎳氫充電電池
M-DWL01DB 系列
兩個:AA 鹼性電池、AA 錳電池或 AA 鎳氫充電電池
操作時間
使用鹼性電池時的預估值
連續操作時間:
M-DWS01DB 系列 約 130 小時
M-DWM01DB 系列 約 154 小時
M-DWL01DB 系列 約 346 小時
連續待機時間:
M-DWS01DB 系列 約 416 天
M-DWM01DB 系列 約 468 天
M-DWL01DB 系列 約 1041 天
預估使用時間:
M-DWS01DB 系列 約 260 天
M-DWM01DB 系列 約 306 天
M-DWL01DB 系列 約 684 天
(假設每天使用電腦八小時,且其中 5% 的時間在操作滑
鼠。)
무선마우스
8 LED 램프
10 광학 센서
버튼 모드는 램프의 색으로 표시 됩니다.
11 포인터 속도 변경 버튼
프로필 1: 적색 점등
프로필 4: 핑크색 점등
누를 때마다 포인터 속도를
프로필 2: 녹색 점등
MA 모드: 하늘색
변경합니다. 레벨 1-4의 카운트
프로필 3: 청색 점등
수를 특수 드라이브로 변경할 수
포인터 속도 변경 버튼을 눌러 카운트 수를
있습니다.
변경하면 현재 포인터 속도 레벨이 램프의 깜박임
기본적으로 레벨 1로 설정되어
횟수로 표시 됩니다.
있습니다.
레벨 1 적색으로 한 번 깜박임 ⬅ 레벨 4 적색으로 네 번 깜박임
12 전원 스위치
레벨 2 적색으로 두 번 깜박임
레벨 3 적색으로 세 번 깜박임
13 리시버 유닛 수납부
9 변경 스크롤 모드 버튼
14 건전지 커버
"3 틸트 휠"에 설명된 틸트 휠 작동 모드를
15 건전지 수납부
변경합니다.
16 건전지 배출 시트
"7 사이드 휠"에 설명된 사이드 휠 작동
모드에는 적용되지 않습니다.
17 USB 커넥터(수)
일반 스크롤 모드:
한 번에 한 행을 정확히
스크롤합니다.
가속 스크롤 모드:
부드러운 동작 한 번으로 빠르게
스크롤합니다.
대응 OS
Windows® 10, Windows® 8.1, Windows® 7, macOS High
Sierra (10.13)*
*
특
수
드
라
이
버
는
M
c a
n i
o t
h s
에
이
용
할
수
없
습
니
다
.
버
튼
할당은 Elecom Mouse Assistant 로 구성할 수 있습니다 .
( 각 운영 체제의 최신 버전으로 업데이트하거나 서비스 팩
설치가 필요할 수 있습니다 .)
無線滑鼠
8 LED 指示燈
10 光學式感應器
按鈕模式是由指示燈的顏色指示。
11 變更游標速度按鈕
設定檔 1:紅燈
設定檔 4:粉紅燈
每次按下時將變更游標速度。
設定檔 2:綠燈
MA 模式:淺藍燈
使用特殊的驅動程式,可變更等
設定檔 3:藍燈
級 1 - 4 的計數。
如果您使用變更游標速度按鈕來變更計數,那
依預設,其設定為等級 1。
麼目前的游標速度等級則是由指示燈閃爍的次
12 電源開關
數來表示。
等級 1 閃一次紅燈
等級 4 閃四次紅燈
13 接收器儲存區
14 電池蓋
等級 2 閃兩次紅燈
等級 3 閃三次紅燈
15 電池收納部位
9 變更滾動模式按鈕
16 電池取出膠片
變更在 「3 傾斜輪 」 中所描述的傾斜輪操作模
17 USB 接頭 (公)
式。這並不適用在 「7 側輪」 中所描述的側輪
操作模式。
一般滾動模式:
一次滾動恰好一行。
加速滾動模式:
滑動滾輪時滾動速度加快。
支援的作業系統
Windows® 10、Windows® 8.1、Windows® 7、macOS
High Sierra (10.13)*
* 特殊驅動程式無法用於 Macintosh。可以使用 Elecom 滑
鼠助手設定按鈕指派。
(您可能需要更新至每種作業系統的最新版本,或安裝服務
套件。)
Advertisement

Related Manuals for Elecom M-DWS01DB


Summary of Contents for Elecom M-DWS01DB
- Page 1 건전지를를 올바른 방향으로 삽입합니다. model you purchased. Insert the battery in the correct Windows에서 본 제품의 구성은 Elecom Mouse Assistnat로 변경할 수 없습니다. In Windows, the configuration for this product can not be changed with the Elecom Mouse Assistant. direction. 특수 드라이버 다운로드...
- Page 2 * Vui lòng lưu ý r ng chúng tôi không th nh n b t kỳ trách yang tidak terkena cairan seperti air. Hujan, percikan air, jus, In “ELECOM CO., LTD. (Japan)”, no customer support is available for enquiries about purchases or usage in/from any countries other than ketertiban umum oleh karena kegagalan produk ini.