Table of Contents
Advertisement
Quick Links
STEP ONE
STEP THREE
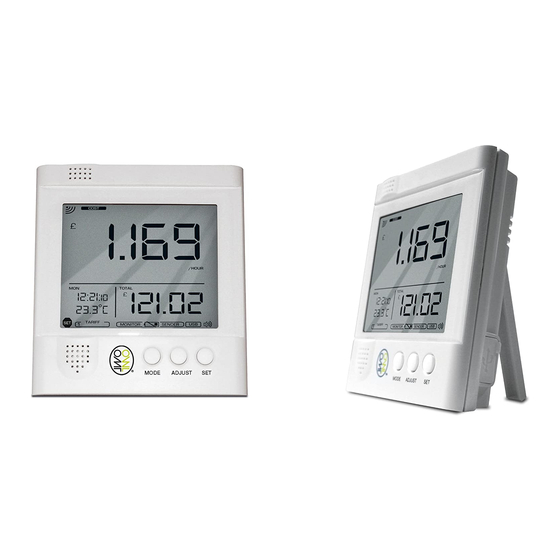
YOUR MONITOR UNIT HAS THREE SCREENS.
The main screen displays real time data. The lower left hand screen displays the time, date and
room temperature. The lower right hand screen displays accumulated and average data to date.
You will hear a short beep every time you press one of the keys, MODE, ADJUST, SET. We
recommend you use the sound to help you programme the settings accurately. If you would prefer
not to hear the beep, you can turn the sound off by pressing the MODE and ADJUST keys at the
same time. Hold for 2 seconds. When the sound indicator icon is no longer visible, the sound has
been turned off. This icon is only visible when the sound is on. To resume sound, press the two
keys again and hold for 2 seconds. You will hear a short beep and the sound indicator icon will
reappear
A.
TIME/CLOCK:
Press and hold the SET key until you hear a beep. SET icon will appear in bottom left hand corner.
CLOCK will be displayed.
Press SET again. Press ADJUST or MODE key to display the time in either 12 hour clock or 24
hour clock mode. Press SET to confirm.
HOUR will be displayed. Press the ADJUST or MODE key to set the correct hour. Press SET to confirm.
MINU will be displayed. Press the ADJUST or MODE key to set the correct minutes. Press SET to
confirm.
DATE will be displayed
B.
DATE:
Press SET to set the date. DDMM (Day/Month/Year) will be displayed. Press ADJUST or MODE if
you wish to change the date display to MMDD (Month/Day/Year). Press SET to confirm. YEAR will be
displayed. Default setting is 10 (2010). Press SET to confirm or ADJUST or MODE to change the
year. Press SET to confirm.
MNTH will be displayed. Press ADJUST or MODE to set the month. Press SET to confirm. DAY will be
displayed. Press ADJUST or MODE to set the day. Press SET to confirm.
TAR 1(tariff) will be displayed.
C.
TARIFF RATE:
Your OWL can be programmed with up to 6 different tariff settings, to allow for different tariff rates
according to time and/or days of the week. TAR 1 is your main setting. You can choose to switch
TAR 2-6 settings on or off, depending which apply to you.
Press the SET key again and £ will flash in the left hand side of the screen or the Pence will flash
on the right hand side of the screen.
Press the ADJUST or MODE key and choose to enter your rate as £ per KWh or pence per KWh.
Press SET to confirm.
The first digit of the rate will flash. Check your tariff and enter your rate. e.g. 10.50 pence using the
ADJUST or MODE key.
Press SET to confirm and enter the next digit. Continue this sequence until all four digits of your
rate have been set. Press SET to confirm.
W.DAY will be displayed in the main screen and the days of the week will flash in the lower left hand
screen. Press ADJUST or MODE to choose your tariff rate period. Choose between the five week
days, MON-FRI, or weekend only, SAT-SUN or all week, MON-SUN. Press SET to confirm.
HOUR will be displayed and the first digit of the clock in the lower left hand screen will flash. Press
ADJUST to set the start time hour for this tariff rate. Press SET to confirm.
MINS will be displayed. Press ADJUST or MODE to set the minutes. You have now set the specific
start time for this tariff. Press SET to confirm. TAR 2 and OFF will be displayed.
Enter other tariff menus by pressing the SET key or MODE to skip.
Continue this sequence for all variations in tariff rate and time, pressing SET to confirm.
ALARM will be displayed and OFF.
D.
ALARM:
Press the SET key again. OFF will flash in the window. Change this setting if you would like an
alarm to sound when the usage peaks above a specified rate.
Press ADJUST or MODE to change to ON. Press SET to confirm. The default setting is 10.00 KW.
You can choose to change this from 0 up to 999.9 KW. Press the ADJUST or MODE key to set the
maximum rate to trigger the alarm.
After each digit change, press SET to confirm. Press the SET key again.
CURR will be displayed and a £ sign.
E.
CURRENCY:
Your default setting is £pounds sterling. This will display the cost of your energy consumption in
your chosen currency.
Press the SET key again if you wish to choose a different currency. Your options are €, $, ¥, F, P, R,
& Kr. Press ADJUST or MODE to choose the correct currency. Press SET to confirm.
VOLT and 230 will be displayed.
F.
VOLTAGE:
Your default setting is 230 Volts.
Press the SET key if you wish to choose a different voltage. Your options are between 100 and 400
volts. Press ADJUST or MODE to set the correct voltage for your country. Press SET to confirm.
°C and TEMP will be displayed.
STEP FOUR
Identify live outgoing supply cable to electricity
meter (usually grey, red or brown and located on
the right as you look at the meter).
Unclip the Sensor and fit around live cable. Snap
the clip shut to fasten securely in place (see the
images to the right).
Please Note: It is normal for the sensor
to be loose fit or be able to slide along the
cable.
?
If you have a
3-phase
installation turn
over to find out how
to connect OWL
INSTALL
BATTERIES
Using a cross head or flat bladed screwdriver, remove
the Sender Unit battery compartment cover and insert
3AA batteries. Press the RESET button located on the
rear of the Transmitter
Slide the rear battery compartment off the Display Unit.
Insert 3 AA batteries in the Display Unit. You will hear a
short beep.
PROGRAMMING
LOCATE
OUTGOING
CABLE
STEP TWO
Press and hold the CHECK key on the front of the Sender until the red LED flashes.
Press and hold the SEARCH key, located on the rear of the Display Unit. Release the SEARCH
key on hearing a short beep. The radio wave icon, in the top left hand corner of the main screen,
will flash.
The two units will now connect. Please note, this may take up to 2 minutes. Once connected the
radio wave icon in the top left of the screen will be fully illuminated and a "0" will be displayed in
the main display.
You can position the Display Unit up to 30 metres away from the Sender
(subject to building construction).
The SEARCH button
The CHECK button
Starting at the top, left hand side, follow these
instructions to fully set-up and programme your monitor.
SIGNAL INDICATOR
MODE INDICATOR
TIME, DATE
AND ROOM
TEMPERATURE
SCREEN
SET ICON
(displayed when
in SET mode)
TARIFF INDICATOR
LOW BATTERY INDICATOR
(displayed when batteries in
monitor/sender are low
?
?
To find out what a
tariff rate is, simply
turn over the
If you're on a tiered
sheet for more
tarif simply turn
information
over to find out how
to set up OWL
G.
TEMPERATURE:
Your default setting is Centigrade, shown as °C. You can choose to display the temperature in
Fahrenheit, shown as °F. Press ADJUST or MODE to change. Press SET to confirm.
GHG and 0.46kg/kwh will be displayed.
H.
GREEN HOUSE GAS UNITS:
Your OWL can calculate the amount of CO2 emissions per unit of electricity used. You have four
options for displaying this data. With each option you have real time data and accumulated data.
Real time data is shown in the main screen. Accumulated data is displayed in the lower right hand
screen. You can choose to display this data in either metric or imperial values.
Press the SET key. The measures will flash in both the main screen and lower right hand screen.
Press ADJUST or MODE to choose between these options:
i)
Real time in kilogrammes (KG) & accumulated in kilogrammes (KG)
ii)
Real time in pounds (LB) & accumulated in pounds (LB)
iii)
Real time in kilogrammes (KG) & accumulated in metric tonnes (TONNE)
iv)
Real time in pounds (LB) & accumulated in imperial tons (TON)
When you have chosen press SET to confirm. The digits in the main screen will start to flash. Press
ADJUST or MODE to select the conversion value between 0.00kg to 1.90kg for metric, or 0.00LB
to 4.00LB. Press SET to confirm.
END will be displayed.
TO REVIEW YOUR SETTINGS
Press the SET button and then the MODE button to scroll through your settings. You can exit the
setup at any time by pressing and holding the SET key, and all changes made to this point will be
saved.
STEP FIVE
Fix the mounting bracket (optional) to the wall or the base-
board used to mount your meter, next to the fuse box or
nearby.
Slot the Sender into its bracket and connect the Sensor cable
to any one of the three Sender sockets, located on the base
of the unit.
The photograph on the right shows a typical installation, with the
Sender mounted on it's bracket to the right of the meter and
the Sensor fitted around the live electricity cable (usually grey,
red or brown).
CONGRATULATIONS
You have now set up and installed your
For Troubleshooting and additional information please turn
over this sheet or visit
www.theowl.com
SYNCHRONISE
UNITS
The RADIO WAVE icon
REAL TIME DATA SCREEN
NAVIGATION CONTROLS
?
?
What is the
ALARM function?
Turn over this sheet
Want to view your
to find out.
historical data?
We show you how
on the other side of
this sheet.
FIT THE
TRANSMITTER
successfully.
?
If the
synchronisation
process fails turn
over to find out
what to do
ACCUMULATED
AVERAGE
DATA SCREEN
SOUND
INDICATOR
MINI-USB
CONNECTION
USB ICON
(displayed when
connected to a pc)
?
Want to connect
to your PC?
Full instructions
are included on the
enclosed CD.
Advertisement
Table of Contents


Need help?
Do you have a question about the +USB and is the answer not in the manual?
Questions and answers