Table of Contents
Advertisement
Advertisement
Table of Contents

Subscribe to Our Youtube Channel
Related Manuals for Jonsered ST2261e


Summary of Contents for Jonsered ST2261e
- Page 1 ST2261e Default Operator's manual 2-24...
-
Page 2: Table Of Contents
Contents Introduction..............3 Maintenance..............15 Safety................5 Troubleshooting............21 Assembly................ 8 Transportation, storage and disposal......23 Operation..............11 Technical data.............. 24 797 - 001 -... -
Page 3: Introduction
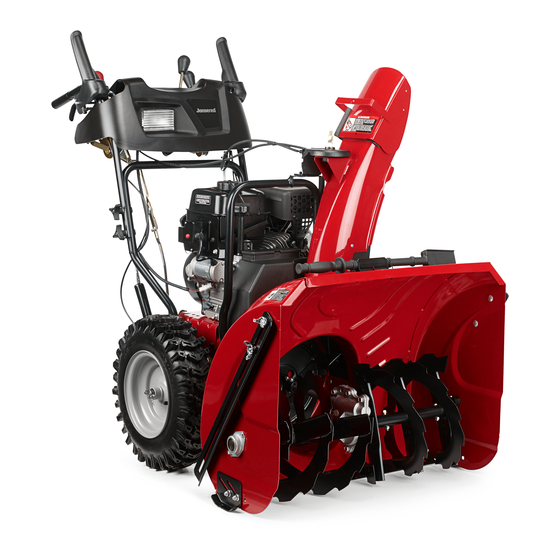
Introduction Product overview 1. Auger engagement 5. Drive engagement 2. Discharge chute control lever 6. Light 3. Drive speed control lever 7. Handle knob 4. Deflector remote control lever 8. Skid plate 797 - 001 -... - Page 4 9. Augers 10. Clean-out tool 11. Discharge chute Fuel. 12. Chute deflector 13. ON/OFF key Oil. 14. Oil drain 15. Choke 16. Primer 17. Muffler Ear protection recommended. 18. Gasoline filler cap 19. Oil fill and Dipstick 20. Electric start button 21.
-
Page 5: Safety
Beware of thrown objects- keep bystanders away. Warning, keep hands away. Traction drive off/on. Warning, keep feet away. Forward/reverse. Snow discharge off/on. Rotate left/push down/ rotate right. Steer left. Product liability As referred to in the product liability laws, we are not liable for damages that our product causes if: •... - Page 6 • Make sure that you always monitor a person, with decreased physical capacity or mental capacity, that uses the product. A responsible adult must be there CAUTION Damage to the product. at all times. • Lock the product in an area that children and Note This information makes the product easier to use.
- Page 7 • Never direct the chute deflector toward people or • Never attempt to make any adjustments while the areas where property damage can occur. Keep engine (motor) is running (except when specifically children and others away. recommended by the manufacturer). •...
-
Page 8: Assembly
flammable materials and/or fumes to prevent • Be careful with fuel. Fuel is flammable and the fumes fire. are explosive and can cause injuries or death. • Do not breathe in the fuel fumes, it can cause injury. Fuel safety Make sure that there is a sufficient airflow. -
Page 9: Loose Parts
4. Remove all package materials. 5. Remove the product from the carton and make sure no loose parts are left in the carton. Locknut ¼-20 (1) Loose parts Nylon washer (1) Knob (3) Carriage bolt 5/16-18 x 5/8 (1) Discharge chute (1) Spring (1) ON/OFF key (s) Shoulder bolt ¼-20 (1) - Page 10 2. Adjust the handle position to one of the mounting 2. Put the chute rotator head (A) on the chute bracket holes (B) and tighten the handle knobs (C) with the (B). If necessary, turn the chute assembly to align carriage bolts (D).
-
Page 11: Operation
2. Install the remote cable eyelet (E) to the chute 4. Attach the lever control knobs (N) by pressing them deflector (F) with a shoulder bolt (G), a nylon washer down on the control levers (O). (C), and tighten with a ¼-20 locknut (K). The cable eyelet will be loose on the shoulder bolt. - Page 12 2. To adjust the snow throwing distance of the chute CAUTION Do not release the grip deflector, move the deflector remote control lever (B) quickly. Move it back to the start position down to decrease the distance and up to increase slowly.
- Page 13 1. To engage the auger blades, push the auger CAUTION Do not over prime the engine. engagement (A) to the handle to engage the auger It can prevent the engine from starting. If and throw snow. the engine is over primed, wait a few minutes before trying to start and do not push the primer.
- Page 14 To use the throttle control 3. Tighten the lock nut (B). • Push the throttle control to change the amount of fuel used. Always operate the engine at full throttle. SLOW FAST To prevent freeze-up after use Note Controls and moving parts can be blocked by ice. Do not apply much force to the controls.
-
Page 15: Maintenance
• If the product does not move forward due to unforeseen circumstances, release the drive engagement immediately or pull out the ON/OFF key to OFF position. Maintenance Introduction malfunction like incorrect tolerance clearance, increased oil consumption, or misalignment of various When the product is in use, bolts can loosen and components. - Page 16 4. Put a container below the oil drain plug. • Examine the spark plug if the engine is low on power, is not easy to start or does not operate 5. Remove the oil drain plug, tip the product and drain correctly at idle speed.
- Page 17 4. Install a ¼-20 locknut (D) and tighten. 4. Install a ¼-20 locknut (D) on the shear pin and tighten. 5. Put the ON/OFF key in the ignition and connect the spark plug cable to the spark plug. 5. Put the ON/OFF key in the ignition and connect the spark plug cable to the spark plug.
- Page 18 To replace the scraper bar 2. Loosen the lock nut (A) that attach the chute rotator head (B) to the mounting bracket (C) to remove the 1. Put the scraper bar (A) in a reversed position when it discharge chute. is worn to the edge of the housing.
- Page 19 2. Remove the tensioner spring (A) attached to the 4. Put the drive belt in the grove of the engine pulley drive belt tensioner arm (B). (G) before installing on the engine shaft. 5. Install the pulley bolt (F) and attach the engine pulley on the engine.
- Page 20 To remove the auger belt 5. Install the 5/16'' bolts (A), (C) and tighten (8-12 Ft.Lbs / 11-16 Nm). 1. Remove the 5/16'' bolts (A) and the lower ¼" bolts (B) from the 2 sides of the frame assembly. Do not discard the bolts.
-
Page 21: Troubleshooting
Troubleshooting Troubleshooting Problem Possible cause Solution The product does not start The safety ignition key is not inserted. Insert the safety ignition key. The product is out of fuel. Fill the fuel tank with fresh, clean gasoline. The ON/OFF key is OFF. Move the ON/OFF key to ON posi- tion. - Page 22 Problem Possible cause Solution Decreased power The spark plug cable is not connected. Connect the cable to the spark plug. The product throws too much snow. Decrease the speed and the width of the swath. The fuel tank cap is covered with ice or snow. Remove the ice and the snow on and around the fuel tank cap.
-
Page 23: Transportation, Storage And Disposal
Problem Possible cause Solution Loss of traction drive/ The belt slips. Adjust the cable. Adjust the belt. slowing of drive speed The belt is worn. Check / replace the belt. Adjust the pulley. Loss of snow discharge or slowing of snow discharge The belt is off the pulley. -
Page 24: Technical Data
Obey the local recycling requirements and applicable • When the product is no longer in use, send it to a regulations. Jonsered dealer or discard it at a recycling location. Technical data Technical data Note All data, images and specifications are typical and for reference only, and may be changed due to product improvement without prior notice. - Page 25 797 - 001 -...
- Page 26 797 - 001 -...
- Page 27 797 - 001 -...
- Page 28 Original instructions 1140522-49 2018-07-11...
Need help?
Do you have a question about the ST2261e and is the answer not in the manual?
Questions and answers