Table of Contents
Advertisement
Advertisement
Table of Contents

Related Manuals for Medion E66413


Summary of Contents for Medion E66413
- Page 1 User Manual DAB+/PLL FM RADIO E66413...
-
Page 2: Table Of Contents
Contents Overview ..............3 Device parts .............4 About this user manual .......... 7 Proper use ............. 10 Safety instructions ..........11 Package contents ..........20 Unpacking the device and setting it up ....21 Connect mains adapter to radio ......21 Inserting batteries into the device .......21 Turning device on/off ........... -
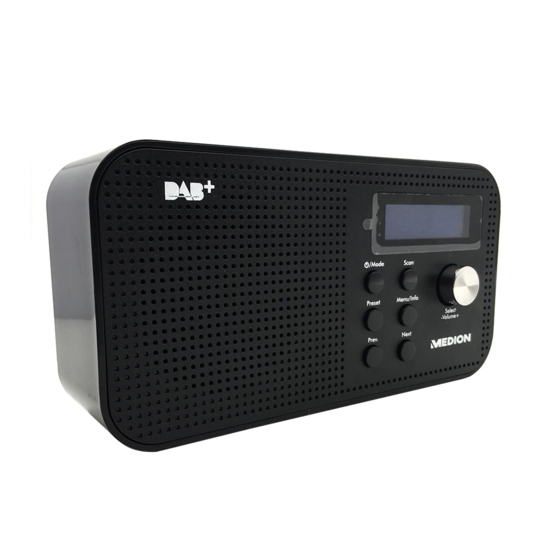
Page 4: Device Parts
Device parts P r e v. Telescopic aerial : Tuning to previous station P r e s e t Battery compartment : Storing station, (opened) tuning to stored station / M o d e Headphone socket : Switching on/off, selecting DAB/FM mode Display Connector socket for mains adapter... - Page 5 Contents Contents Overview ................ 3 Device parts ..............4 About this user manual ..........7 Symbols ................7 Proper use ..............10 Safety instructions ............11 Restricted access ............... 11 Operating safety ..............11 Handling batteries ............16 Package contents ............20 Unpacking the device and setting it up .......21 Connect mains adapter to radio ........21 Inserting batteries into the device ......21...
- Page 6 Contents Setting display lighting ........... 27 Showing information on the display ......28 Operating the radio ............. 29 DAB mode ................29 FM Mode ................32 Cleaning ............... 34 Disposal ................ 35 Technical data .............. 36 Warranty Details ............37 Repair and Refurbished Goods or Parts Notice ..38...
-
Page 7: About This User Manual
About this user manual About this user manual Read the safety instructions through carefully before starting to use this device. Heed the warnings on the device and in the user manual. Always keep the user manual handy. If you sell the device or pass it on to someone else, make sure you also include this user manual. - Page 8 About this user manual This symbol provides useful supplementary information on assembly or operation. Symbol for DC current Symbol for AC current The Australian Regulatory Compliance Mark (RCM) is a single compliance mark used by suppliers after establishing compliance with all applicable regulations, including EMC, telecoms, radiocoms, electromagnetic radiation (EMR) and electrical safety.
- Page 9 About this user manual Protection class II Electrical appliances in protection class II are electrical appliances that permanently have double and/or reinforced insulation and do not have any connection options for a protective earth. The housing of an electrical appliance in protection class II that is enclosed in insulated material can partially or fully act as the additional or reinforced insulation.
-
Page 10: Proper Use
Proper use Proper use Your DAB+/FM radio is designed to play back music and radio programmes. The device is intended for private use only and not for industrial/commercial use. Please note that we shall not be liable in cases of improper use: −... -
Page 11: Safety Instructions
Safety instructions Safety instructions Restricted access − This device is not intended for use by people (including children) with reduced physical, sensory or mental abilities or by those without experience and/or knowledge, unless they are supervised by a person responsible for their safety or they have been instructed in its use by that person. - Page 12 Safety instructions − In the case of damage to the mains adapter, the power supply cord or the device, pull the plug out of the power point immediately. − If the device is moved from a cold place to a warm place, condensation may occur in the device and mains adapter.
- Page 13 Safety instructions − The power point must be freely accessible so that you can unplug the device from the power point quickly if necessary. − Always pull the plug of the mains adapter out of the power point each time before cleaning. −...
- Page 14 Safety instructions − On no account should you make changes to the device yourself, or try to open a part of the device or repair it yourself. − No user replaceable parts inside, refer servicing to qualifi ed service personnel. −...
- Page 15 Safety instructions − Ventilation must not be reduced by covering the device with objects, e.g. magazi nes, table cloths, curtains etc. − Make sure that the device is not exposed to any direct sources of heat (e.g., heating). − Do not allow any naked fl ames (e.g., burning candles) to be placed on or near the device.
-
Page 16: Handling Batteries
Safety instructions − Do not subject the device to extreme conditions. The following are to be avoided: − High atmospheric humidity or moisture, − extremes of temperature (high or low), − direct sunlight, − naked fl ames. Electromagnetic compatibility − Keep the device at a distance of at least one metre from sources of high- frequency or magnetic interference (televisions, other loudspeakers, mobile... - Page 17 Safety instructions − Keep new and used batteries out of the reach of children. WARNING! Risk of chemical burns! If a battery is swallowed, it can result in serious internal chemical burns within 2 hours, which can result in death. −...
- Page 18 Safety instructions − Only use new batteries of the same type. Never use old and new batteries together. − Please note the polarity (+/-) when inserting the batteries. WARNING! Risk of explosion! There is a risk of explosion if batteries are replaced incorrectly! −...
- Page 19 Safety instructions − Remove leaking batteries from the device immediately. Clean the contacts before inserting a new battery. There is a risk of chemical burns from battery acid! − Always remove fl at batteries from the device. − If the device is not going to be used for long periods, remove the batteries.
-
Page 20: Package Contents
Package contents Package contents DANGER! Risk of suffocation! There is risk of suffocation as a result of swallowing or inhaling small parts or plastic wrap. − Keep plastic packaging out of the reach of children. Please check the contents to see that all components have been supplied and contact us within 14 days of purchase if any components are missing. -
Page 21: Unpacking The Device And Setting It Up
Unpacking the device and setting it up Unpacking the device and setting it up − Remove all packaging materials. − Place the device on a fi rm, level surface. Ensure that • the device and the battery will not be exposed to sources of intense heat;... -
Page 22: Turning Device On/Off
Turning device on/off − Insert four 1.5 V AA/R06 batteries (not supplied) with the negative end against the springs. Take note of the diagram in the battery compartment. − Slide the battery compartment cover back onto the device. If the device will not be used for long periods, remove the batteries. -
Page 23: Adjusting The Volume
Adjusting the volume Adjusting the volume –Volume+ − Turn the control to the left to turn the volume down. –Volume+ − Turn the control to the right to turn the volume up. Connecting ear-/headphones WARNING! Hearing damage! Excessive sound levels when using earphones and headphones can cause hearing damage and/or loss of hearing. -
Page 24: System Settings
System settings System settings System settings can be confi gured both in DAB mode and in FM mode. You can confi gure the following in System Settings: • Time (Set Time/Date, Automatic Update, Date Format) • SW version • Factory settings •... - Page 25 System settings Standby is not available with battery operation, which is why the time is not displayed. System/TIME Access the function. Select − Press the button to confi rm your input. Prev. Next SET TIME/ − Use the button to select the DATE entry.
-
Page 26: Setting Date Format
System settings Setting date format System/TIME/Set Date Format Access the function. Prev. Next DD-MM- − Use the button to choose the YYYY MM-DD-YYYY format for the date. Select − Press the button to confi rm your input. Menu − Finally, press the button to exit the menu. -
Page 27: Software Version
System settings Software version System/SW You can view the software version of the device in version Factory settings System/Factory You can return the device to factory settings in Reset When factory settings are restored, all station presets are deleted. Prev. Next Factory −... -
Page 28: Showing Information On The Display
System settings Setting display brightness On level allows you to specify the display brightness when the radio is on. Prev. Next On level − Use the button to select the menu. Select − Press the button to confi rm your input. Prev. -
Page 29: Operating The Radio
Operating the radio Operating the radio This radio allows you to receive FM stations and DAB stations. Your radio uses the DLS (Dynamic Label Segment) data service, allowing information such as artist, music titles or current traffi c bulletins to be shown on the display DAB mode The first time the device is used in DAB mode, it automatically searches for all the DAB stations it can receive, and stores them... - Page 30 Operating the radio The device will now search for all available DAB stations. Carry out a DAB station search regularly in order to keep your DAB station list current. Tuning stations manually You can carry out a manual station search and include the chosen station in the station list.
- Page 31 Operating the radio Prev. Next − Use the button to set the DRC to LOW in order to select minimum compression. − Select the option in order to deactivate the function. Deleting inactive stations Prune − Access the function in the DAB menu. −...
-
Page 32: Fm Mode
Operating the radio Select − Press the button to confi rm. The station will be played. FM Mode You can listen to VHF radio in this mode. /Mode − Press the button repeatedly until the display shows Scanning for FM stations and storing Prev. - Page 33 Operating the radio Accessing FM stations Preset Prev. − Press the button and then use the Next button to select the preset position of the station that you would like to play. Select − Press the button to confi rm. The station will be played.
-
Page 34: Cleaning
Cleaning Cleaning WARNING! Risk of electric shock/short-circuit! There is a risk of electric shock/short-circuit due to live parts. − Before cleaning, pull the plug out of the power point. − Do not use chemical solutions or cleaning products, as these may damage the surface and/or labelling of the device. -
Page 35: Disposal
Disposal Disposal PACKAGING The product has been packaged to protect it from damage in transit. The packaging is made of materials that can be recycled in an environmentally friendly manner. DEVICE Old devices may not be disposed of with normal household waste. -
Page 36: Technical Data
Technical data Technical data Mains adapter Manufacturer Dongguan Obelieve Electronic Co., Ltd., China Model OBL06-0501000 Input voltage 100-240 V~ 50/60Hz, 0.2 A max. Output voltage DC 5 V Radio Power supply DC 5 V Battery operation 4 x 1.5 V Mignon/ AA/ LR6 Power output 1 W RMS Headphone outlet... -
Page 37: Warranty Details
DAB+/PLL FM RADIO E66413 Warranty Details REGISTER YOUR PURCHASE AT www.aldi.com.au/en/about-aldi/ product-registration/ TO KEEP UP-TO-DATE WITH IMPORTANT PRODUCT INFORMATION The product is guaranteed to be free from defects in workmanship and parts for a period of 12 months from the date of purchase. Defects that occur within this warranty period, under normal use and care, will be repaired, replaced or refunded at our discretion. -
Page 38: Repair And Refurbished Goods Or Parts Notice
DAB+/PLL FM RADIO E66413 Repair and Refurbished Goods or Parts Notice REGISTER YOUR PURCHASE AT www.aldi.com.au/en/about-aldi/ product-registration/ TO KEEP UP-TO-DATE WITH IMPORTANT PRODUCT INFORMATION Unfortunately, from time to time, faulty products are manufactured which need to be returned to the Supplier for repair. - Page 39 Please telephone us on 1300 884 987 or write to us at: MEDION Australia Pty Ltd St Leonards, NSW 2065 Australia Hotline: 1300 884 987 (Opening hours: Mon - Fri 08:30AM to 06:00PM EST) Internet www.medion.com.au; E-mail Support australia@medion.com AFTER SALES SUPPORT YEAR 1300 884 987 WARRANTY...
- Page 40 Made in China DISTRIBUTED BY: ALDI STORES 1 SARGENTS ROAD MINCHINBURY NSW 2770 WWW.ALDI.COM.AU AFTER SALES SUPPORT 61172 1300 884 987 YEAR www.medion.com.au WARRANTY MODEL: MD 43747 05/2018...
Need help?
Do you have a question about the E66413 and is the answer not in the manual?
Questions and answers