
Related Manuals for PERFECTPRO SLIM-3


Summary of Contents for PERFECTPRO SLIM-3
- Page 1 INSTRUCTION MANUAL MANUEL DE L'UTILISATEUR BRUKSANVISNING GEBRUIKSAANWIJZING BEDIENUNGSANLEITUNG...
-
Page 2: Table Of Contents
CONTENTS CONTENTS CONTENT ........................1 USB/SD MODE ....................17 IMPORTANT SAFETY INSTRUCTIONS ................ 3 Insert and remove a USB memory device ........... 17 CONTROLS ......................4 Insert and remove a SD card ................. 17 POWER SUPPLY ....................6 Playing MP3 and WMA files ................18 GENERAL FUNCTIONS .................. -
Page 3: Important Safety Instructions
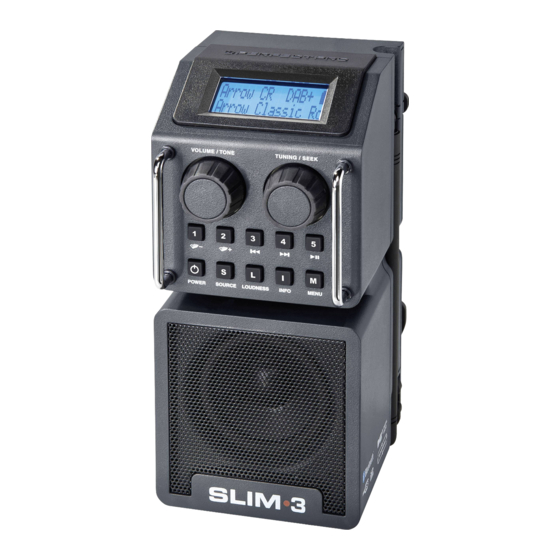
IMPORTANT SAFETY INSTRUCTIONS CONTROLS Read these instructions. Keep these instructions. Heed all warnings. Follow all instructions. Clean only with dry cloth. Do not block any ventilation openings. Install in accordance with the instructions. Do not install near any heat sources such as radiators, heat registers, stoves or other apparatus (including amplifiers) that produce heat. -
Page 4: Power Supply
This unit can be operated with either Alkaline batteries (6 x 1,5V type IEC LR6 / UM-3 / AA-size) or NiMH rechargeable batteries (6 x 1,2V PerfectPro Rechargeable UM3/AA 2300mAh). Set the Battery Select switch in the battery compartment according to the battery type to be used (ALKALINE or CHARGE NIMH ON). - Page 5 19. Batteries (even when supplied with the radio), as being consumables, do not fall continue. under the warranty conditions of the radio. 20. It is advised to use Perfectpro rechargeable batteries as the radio and its charger Note: were developed for use with these batteries.
-
Page 6: General Functions
GENERAL FUNCTIONS DAB RADIO MODE Switching on and off Operating the radio – DAB Press the ON/OFF button to turn the radio on or in standby. Carefully extend the antenna. Press the ON/OFF button to switch on the radio. Switching among DAB / FM / Bluetooth / AUX IN / USB / SD modes Select the DAB waveband by pressing the SOURCE button. -
Page 7: Display Modes - Dab
Display modes – DAB Dynamic Range Control (DRC) settings – DAB In DAB mode, the radio can display a range of information on the display. DRC can make quieter sounds easier to hear when the radio is used in a noisy environment. -
Page 8: Fm Mode
Calling up RDS information FM MODE When you are listening to a FM station with RDS system, repeatedly press the INFO button to cycle through the information. This will only function if the reception level is Operating the radio – FM seek station sufficient and clear. -
Page 9: Recalling Preset Stations
Recalling preset stations Display modes – Bluetooth Press the ON/OFF button to turn on the radio. In Bluetooth mode, the radio can display a range of information of the current playing Press the SOURCE button to select the desired waveband. music on the display. -
Page 10: Usb/Sd Mode
Playing MP3 and WMA files USB/SD MODE Press the ON/OFF button to turn on the radio. NEVER USE THE USB SOCKET OR AUX-IN SOCKET IN RAINY OR MOIST Press the SOURCE button to select the USB or SD mode. CONDITIONS TO PREVENT MOIST FROM ENTERING THE RADIO!! KEEP THE The display shows “READING”. -
Page 11: Play Mode
The radio supports a limited number of folders and files in the searching: AUX IN MODE Mode Max. no. of folders supported Max. no. of files supported A 3.5mm stereo Aux In socket is provided on the side behind the rubber cover, for Stop 999 (with folder name) 9999 (with file name) connecting an external audio device such as MP3 player or CD player (not included with Play 9999 this radio). -
Page 12: Setting The Alarm
SETTING THE ALARM LOUDNESS The alarm can only be set when the radio is in standby mode. If no buttons are The Loudness function enables to get compensation on lower and higher frequency. pressed for 10 seconds, the radio will exit the alarm setup and the setting is cancelled. The effect will be more audible when the radio is in a lower volume level (Dynamic Or press the MENU button during alarm setup, the radio will also return to standby mode Loudness). -
Page 13: Software Version
SOFTWARE VERSION BACKLIGHT The software display cannot be altered and is just for your reference. You can only view LCD backlight configuration the software version in DAB, FM or Bluetooth mode. Press the ON/OFF button to switch on the radio. Press the ON/OFF button to turn on the radio. Press the SOURCE button to select FM or DAB, or Bluetooth mode. -
Page 14: Name
NAME WARRANTY This radio is supporting users to customize the radio’s name. If the radio has been This radio has a 2 year limited warranty. renamed, the new name of the radio will be shown when the radio is turning off or entering to standby. -
Page 15: Specifications
Help protect the environment by recycling used products. Power supply Mains operation: AC 230 V ~ 50/60Hz Battery operation: 6 x AM3/AA/LR6 (Batteries of PerfectPro brand are highly recommended to be used) Power consumption (mains supply) Operation: < 24 W (MAX) Standby: < 1 W Frequency coverage FM 87.50MHz –...
Need help?
Do you have a question about the SLIM-3 and is the answer not in the manual?
Questions and answers