Advertisement
Available languages
Available languages
IMPORTANT SAFEGUARDS
When using electrical appliances, basic safety precautions should
always be followed including the following:
R
a
I
B
u
ead
ll
nstRuctIons
efoRe
• Use iron only for its intended use.
• T o protect against risk of electric shock, do not immerse the iron in water or other
liquids.
• T he Fabric Select Dial and Steam Lever should always be turned to OFF before
plugging or unplugging from outlet. Never yank cord to disconnect from outlet;
instead, grasp plug and pull to disconnect.
• D o not allow cord to touch hot surfaces. Let iron cool completely before storing.
Loop cord loosely around iron when storing.
• A lways disconnect iron from electrical outlet when filling with water, cleaning,
emptying or when not in use.
• D o not operate iron with a damaged cord or if the iron has been dropped or
damaged. To avoid the risk of electric shock, do not disassemble the iron.
Take it to an authorized service center for examination and/or repair. Incorrect
reassembly can cause a risk of electric shock when iron is used.
• C lose supervision is necessary for any appliance being used by or near children.
Do not leave iron unattended while plugged in, turned on or on an ironing board.
• B urns can occur from contact with hot metal parts, hot water or steam. Use caution
when you turn a steam iron upside down – there may be hot water in the reservoir.
• I f the iron is not operating normally, disconnect from the power supply and
have the iron serviced by an authorized service center or call Customer
Service at 1-800-667-8623.
• Y our SUNBEAM
®
iron is designed to rest on the heel rest. Do not leave the iron
unattended. Do not set the iron on an unprotected surface, even if it is on the
heel rest.
• T his is a high wattage appliance. To avoid a circuit overload, do not operate
another high wattage appliance on the same circuit.
• I f an extension cord is absolutely necessary, a 15-ampere cord should be used.
Cords rated for less amperage may overheat. Care should be taken to arrange
the extension cord so that it cannot be pulled or tripped over.
SAVE THESE INSTRUCTIONS
F
P
P
u
s
c
or
roducts
urchased in the
nited
tates and
anada
To reduce the risk of electrical shock, this appliance has a polarized plug (one
blade is wider than the other). This plug fits a polarized outlet only one way; if the
plug does not fit fully into the outlet, reverse the plug. If it still does not fit, contact a
qualified electrician. Do not attempt to defeat this safety feature.
M
y
I
(continued)
aInTaInIng
our
ron
3. Fill water reservoir with tap water to MAX line.
4. Plug in iron, set Fabric Select Dial to Linen and heat for 2 minutes.
5. Unplug iron. Holding iron over a sink in a horizontal position, press Self-Clean Button (or depending on your
model, rotate the steam control knob to the clean setting) and hold. Water will begin dripping from the steam
vents. Slowly rock iron side to side and front to back for 30 seconds. Dip nose of the iron slightly below the rear to
circulate water. Release Self-Clean Button after one minute.
6. O pen fill cap and empty remaining water. Carefully dry soleplate with a towel.
7. P lug in iron and set Fabric Select Dial to Linen and Heat for 2 minutes to dry out completely. Set Fabric Select
Dial to Off, unplug the iron, and allow to cool.
CLEANING SOLEPLATE: Clean soleplate after every 30 uses, or more frequently if starch is used or build-up starts
to accumulate. Before cleaning, ensure iron is unplugged and cool.
WARNING: Do not immerse in liquids or use abrasive cleansers or scouring pads to clean the soleplate. This will
damage the finish.
Type of Debris/Build-Up
Cleaning Recommendation
Light Dirt
Use a cotton cloth or terrycloth towel to wipe the soleplate with warm soapy water.
Hard Water Deposits
Use a cotton cloth or terrycloth towel to wipe the soleplate with a 50/50 vinegar/water
mixture.
Heavy Starch or Residue
Use Hot Iron Cleaner or Mr.Clean
®
Magic Eraser
®
cleaning pad. Refer to the
Build-up
manufacturer's directions included with these products for specific cleaner usage
instructions.
Mr. Clean
®
and Magic Eraser
®
are registered trademarks owned by the Procter &
Gamble company.
a
-c
s
(select models only)
nTI
alcIuM
ysTeM
Anti-calcium is a permanent system located inside the water reservoir to eliminate impurities.
T
p
e
, F
T
s
o
M
After Every 30 Uses:
o
rolong
FFIcIency
olloW
hese
Teps
nce a
onTh or
Ensure that your model has this feature before performing these steps.
1. T urn off iron.
2. A dd 1 teaspoon of salt to ¾ cup water and fill water reservoir with this solution.
3. L eave solution in water reservoir for 15 minutes, shake occasionally, and then empty through the fill hole or
through the "clean method".
4. F ill water reservoir again with salt water solution, shake and empty after 15 minutes.
5. Fill water reservoir with fresh water to rinse and empty.
I
T
ronIng
Ips
• Before ironing, check the garment label and follow manufacturer's instructions. If no instructions, start with a low-heat
setting and test by ironing a small area, and gradually increase heat.
• Sort garments by fabric type. Iron articles requiring a low-temperature setting and gradually work up the temperature range.
• When changing from a high-temperature setting to a lower one, allow 5 minutes for change.
• When steam ironing, use long, slow passes over the fabric to allow the steam to penetrate the fabric and the heat of
the soleplate to dry the moisture.
• Iron linen garments inside out to prevent shine. An ironing cloth or cotton fabric can be used to reduce shine.
• If the garment is lined, use a low heat setting.
• Ensure zippers are closed and flap is flat. Iron over the flap, holding the garment taut.
• Spray starch makes the job easier.
IRONING SHIRTS
• Begin with the collar and work toward the middle from the outer edges. Iron lengthwise, not in circles.
• Lay shoulder over narrow edge of the board and iron one side of the front. Then iron the shoulder, across the back
(below the collar line), the other shoulder and the remainder of the front.
GCSBCL-202-033_14EFM1.indd 1
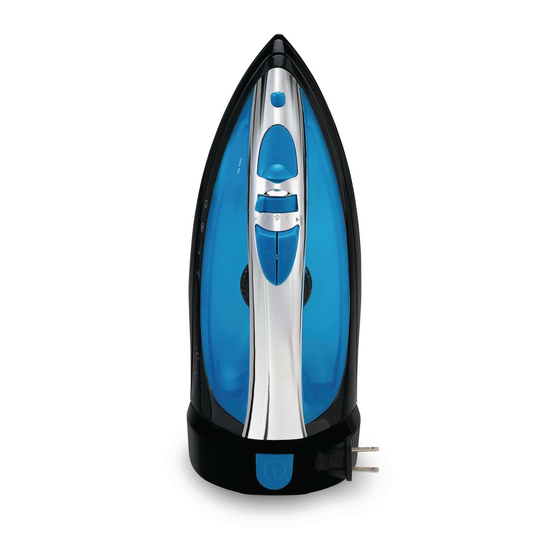
F
eaTures
1. SPRAY MIST
6
7
2. Water Fill Hole
5
3. Steam Lever/ Knob
4
4. SHOT OF STEAM
3
se
5. Reset Button/Light (select models only)
2
6. Handle
7. Retractable Cord (select models only)
1
8. Power Indicator Light (Location may vary by model)
8
9. Fabric Select Dial
9
10. S elf Clean Button
10
11. S ee-Through Water Reservoir/
Maximum Fill Line
12. Soleplate
11
13
12
13. S torage Strip Indicator (select models only)
NOTE: The model shown in the manual is for reference only. Your model may differ slightly
F
W
r
IllIng
aTer
eservoIr
1. T urn Steam Lever to
(Dry) and Fabric Select Dial to Off. Unplug.
2. Lift the Water Fill Hole Cover. Use any easy-pour measuring cup to fill the water reservoir with tap water through
the water fill hole. Do not fill water reservoir beyond maximum fill line.
WARNING: To prevent the risk of burns, be careful when filling a hot iron with water. Hot metal parts, hot water and
steam can cause injuries.
d
I
ry
ronIng
1. Ensure Steam Lever is turned to the
(Dry) setting.
2. Plug the cord into a 120-Volt AC outlet.
3. T urn Fabric Select Dial to desired setting. Allow iron to heat for 2 minutes on its heel rest on a stable, protected surface.
NOTE: While Steam Lever is turned to the
(Dry) setting, you may still use the SHOT OF STEAM
MIST
features, as long as the Fabric Select Dial is set to wool, cotton, or linen. Water reservoir must be at least ¼
TM
full of water.
s
I
TeaM
ronIng
1. Fill Water Reservoir and plug the cord into a 120-Volt AC outlet.
2. T urn the Fabric Select Dial to desired setting. Allow the iron to heat for 2 minutes on its heel rest on a stable,
protected surface. Turn steam control to desired setting.
IMPORTANT: When not ironing, always set the Steam Lever to
(Dry) and the Fabric Select Dial to OFF.
s
F
pecIal
eaTures
tM
s
M
F
pray
IsT
eaTure
is a powerful water spray mist that dampens the fabric to aid in removing
wrinkles from heavy fabrics and for setting creases.
TO USE: Press the Spray Mist
button firmly.
TM
®
s
s
F
hoT oF
TeaM
eaTure
provides an extra burst of steam for deep penetration of stubborn
wrinkles. You can use this feature while Dry or Steam ironing as long as the Fabric Select Dial is set to wool, cotton,
or linen. The water reservoir must be at least ¼ full of water.
TO USE: Place the iron on top of the wrinkle and press the Shot of Steam
burst of steam. The Shot of Steam
feature may be used continuously in approximately 3-second intervals.
®
®
v
s
s
F
erTIcal
hoT oF
TeaM
eaTure
allows iron to function vertically as a garment steamer.
I
T
(continued)
ronIng
Ips
• Iron sleeves and cuffs, working down from the underarm seams. To remove creases, shift the double layer of sleeve
fabric and iron out.
• Iron body of garment, from half of the front around the back, then second half of front. If your shirt does not open, slip
over end of ironing board and iron front and back in turn.
IRONING PANTS
• Begin with the waistband and inseam area, then pockets and cuffs.
• Pull waistband on pointy end of the board, as if you're "dressing" the ironing board. Iron upper-front part of the pants,
including the waistband.
• Place pants parallel to ironing board lengthwise so both legs are facing the same direction. Iron each leg by moving the
iron back and forth along the pant leg.
• Take cuff of the leg and bring it over towards the waistband to iron the inner part of the leg. Repeat these 2 steps for
the second leg.
t
s
RouBle
hootIng
PROBLEM
CAUSE/SOLUTION
Power indicator is blinking
• The light blinks to indicate that the iron auto-off function has
been activated
• If your iron has a reset button, press it to restart
• To stop blinking and reset, move the iron back and forth and
allow to re-heat for 2 minutes
Iron is not heating
• Ensure the iron is on and power light is illuminated
• Verify unit is plugged in
• Adjust fabric dial to the correct setting for your garments
Iron will not steam
• Ensure water tank level is at least ¼ full
• Ensure steam lever is switched on
• Press Shot of Steam button several times to prime
Iron is leaking
• Only fill with water to the MAX level
• Allow to heat for at least 2 minutes before use
• Shot of Steam has been pressed too frequently. Only use shot
of steam in 3 second intervals or less
• Shot of Steam used with incorrect fabric setting. Only use with
Wool, Cotton or Linen settings
• Empty water tank after each use and turn steam lever off
Iron leaves spots/flakes on clothing
• Empty water tank completely after each use
• Clean soleplate when cool with a wet, damp cloth
• Use self-cleaning feature once a month
• Refer to the Anti-Calcium System section (select models only)
• Ensure water cup used to fill the iron is clean
Wrinkles are not sufficiently removed
• Check that the temperature dial is set to the correct fabric
setting
• Use Shot of Steam or Spray Mist features to help remove
stubborn wrinkles
Fabrics are getting an unwanted "shine"
• Use an ironing cloth or a 100% white cotton fabric and place it
between the garment being ironed and the iron to prevent "shine"
s
pecIal
Nozzle
TM
TIP: When using vertical steam, hang clothing on a hanger for best results. Hanging curtains and drapes may also
be steamed.
TO USE:
1. H old iron vertically near, but not touching the fabric you want to steam. Pull the fabric tight.
and SPRAY MIST
Buttons
®
TM
2. P ress Shot of Steam
button in 3-second intervals as you move iron over wrinkles.
®
WARNING: To prevent burns, keep hands away from the area being steamed.
WARNING: DO NOT steam garments while wearing them; this may result in injuries.
3-W
M
ay
oTIon
(select models only)
When iron is plugged in, the Power Indicator illuminates, indicating there is power to iron.
IF YOU LEAVE IRON ON:
• H orizontally without moving it, or accidentally tip the iron over, it will automatically stop heating after 30 seconds.
The Power Indicator will blink to indicate the iron has stopped heating.
• V ertically (on its heel rest) without moving it, the iron will automatically turn off after several minutes (8 or 15
depending on model). Some models will produce a beeping sound. Power Indicator blinks to indicate the iron has
stopped heating.
IMPORTANT: The Power Indicator will continue to blink until the iron is unplugged or reset.
(use tap water)
TO RESET: Move iron back and forth and reheat for 2 minutes.
r
eTracTable
1. S elect amount of cord desired before plugging into an electrical outlet. Do not pull cord past red indicator.
2. T o retract cord, press retraction button.
3. If cord is not fully rewound, pull out and steer cord evenly on the reel. If cord is not pulled out easily, pull cord firmly.
4. Do not allow children to use retractable cord feature as cord may cause injury.
s
s
Torage
TrIp
®
Indicates when the iron is cool enough to store.
Red = Iron is too hot to store.
or SPRAY
®
Black = Iron is cool enough to store.
CAUTION:
STORAGE STRIP
indicator should only be used as a guideline. Iron should always be handled and
®
stored with care.
c
arIng For
TURNING OFF IRON: Turn Steam Lever to
WARNING: NEVER yank power cord when unplugging iron. This can damage the cord.
Empty water tank completely after each use.
s
TorIng
1. Turn off iron and allow to cool.
2. E mpty water reservoir after each use for a longer iron life.
3. I f your iron does not have a retractable cord, loosely loop the power cord around the heel rest and store the iron
on its heel rest. IMPORTANT: Wrapping the cord around the iron too tightly can damage the cord.
M
aInTaInIng
u
s
-c
F
:
Use the Self-Clean feature once a month to maintain optimal iron performance.
sIng
elF
lean
eaTure
button each time you would like an extra
®
1. Turn off iron.
2. M ove Steam Lever/Knob back and forth to remove debris and minerals from Steam Valve. This keeps water
flowing into the steam chamber.
3 Y
l
W
eaR
ImIted
aRRantY and
Sunbeam Products, Inc. doing business as Jarden Consumer Solutions or if in Canada, Sunbeam Corporation
(Canada) Limited doing business as Jarden Consumer Solutions (collectively "JCS") warrants that for a period of
three years from the date of initial retail purchase, this product will be free from defects in material and workmanship.
JCS warrants the iron's soleplate will be free from defects in material and workmanship for the life of the iron from
the date of initial retail purchase.
JCS, at its option, will repair or replace this product or any component of the product found to be defective during the
warranty period. Replacement will be made with a new or remanufactured product or component. If the product is no
longer available, replacement may be made with a similar product of equal or greater value. This is your exclusive
warranty. Do NOT attempt to repair or adjust any electrical or mechanical functions on this product. Doing so will
void this warranty.
This warranty is valid for the original retail purchaser from the date of initial retail purchase and is not transferable.
Keep the original sales receipt. Proof of purchase is required to obtain warranty performance. JCS dealers, service
centers, or retail stores selling JCS products do not have the right to alter, modify or any way change the terms and
conditions of this warranty.
This warranty does not cover normal wear of parts or damage resulting from any of the following: negligent use or
misuse of the product, commercial use, accident, use on improper voltage or current, use contrary to the operating
instructions, disassembly, repair or alteration by anyone other than JCS or an authorized JCS service center.
Further, the warranty does not cover: Acts of God, such as fire, flood, hurricanes and tornadoes. Soleplate warranty
does not cover scratches or discoloration of the soleplate finish and only applies as long as the iron generates
optimal heat.
What are the limits on JCS's Liability?
JCS shall not be liable for any incidental or consequential damages caused by the breach of any express, implied or
statutory warranty or condition.
Except to the extent prohibited by applicable law, any implied warranty or condition of merchantability or fitness for a
particular purpose is limited in duration to the duration of the above warranty.
JCS disclaims all other warranties, conditions or representations, express, implied, statutory or otherwise.
JCS shall not be liable for any damages of any kind resulting from the purchase, use or misuse of, or inability to use
the product including incidental, special, consequential or similar damages or loss of profits, or for any breach of
contract, fundamental or otherwise, or for any claim brought against purchaser by any other party.
Some provinces, states or jurisdictions do not allow the exclusion or limitation of incidental or consequential damages or
limitations on how long an implied warranty lasts, so the above limitations or exclusion may not apply to you.
This warranty gives you specific legal rights, and you may also have other rights that vary from province to province,
state to state or jurisdiction to jurisdiction.
How to Obtain Warranty Service
In the U.S.A.
If you have any question regarding this warranty or would like to obtain warranty service, please call 1- 800- 458-8407 and
a convenient service center address will be provided to you.
In Canada
If you have any question regarding this warranty or would like to obtain warranty service, please call 1-800-667-8623
and a convenient service center address will be provided to you.
In the U.S.A., this warranty is offered by Sunbeam Products, Inc. doing business as Jarden Consumer Solutions
located in Boca Raton, Florida 33431. In Canada, this warranty is offered by Sunbeam Corporation (Canada)
Limited doing business as Jarden Consumer Solutions, located at 20 B Hereford Street, Brampton, Ontario L6Y
0M1. If you have any other problem or claim in connection with this product, please write our Consumer Service
Department. PLEASE DO NOT RETURN THIS PRODUCT TO ANY OF THESE ADDRESSES OR TO THE PLACE
OF PURCHASE.
PLEASE DO NOT RETURN THIS PRODUCT TO ANY OF THESE ADDRESSES
STOP
OR TO THE PLACE OF PURCHASE.
For product questions visit us online at www.sunbeam.ca or call 1-800-667-8623.
F
(continued)
eaTures
s
a
-o
F
MarT
uTo
FF
eaTure
TM
c
(select models only)
ord
(select models only)
I
ndIcaTor
y
I
a
u
our
ron
FTer
se
(Dry) and Fabric Select Dial to Off. Unplug.
y
I
our
ron
y
I
our
ron
l
l
s
W
IfetIme
ImIted
oleplate
aRRantY
www.sunbeam.ca
Sunbeam
Irons
®
Instruction Manual
Fers Sunbeam
MD
Notice d'emploi
MODEL
GCSBCL-202-033
MODÈLE
P.N. 179520
12/5/14 2:13 PM
Advertisement
Table of Contents

Subscribe to Our Youtube Channel
Related Manuals for Sunbeam GCSBCL-202-033


Summary of Contents for Sunbeam GCSBCL-202-033
-
Page 1: Important Safeguards
PLEASE DO NOT RETURN THIS PRODUCT TO ANY OF THESE ADDRESSES STOP OR TO THE PLACE OF PURCHASE. • Begin with the collar and work toward the middle from the outer edges. Iron lengthwise, not in circles. • Lay shoulder over narrow edge of the board and iron one side of the front. Then iron the shoulder, across the back (below the collar line), the other shoulder and the remainder of the front. For product questions visit us online at www.sunbeam.ca or call 1-800-667-8623. www.sunbeam.ca P.N. 179520 GCSBCL-202-033_14EFM1.indd 1 12/5/14 2:13 PM... - Page 2 REPASSAGE DES CHEMISES ET DES CHEMISIERS NE RETOURNEZ CE PRODUIT NI À CES ADRESSES NI AU LIEU D’ACHAT. • Repassez le col en premier, des pointes vers le milieu. Repassez sur la longueur et non en rond. ARRÊT Pour toutes questions, visitez au www.sunbeam.ca ou appelez au 1 800 667-8623. • Placez l’empiècement sur la partie la plus étroite de la table à repasser; défroissez la partie du pan avant, l’épaule, l’empiècement (sous le col), l’autre épaule puis une partie de l’autre pan avant. GCSBCL-202-033_14EFM1.indd 2 12/5/14 2:13 PM...
Need help?
Do you have a question about the GCSBCL-202-033 and is the answer not in the manual?
Questions and answers
My fabric dial selection is erased. How an I mark it again
To mark the fabric dial selection again on the Sunbeam GCSBCL-202-033, plug in the iron, turn it on, and use the fabric dial to select the appropriate setting for your fabric type. There is no specific marking process mentioned beyond selecting the fabric setting using the dial.
This answer is automatically generated