dji RONIN-S Quick Start Manual
Hide thumbs
Also See for RONIN-S:
- Quick start manual ,
- User manual (61 pages) ,
- Disclaimer and safety manuallines (10 pages)
Table of Contents
Advertisement
Quick Links
Advertisement
Table of Contents

Related Manuals for dji RONIN-S


Summary of Contents for dji RONIN-S
- Page 1 RONIN - S Quick Start Guide 快速入门指南 V1.0...
- Page 2 Contents Quick Start Guide 快速入门指南 © 2018 DJI OSMO All Rights Reserved.
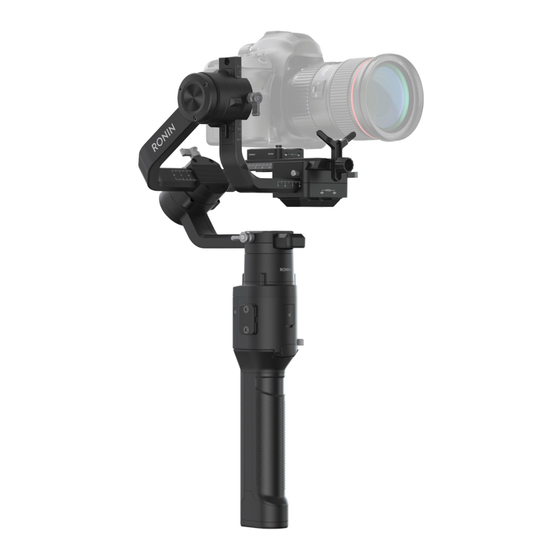
- Page 3 RONIN-S Quick Start Guide Ronin-S Overview 1. Roll Motor 10. Tilt Motor 2. Pan Motor 11. 12V Accessory Power Port 3. Profile LED Indicators 12. USB-C Port 4. Power Button 13. Trigger 5. Joystick 14. Battery Level Indicators 6. M Button 15. Grip Power Button 7. Camera Control Button 16. Focus Wheel 8. Grip 17. Camera Control Port (RSS Port) 9. Extended Grip/Tripod 18. Camera Mounting Plate © 2018 DJI OSMO All Rights Reserved.
-
Page 4: Getting Started
Charging Time: approx. 2 hours 15 minutes High Power Outlet USB Power Adapter USB-C Port 100 - 240 V Mounting the Grip Attach the gimbal to the grip by sliding it into the dovetail mount. Toggle the lever to the locked position. The Ronin-S’s power/data ports and connectors are not waterproof. Ensure to protect them from harmful dust and water during use to avoid damage. © 2018 DJI OSMO All Rights Reserved. -
Page 5: Attaching The Extended Grip
* The hot shoe module is sold separately. It is recommended to mount the camera using a hot shoe module when mounting the gimbal on a car. You can skip all the steps about the hot shoe module in this manual for handheld use. ** Mount the riser plate if needed. © 2018 DJI OSMO All Rights Reserved. - Page 6 5. Attach the optional hot shoe module to the top of the camera. Balancing 1. Balancing the Vertical Tilt a. Rotate the tilt axis so that the camera lens is pointing up. Hold the tilt axis motor to ensure the roll axis remains horizontal and check if the camera is top or bottom heavy. b. Loosen the knob on the tilt motor and adjust the camera balance until the camera stays still without tilting it up or down. c. Tighten the knob. * For the best results during setup, use the lens support whenever possible. © 2018 DJI OSMO All Rights Reserved.
- Page 7 2. Balancing Depth for the Tilt Axis a. Rotate the tilt axis so that the camera lens is pointing forward. Hold the tilt motor to check if the camera is top or bottom heavy. b. Toggle the lever to the unlocked position and loosen the hot shoe knob . Adjust the camera balance until the camera stays still when rotating the tilt axis 45° upwards or downwards. c. Toggle the lever to the locked position and tighten the hot shoe knob. 3. Balancing the Roll Axis a. Release the tilt motor to check the direction in which the motor swings. b. Loosen the roll axis knob and adjust the camera balance until the camera stays still when rotating the tilt axis 45° to the left or right. c. Tighten the knob. © 2018 DJI OSMO All Rights Reserved.
-
Page 8: Activating Ronin-S
Tighten the knob. Activating Ronin-S Make sure the camera is balanced before powering on Ronin-S. Do not turn on Ronin-S without a balanced load, as doing so may damage the gimbal motors. 1. Press the power button once to turn on the grip, and then press and hold the gimbal power button to turn on the gimbal. -
Page 9: Operation
Approx. 4.1 lb (gimbal and grip included) Dimensions Approx. 202×185×486 mm Input Power Model: RB1-2400mAh-14.4V Type: 18650 LiPo Capacity: 2400 mAh Energy: 34.56 Wh Working Current Static Current: 0.16 A Bluetooth Operating Frequency 2.4 to 2.48 GHz Bluetooth Transmitter Power 0 dBm Operating Temperature -4° to 113° F (-20° to 45° C) For more information, read the User Manual: http://www.dji.com/cn/ronin-s ※This content is subject to change without prior notice. © 2018 DJI OSMO All Rights Reserved. - Page 10 RONIN-S 快速入门指南 认识 Ronin-S 1. 横滚轴电机 10. 俯仰轴电机 2. 平移轴电机 11. 12V 电源 / 配件输出接口 3. 配置指示灯 12. USB-C 接口 4. 电源按键 13. 模式切换按键 5. 摇杆 14. 电量指示灯 6. 配置切换按键(M 按键) 15. 手柄电源按键 7. 相机控制按键 16. 跟焦轮 8. 手柄 17. 相机控制接口...
- Page 11 RONIN-S 快速入门指南 准备 A. 下载 RONIN App 和观看教学视频 请在软件商店或使用移动设备扫描二维码下载。 请在 DJI 官网观看 Ronin-S 教学视频。 https://www.dji.com/ronin-s Ronin App B. 充电 使用标配 USB 充电器和 USB-C 线给云台充电。完全充满约需时 2 小时 15 分钟。短按一次手柄 电源按键开启手柄,然后长按云台电源按键开启云台。 长按云台电源按键关闭云台。短按一次,再长按手柄电源按键以关闭手柄(手柄未连接云台,或 云台未开启超过 12 个小时,手柄将自动关闭)。 高 低 USB 充电器 USB-C 接口 交流电源...
- Page 12 RONIN-S 快速入门指南 安装手柄延长脚架(三脚架) 将标配手柄延长脚架与云台连接,旋转拧紧后展开脚架。 安装相机 安装相机之前,确保相机已做好拍摄准备,已移除镜头盖,电池以及内存卡已装好。 1. 安装选配热靴模块 *。 2. 安装垫高模块(使用一字螺丝刀或硬币安装)**。 * 热靴模块需另行购买。推荐使用车载模式时安装热靴模块,确保相机安全。手持使用时可不安装热靴模块,请跳过 本文提及的关于热靴模块的使用步骤。 ** 根据相机大小,视情况使用垫高模块。 © 2018 大疆灵眸 版权所有...
- Page 13 RONIN-S 快速入门指南 3. 安装相机底部安装板和镜头固定支架 *。 4. 将相机嵌入云台的相机安装底座,在前后达到大致平衡时锁紧侧边锁扣。 5. 调整热靴模块位置,固定热靴与相机。 平衡调节 1. 俯仰轴的垂直平衡调节 a. 翻转相机使镜头垂直朝上,一只手固定俯仰轴电机,判断相机重心偏向。 b. 拧松俯仰轴电机旋钮 ,推拉俯仰轴力臂调整相机位置 。 c. 拧紧旋钮,相机镜头垂直朝上时能稳定停留代表已调节平衡。 * 推荐使用过程中使用镜头固定支架以获得更好的效果。 © 2018 大疆灵眸 版权所有...
- Page 14 RONIN-S 快速入门指南 2. 俯仰轴的前后平衡调节 a. 使相机镜头水平朝前,一只手固定俯仰轴电机,判断相机重心偏向。 b. 打开相机安装底座锁扣 ,拧松两个热靴固定旋钮 ,调整相机位置 。 c. 锁紧锁扣 。使相机向上或向上倾斜 45°,若相机能稳定停留,表示 ,拧紧热靴固定旋钮 已调节平衡。 3. 横滚轴的平衡调节 a. 判断相机重心偏移方向。 b. 拧松横滚轴旋钮 ,推拉横滚轴力臂调整相机位置 。 c. 使相机向左或向右倾斜 45°,若相机能稳定停留,表示已调节平衡。 © 2018 大疆灵眸 版权所有...
- Page 15 RONIN-S 快速入门指南 4. 平移轴的平衡调节 a. 握住云台向前侧斜,观察相机在平移轴旋转方向。 b. 拧松平移轴旋钮 ,拉伸平移轴力臂调整相机位置 。 c. 拧紧旋钮,若云台平移轴在任意角度都能保持静止不动,表示已调节平衡。 激活 开启云台电源之前,确保相机已调节平衡。未调节平衡时开启云台电源有可能损坏电机。 1. 开启手柄电源之后,再长按云台电源按键,开启云台。 2. 开启移动设备蓝牙功能。 3. 运行 Ronin App,在设备列表中选择“Ronin-S”,按提示激活。激活过程中需连接互联网。 9 41 AM 100% 默认 R O N I N 电机参数 SmoothTrack xxx@dji.com 遥控设定 系统设置 Sign In 登录...
- Page 16 系统设置 Sign In 登录 注册 忘记密码 接云台相机控制接口): a. 半按压相机控制按键自动对焦。 b. 按压相机控制按键开始或停止录影。双击相机控制按键拍照。 5. 模式切换按键:长按进入锁定模式;双击云台回中;三击云台进入自 拍模式。 6. 跟焦轮:转动跟焦轮控制相机对焦(支持跟焦轮对焦功能的相机列表请详见 Ronin-S 用户手册)。 规格参数 约 1.50 kg ( 仅含云台 ) 重量 约 1.86 kg(含云台、手柄) 约 202×185×486 mm 尺寸 型号:RB1-2400 mAh-14.4 V 手柄内置电池 类型:18650 LiPo 容量:2400 mAh 能量:34.56 Wh...
- Page 17 DJI Support DJI 技术支持 http://www.dji.com/support RONIN is a trademark of DJI OSMO. Copyright © 2018 DJI OSMO All Rights Reserved. Printed in China. YC.BZ.SS000528.01...
Need help?
Do you have a question about the RONIN-S and is the answer not in the manual?
Questions and answers