Table of Contents
Advertisement
Quick Links
Advertisement
Table of Contents

Related Manuals for PATCHWORK BlackBox air

Summary of Contents for PATCHWORK BlackBox air
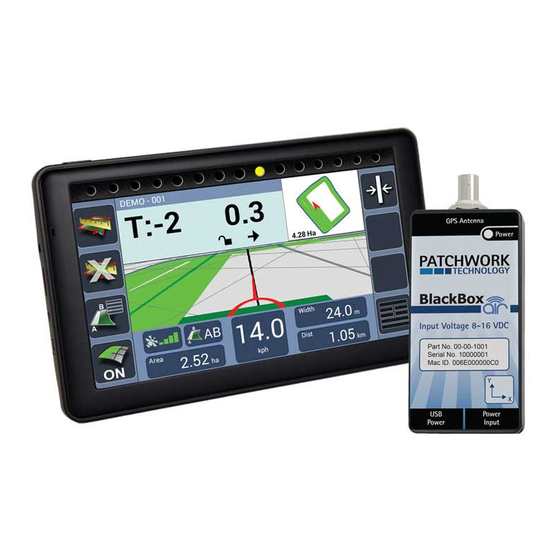
- Page 1 User Guide...
- Page 2 Display Mount to the windscreen using supplied suction mount and arm. On/Off button Touch Screen Mini USB Charge port Warranty Void if suction mount fails !! - It is advised that the suction mount is removed from the windscreen when the unit is not in operation and reattached on a day to day basis. For a more permanent fixing, a mounting kit that can be secured to the vehicle is available for an additional cost.
- Page 3 Installing the Unit GPS Receiver and Tilt unit If the tilt function is required, the unit needs to be securely mounted on a flat surface with the ‘Y’ pointing towards the direction of travel. 12v DC Plug Warning - Please disconnect the unit Plug into 3 pin socket on vehicle.
- Page 4 Setup When launching the BlackBox for the first time the ‘Setup Wizard’ will guide through the essential settings ready for guidance and area measurement. Navigation Bar Previous Next Home Information Cancel Confirm N.B. The wizard can be re-accessed via Setup > Unit Setup > Run Initial Setup Wizard. Enable Tilt Correction (If required) 1) Select Setup >...
- Page 5 Starting a Job N.B. Before starting a job it is important the correct Bluetooth device is selected and that the GPS Quality level is within the green. This ensures the best GPS performance for use with guidance and area measurement. 1) Press Start Job.
- Page 6 Guidance Screen Overview Mini Map (Toggle Start/Pause 2D mode) Boundary Close Recalibrate Boundary Guidance Line (Straight Mode Guidance Only) Options Recording Menu On/Off Information Panel Guidance Status Working Width GPS Strength Distance Travelled Coverage Area Ground speed (Toggle Speedometer /Digital)
- Page 7 Measuring Field Area 1) After starting a new job, position your vehicle at the edge of the field and press Start/ Pause Boundary. 2) Set Type to Boundary 3) Set the Offset to the distance from the antenna to the edge of the field. 4) Press Start and drive around the field until the start point is reached.
- Page 8 N.B. The green coverage recording can be turned off and on using the ‘Recording On/Off’ button if ‘On Screen’ has been set. 1) Position the vehicle in the field where the job will begin. (When using a curved line it is important to use the longer edge of the field to set a guide line).
- Page 9 Setting and Using a Guidance Line 4) If working the headland pass, 5) When turning in the headland the continue around then line up to the set next AB line will appear. AB line and use the guidance to work the inner areas of the field.
- Page 10 The following setup instructions are exclusive to Air+ software users, the Air+ software is a paid for upgrade which is available to all BlackBox Air users and includes the following features :- Pause Job | Auto Record | Headland Guidance | Headland Warning | Tracking | Boundary Printing...
- Page 11 Air+ Features Auto Record Auto record automatically turns the coverage recording OFF when 75 percent of the working width goes inside a previously recorded area and turns back ON when 25 percent of the working width is outside the recorded area. 1) On the Home screen, press Setup.
- Page 12 Headland Guidance Headland guidance uses an existing Field Boundary Map to create a guidance line based on the working width. This guidance line is to guide the user when working the headland of the field. 1) When in the job screen with the 2) The headland guidance line will Field Boundary loaded, press in the appear indicated by ‘H:’, ready to...
- Page 13 Air+ Features Headland Warning Headland warning creates a headland zone from the field boundary map at a distance specified by the user as the ‘Headland Size’. As the user approaches the edge of the zone a distance counter will countdown to zero alerting the user to stop or start the implement. 2) Press Antenna Offset, then 1) On the home screen, press Setup >...
- Page 14 5) Press Headland Warning 6) Press Headland Size and and select Enable enter the distance required. 7) Headland Distance Off / Headland 8) Press Home, Headland Distance On, these can be set to alert Warning is now setup ready to the user earlier, i.e.
- Page 15 Air+ Features Using in the Job Screen N.B. A field boundary map needs to be created for the field. The headland zone edge is displayed as a Red Line in the 2d mini map. When the user drives in and out of the headland, a countdown starts at 25m, when 0 is reached the green bar will change to white.
- Page 16 Wi-Fi to the mobile phone and uses the mobile data to send positional data to BlackBox Core PC software. Within Patchwork Core the tracking data can be displayed to show the current position of the BlackBox and where it has been.
- Page 17 Setup > Air+ Setup. code. Once connected press Home and then Start BlackBox Air. 6) Press Tracking and then Enable. 7) Press Home, the BlackBox is now sending positional data to Patchwork Core, so it can be tracked.
- Page 18 2) Fit the USB cable into a spare slot on the PC and ensure the other side is connected to the tablet. 3) With the tablet power on, navigate 4) Using your finger swipe down in to the BlackBox Air+ home screen. the top left of the screen to display the Android navigation bars.
- Page 19 Air+ Features 5) Swipe down in the top left a 6) An app called ‘Android USB Mass Storage’ will open, press Turn on USB second time to display the USB options and from the list press on Storage and press OK to the mes- USB Connected.
- Page 20 Air+ Features 9) To print the boundaries, right mouse 8) Locate the folder labelled ‘DCIM’ click on the file or select multiple files and and open it. All the boundaries that right click one of them and from the drop are printable will be stored here.
- Page 21 Bluetooth options, ensure Bluetooth is enabled, locate the device under available devices, select it and then Pair. Once repaired press home and launch BlackBox Air. No GPS Signal Obstructions are causing Ensure the antenna in its current position the antenna not to pick has a clear view of the sky.
- Page 22 Problem Cause Solution Guidance off to Left or right antenna Go to Setup > Guidance Setup > Antenna the one side offset has been set Offset, set the B to 0m. Interference due to other Mount the antenna in a different location radio equipment and retry.
- Page 23 Troubleshooting Problem Cause Solution Guidance line Using curved guidance When setting a curved line ensure that it not displaying and the line has been set is set on the longest edge in the field and correctly to short the full length of the run. In Headland Guidance Press the H: to toggle back to AB track mode ‘H:’...
- Page 24 Patchwork Technology Ltd. Oaklands, Llancayo Court, Llancayo, Usk, Monmouthshire, NP15 1HY +44 (0)1291 673366...
Need help?
Do you have a question about the BlackBox air and is the answer not in the manual?
Questions and answers