Advertisement
The design and specifications are subject to change without prior notice for
product improvement. Consult with the sales agency or manufacturer for
details.
For Further Details, please go to: www.highseer.com
16117000A09623
AIR CONDITIONER
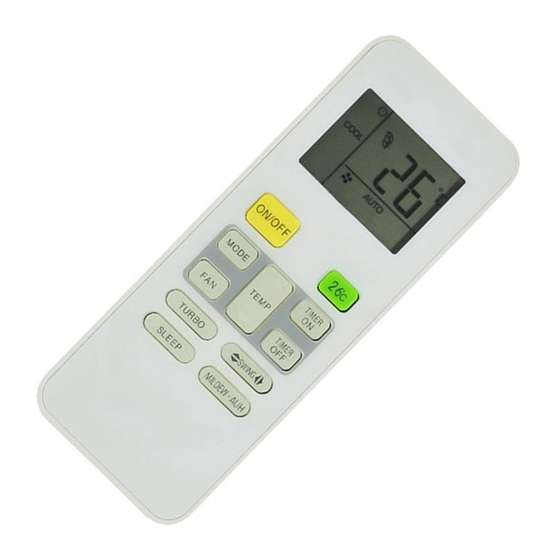
REMOTE CONTROLLER ILLUSTRATION
Thank you very much for purchasing our air conditioner.
Please read this owner's manual carefully before using
your air conditioner.
勹
_
—
Advertisement
Table of Contents

Related Manuals for Pioneer RG52F3JBGEFU1


Summary of Contents for Pioneer RG52F3JBGEFU1
- Page 1 勹 AIR CONDITIONER REMOTE CONTROLLER ILLUSTRATION The design and specifications are subject to change without prior notice for product improvement. Consult with the sales agency or manufacturer for details. For Further Details, please go to: www.highseer.com Thank you very much for purchasing our air conditioner. 16117000A09623 Please read this owner's manual carefully before using your air conditioner.
-
Page 2: Table Of Contents
[ Handling the remote controller l CONTENTS 1 1 r- 子 1 Location of the remote controller. — • Use the remote controller within a distance of 8 Handling the remote controller ……………………………………………… 妇 , meters from the appliance, pointing it towards the ,... -
Page 3: Remote Controller Specifications
勹 Function buttons Remote Controller Specifications 8 ON/OFF Button Operation starts when this button is pressed Model RG52F3JBGEFU1. and stops when this button is pressed again. 3.0V(Dry batteries R03/LR03 X 2) Rated Voltage f) MODE Button Signal Receiving Each time the button is pressed, the operation... - Page 4 — 『 and then be off for 2 seconds by turns. 0 SELF CLEAN Button Press ON/OFF,SLEEP, FP, MODE, FAN Active/Disable Self Clean function. SPEED.UP, DOWN buttonwhile operating Airborne bacteria can grow in the moisture will cancel the freeze protection function. that condenses around heat exchangers in the unit.
-
Page 5: Indicators On Lcd
— Indicators on LCD Mode display NOTE: Displays the current operation mode. Including The device could comply with the local national regulations. auto(U), cool (* ), dry( (i ), heat (今'if-"=) (be • n Canada, it should comply with CAN ICES-3(B)/NMB-3(B). applicable to cooling &... -
Page 6: How To Use The Buttons
- 厂 Dehumidifying operation How to use the buttons ! Ensure the unit is plugged in and power is Auto operation available. The OPERATION indicator on the display panel of the indoor unit starts flashing. Ensure the unit is plugged in and power is 1. -
Page 7: Timer Operation
Timer operation IAcAur10N I Press the TIMER ON button can set the auto-on time of the unit. Press the TIMER OFF button • The effective operation time set by the remote controller for the timer function can set the auto-off time of the unit. is limited to the following settings: 0.5, 1.0, 1.5, 2.0, 2.5, 3.0, 3.5, 4.0, 4.5, 5.0, 5.5, 6.0, 6.5, 7.0, 7.5, 8.0, 8.5, 9.0, 9.5, 10, 11, 12, 13, 14, 15,16,17, 18, 19, 20, To set the Auto-on time. - Page 8 , , 。 © ,. ,.. TIMER ON - TIMER OFF TIMER OFF (Auto-off Operation) (Off - Start - Stop operation) ' ' O oFF The TIMER OFF feature is useful when you want the This feature is useful when you want to start _...
Need help?
Do you have a question about the RG52F3JBGEFU1 and is the answer not in the manual?
Questions and answers